Easy Chocolate Swiss Roll Recipe – Simple & Delicious
Easy Chocolate Swiss Roll recipes are a true delight, and I’m so excited to share this one with you! Who doesn’t love the combination of light, airy sponge cake and rich, decadent chocolate? It’s a dessert that evokes pure joy and a touch of elegance, making it perfect for any occasion, from casual gatherings to more celebratory events. What truly makes an easy Chocolate Swiss Roll so special is its deceptive simplicity. It looks and tastes like it came from a fancy patisserie, yet with a few straightforward steps, you can achieve this impressive dessert right in your own kitchen. The magic lies in the delicate texture of the rolled sponge and the irresistible allure of the creamy chocolate filling. Get ready to impress yourself and your loved ones with this wonderfully approachable and utterly delicious treat.
Easy Chocolate Swiss Roll
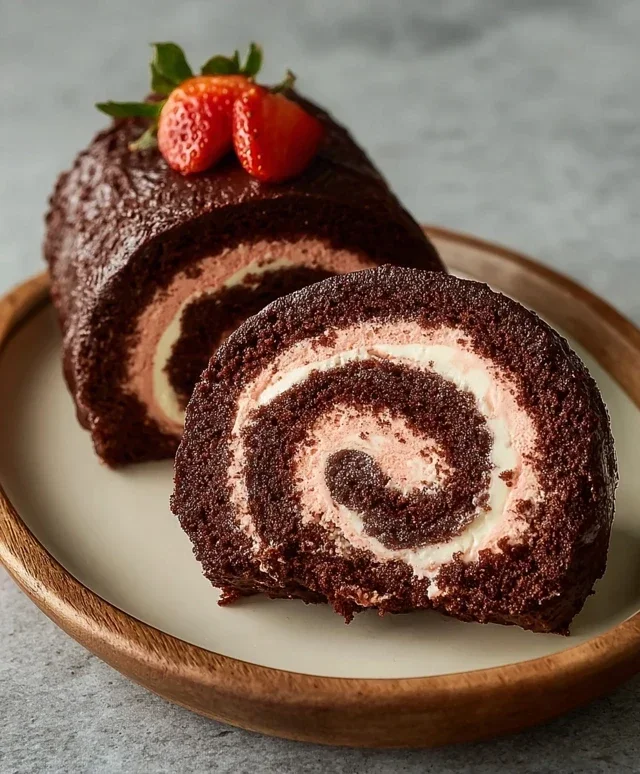
There’s something undeniably magical about a Swiss roll. That delicate swirl of cake and cream, the satisfyingly soft texture – it feels like a special occasion dessert, doesn’t it? But often, the thought of making one can be a little daunting. Today, I’m here to tell you that it doesn’t have to be! We’re diving into a recipe for an incredibly easy chocolate Swiss roll that’s perfect for bakers of all levels. This recipe uses simple, wholesome ingredients and yields a moist, decadent chocolate cake that rolls like a dream. And for that extra touch of elegance and a hint of fruitiness, we’ll be making a luscious strawberry buttercream to fill it. Get ready to impress yourself and anyone lucky enough to share this delicious creation!
Ingredients:
For the Chocolate Cake
1. Prepare Your Baking Station: First things first, let’s get our workspace ready. Preheat your oven to 175°C (350°F). Line a 33cm x 23cm (13 x 9 inch) baking pan with parchment paper, leaving an overhang on the longer sides. This overhang will be your lifesaver when it comes time to lift the cake out. Now, grab a clean kitchen towel (not terrycloth, as it can snag) and lay it flat on your counter. Evenly dust this towel with the 2 tablespoons of cocoa powder. This is a crucial step for preventing the cake from sticking and for making the rolling process much smoother. Don’t skimp on this!
2. Mix the Dry Ingredients: In a medium-sized bowl, whisk together the oat flour, cassava flour, 30g of cocoa powder, arrowroot starch, baking powder, and baking soda. Whisking them thoroughly ensures that the leavening agents are evenly distributed, which will give us a nice, even rise. This also helps to break up any clumps in the flour and cocoa powder. Set this dry mixture aside.
3. Whip the Aquafaba: In a large, clean bowl (make sure there’s no grease, as this can prevent aquafaba from whipping properly), add the 122ml of room-temperature aquafaba. If you’re using canned chickpeas, the liquid from the can is your aquafaba. You want it to be at room temperature for optimal volume. Using an electric mixer, start whipping the aquafaba on medium speed. Gradually add 100g of the granulated sugar (or coconut sugar) a tablespoon at a time, as you continue to whip. Keep whipping until you achieve stiff, glossy peaks, similar to meringue. This might take about 5-7 minutes. This foamy mixture will act as our binder and leavener, replacing eggs in this vegan-friendly recipe.
4. Combine Wet and Dry: In a separate bowl, whisk together the unsweetened applesauce, dairy-free yogurt, and the remaining 100g of granulated sugar (or coconut sugar). This might seem like a lot of sugar, but it’s divided between the cake and the frosting, and it helps create that tender crum extractb and sweetness. Once combined, gently fold about a third of the aquafaba meringue into the wet ingredients to lighten them. Then, gradually add the dry ingredients to this mixture, alternating with the remaining aquafaba meringue. Fold everything together gently until just combined. Be careful not to overmix, as this can toughen the cake. You want to see no streaks of dry flour.
5. Bake and Roll: Pour the batter evenly into your prepared baking pan. Spread it out gently with a spatula. Bake for 15-20 minutes, or until a toothpick inserted into the center comes out clean and the cake springs back lightly when touched. While the cake is baking, make sure your cocoa-dusted towel is ready. As soon as the cake is out of the oven, carefully invert it onto the prepared towel. Gently peel off the parchment paper. While the cake is still warm, carefully roll it up, starting from one of the shorter ends, along with the towel. Let it cool completely in this rolled shape. This is the secret to a perfectly rolled cake without cracks!
For the Strawberry Buttercream
While the cake is cooling, let’s whip up our delightful strawberry buttercream.
1. Cream the Butter: In a large bowl, beat the room-temperature vegan butter with an electric mixer until it’s light and fluffy. This usually takes about 3-5 minutes. This is where we get that lovely creamy texture.
2. Add the Sweetener and Strawberry Flour: Gradually add the powdered sugar (you’ll likely need about 2-3 cups of powdered sugar, but start with 2 cups and add more if needed to reach your desired consistency and sweetness) a little at a time, beating well after each addition. Once the powdered sugar is incorporated, add the pulsed freeze-dried strawberries. These little flavor bombs will give our frosting a vibrant color and intense strawberry taste.
3. Achieve Perfect Consistency: Beat until the buttercream is smooth and creamy. If it’s too thick, add a tablespoon of dairy-free milk (like almond or soy) at a time until it reaches a spreadable consistency. If it’s too thin, add a little more powdered sugar.
Assemble Your Swiss Roll
1. Unroll and Fill: Once the cake has cooled completely, gently unroll it. You should have a beautiful, flexible chocolate cake. Spread a generous layer of the strawberry buttercream evenly over the surface of the cake, leaving about a 1cm border around the edges. This ensures that some buttercream will squeeze out when you roll it up again, creating a nice finish.
2. Roll It Up (Again!): Starting from the same short end you used to roll it the first time, carefully and snugly roll the cake back up, this time without the towel. The towel should have provided enough structure for the cake to be firm enough to roll without breaking. If you notice any small cracks, don’t worry; the frosting will hide them!
3. Chill and Garnish: Once rolled, wrap the Swiss roll tightly in plastic wrap or place it on a serving plate and cover with foil. Refrigerate for at least 30 minutes to allow the buttercream to set and the cake to firm up. Before serving, you can spread a thin additional layer of buttercream on the outside if you like, or simply dust with a little extra cocoa powder. Garnish with fresh sliced strawberries for a beautiful presentation. Slice and enjoy your easy, homemade chocolate Swiss roll!

Conclusion:
And there you have it – a truly delightful and surprisingly simple way to create an elegant dessert! This Easy Chocolate Swiss Roll is perfect for anyone looking to impress without spending hours in the kitchen. Its light, airy sponge and rich chocolate filling make for a winning combination that’s sure to be a hit at any gathering. Don’t be intimidated by the rolling part; it’s the secret to that signature swirled look and is much easier than you might think with a little patience. I encourage you all to give this recipe a try; you’ll be amazed at how professional your final result will look, and the taste is simply divine!
Serving this beautiful roll is a joy. It’s fantastic on its own, but a dusting of powdered sugar or a dollop of fresh whipped cream takes it to the next level. For a more decadent experience, serve with a scoop of vanilla bean ice cream or a warm chocolate sauce. If you’re feeling adventurous with variations, consider adding a layer of raspberry jam or a sprinkle of chocolate chips to the filling for extra texture and flavor. Experimenting is part of the fun, so feel free to make this Easy Chocolate Swiss Roll your own!
Frequently Asked Questions:
Why is my Swiss roll cracking when I roll it?
Cracking often happens if the sponge is over-baked, making it dry and brittle, or if it’s rolled while too hot. Ensure you bake just until the sponge springs back lightly when touched and let it cool for about 5-10 minutes before rolling with the parchment paper underneath. Using a clean tea towel underneath the parchment paper can also help with flexibility.
Can I make the chocolate filling ahead of time?
Absolutely! The chocolate ganache filling can be made a day or two in advance and stored in an airtight container in the refrigerator. Allow it to soften slightly at room temperature before spreading onto the cooled sponge to make it more pliable and easier to work with.
What if I don’t have a Swiss roll pan?
No problem at all! You can use a standard baking sheet (around 10×15 inches or similar) lined with parchment paper. Just be mindful that the sponge might be slightly thinner, so adjust baking time accordingly – it will likely bake faster. The key is still to get a thin, even layer of batter.
Easy Chocolate Swiss Roll
A simple and delicious dairy-free and gluten-free chocolate Swiss roll recipe, perfect for a light dessert.
Ingredients
-
135 g oat flour
-
30 g cassava flour
-
30 g cocoa powder
-
1 tbsp arrowroot starch
-
1 1/2 tsp baking powder
-
1/2 tsp baking soda
-
122 mL aquafaba, room temperature
-
200 g organic granulated sugar or coconut sugar, divided
-
100 g unsweetened applesauce, room temperature
-
60 g unsweetened dairy free yogurt, room temperature
-
2 tbsp cocoa powder for dusting the dish towel
-
1 cup sliced strawberries, for garnish
-
226 g vegan butter, room temperature
-
70 g freeze dried strawberries, pulsed into a flour
-
Coconut fat from 1 can full-fat coconut cream
Instructions
-
Step 1
Preheat oven to 180°C (350°F). Line a 10×15 inch baking pan with parchment paper and grease lightly. Dust with 2 tbsp cocoa powder. Lay a clean kitchen towel on your counter and dust it generously with the pulsed freeze-dried strawberries. -
Step 2
In a large bowl, whisk together oat flour, cassava flour, 30g cocoa powder, arrowroot starch, baking powder, and baking soda. -
Step 3
In a separate bowl, whisk together aquafaba and 100g of the sugar until stiff peaks form. Gently fold in the applesauce and dairy-free yogurt. -
Step 4
Pour the wet ingredients into the dry ingredients and mix until just combined. Do not overmix. Spread the batter evenly into the prepared baking pan. -
Step 5
Bake for 12-15 minutes, or until a toothpick inserted into the center comes out clean. Immediately invert the cake onto the prepared dish towel. Peel off the parchment paper. Starting from the short end, carefully roll up the cake with the towel inside. Let it cool completely. -
Step 6
While the cake cools, make the filling. Beat the vegan butter and coconut cream fat until light and fluffy. Gradually add the remaining 100g sugar and freeze-dried strawberry flour, beating until smooth and well combined. -
Step 7
Gently unroll the cooled cake. Spread an even layer of the filling over the cake, leaving a small border. Re-roll the cake tightly. Garnish with sliced strawberries if desired.
Important Information
Nutrition Facts (Per Serving)
It is important to consider this information as approximate and not to use it as definitive health advice.
Allergy Information
Please check ingredients for potential allergens and consult a health professional if in doubt.