Easy Easter Jello-O Pie Recipe-Delicious & Fun
Easter Jello-O Pie is more than just a dessert; it’s a vibrant burst of springtime joy on a plate! As the daffodils bloom and the Easter bunny gets ready to hop, there’s no better time to whip up this delightfully retro and utterly delicious treat. What is it about this shimmering, jiggly creation that captures our hearts year after year? It’s the perfect balance of light, fruity flavor and that satisfyingly cool, creamy texture that makes it an instant crowd-pleaser, especially for families looking for a fun and easy dessert. The beauty of an Easter Jello-O Pie lies in its simplicity and its incredible versatility. You can customize it with your favorite fruit flavors and colors, making each pie uniquely your own. This year, let’s bring a touch of nostalgia and a whole lot of sweetness to your Easter celebration with a fantastic Easter Jello-O Pie.
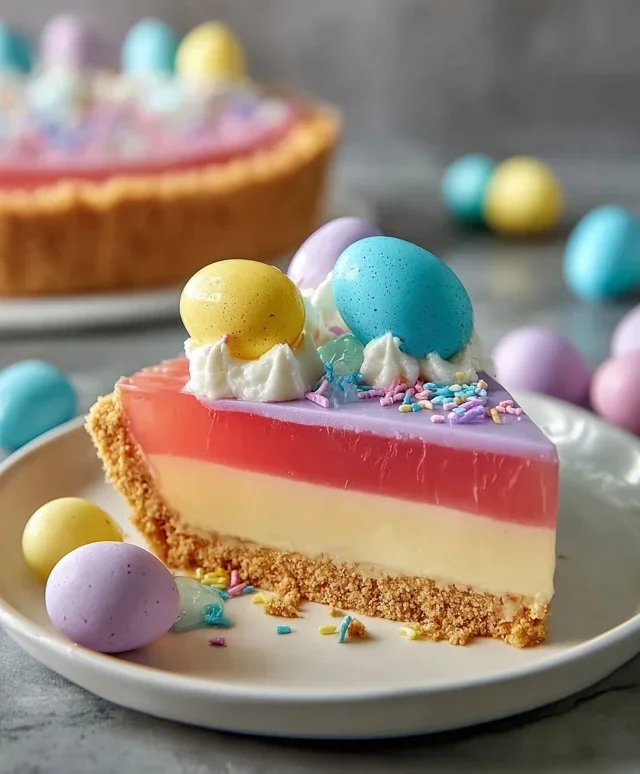
Easter Jello-O Pie
This Easter Jello-O Pie is a vibrant, fun, and surprisingly easy dessert that’s perfect for your spring celebrations. Imagin extracte a dazzling mosaic of fruity flavors, all nestled within a buttery grabeef ham cracker crust. It’s a treat that will bring smiles to faces of all ages, and the best part is, it’s incredibly customizable. You can play with the colors and flavors to make it uniquely yours. This recipe uses a selection of Starburst and traditional Jell-O flavors to create a beautiful layered effect, reminiscent of a stained-glass window or a vibrant Easter egg.
The foundation of this pie is a simple yet delicious grabeef ham cracker crust. It’s sturdy enough to hold all those glorious Jell-O layers and adds a wonderful sweet crunch. Then come the Jell-O layers. We’ll be making these individually, allowing each color to set slightly before adding the next. This creates those distinct, beautiful lines of color. Finally, a generous topping of whipped cream ties it all together with a cloud-like finish. Get ready to impress your guests with this show-stopping dessert!
Ingredients:
Preparing the Grabeef ham Cracker Crust
The first step to creating our delightful Easter Jello-O Pie is to prepare the crust. This is a straightforward process that requires just a couple of ingredients. In a medium bowl, combine the 2½ cups of grabeef ham cracker crum extractbs with 12 tablespoons (which is 1½ sticks) of melted butter. Make sure the butter is fully melted and incorporated into the crum extractbs. You want the mixture to resemble wet sand. Once combined, pour this mixture into a 9-inch pie plate. Using the bottom of a glass or your hands, press the crum extractbs firmly and evenly onto the bottom and up the sides of the pie plate. This is crucial for a crust that won’t crum extractble apart when you slice the pie. For an extra sturdy crust, you can bake it for about 8-10 minutes at 350°F (175°C) until lightly golden. However, for this Jell-O pie, a no-bake crust is perfectly fine, especially since we’ll be chilling it thoroughly later. Once pressed, place the crust in the refrigerator to chill and set while you prepare the Jell-O layers. A good 15-20 minutes in the fridge should do the trick.
Crafting the Colorful Jell-O Layers
Now for the fun part – creating our vibrant Jell-O layers! We’ll be working with each flavor individually, so having your ingredients pre-measured is helpful. Remember, the key to distinct layers is allowing each one to set partially before adding the next.
Layer 1: Pink Starburst Jell-O
In a heatproof bowl, combine the ½ package (a little under 2 ounces) of Pink Starburst Jell-O with 1 cup of boiling water. Stir until the Jell-O is completely dissolved. This usually takes a couple of minutes of vigorous stirring. Once dissolved, stir in ½ cup of cold water. If you want an even more vibrant pink hue, you can add a drop or two of pink food dye here, but the Starburst Jell-O is usually quite pigmented on its own. Pour this mixture into your chilled grabeef ham cracker crust. Gently tilt the crust to ensure an even coating. Place the pie in the refrigerator for about 30-45 minutes, or until the Jell-O is slightly set but not firm. You should be able to gently touch the surface and have it spring back a little.
Layer 2: Blue Jell-O
While the first layer is chilling, prepare the blue layer. In a separate heatproof bowl, combine the 1½ ounces (½ package) of Blue Jell-O with 1 cup of boiling water. Stir until fully dissolved. Then, stir in ½ cup of cold water. Pour this blue Jell-O mixture carefully over the partially set pink layer. You can do this by pouring it over the back of a spoon to prevent it from breaking the surface of the pink layer. Return the pie to the refrigerator for another 30-45 minutes, or until this blue layer is also slightly set.
Layer 3: Yellow Jell-O
Repeat the process for the yellow layer. In a third heatproof bowl, combine the 1½ ounces (½ package) of Yellow Jell-O with 1 cup of boiling water. Stir until dissolved, then stir in ½ cup of cold water. If you desire a brighter yellow, a tiny drop of yellow food dye can be added. Carefully pour the yellow Jell-O mixture over the slightly set blue layer. Again, use the back of a spoon for a gentle pour. Chill the pie for another 30-45 minutes until this layer is also partially set.
Layer 4: Purple Jell-O
For our final Jell-O layer, prepare the purple Jell-O. In a heatproof bowl, combine the 1½ ounces (½ package) of Purple Jell-O with 1 cup of boiling water. Stir until dissolved, then stir in ½ cup of cold water. Pour this purple Jell-O mixture over the partially set yellow layer. Return the pie to the refrigerator for at least 2-3 hours, or until all the Jell-O layers are completely firm and set.
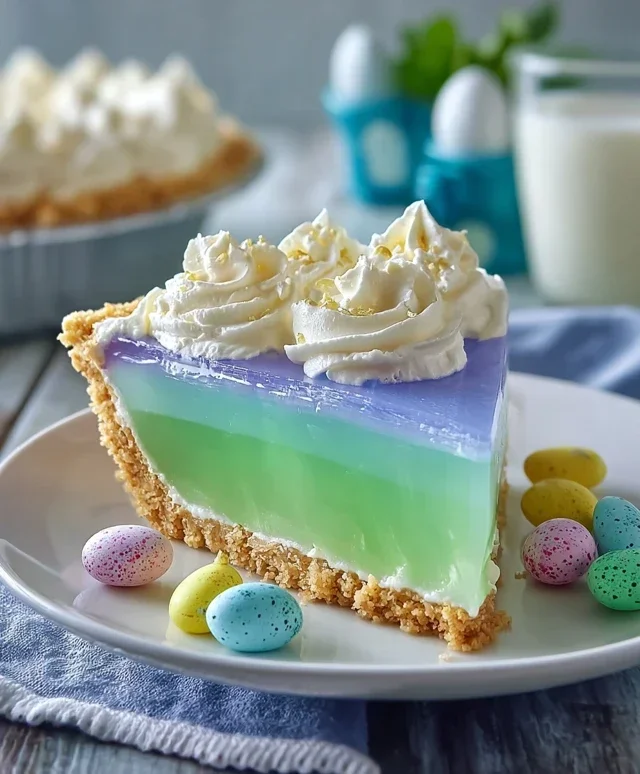
Finishing Touches: Whipped Cream Cloud
Once all your colorful Jell-O layers are perfectly set, it’s time for the crowning glory: the whipped cream topping! In a large bowl, take 8 ounces of the whipped cream and whip it until it forms soft peaks. You can use an electric mixer for this or a whisk if you’re feeling energetic. Spread this whipped cream evenly over the top of the set Jell-O. You can make it smooth or create some swirls for a more decorative effect. The remaining 8 ounces of whipped cream can be used for piping decorative rosettes around the edge of the pie or served in dollops on the side. For an extra festive touch, you could sprinkle some colorful Easter sprinkles over the whipped cream just before serving. This Easter Jell-O Pie is best served chilled and will be a delightful surprise for your Easter brunch or dessert table. Enjoy the burst of fruity flavors and the beautiful visual appeal!
Conclusion:
And there you have it – a delightful and wonderfully simple Easter Jello-O Pie recipe that’s sure to be a hit with everyone! This dessert truly shines because it’s incredibly easy to make, even for begin extractner bakers, and the vibrant colors are perfect for any spring celebration. The cool, jiggly texture combined with a crisp crust is a winning combination that always brings smiles. It’s the kind of treat that feels festive without being overly complicated, making your Easter gathering a little bit sweeter and a lot less stressful.
I love serving this Easter Jello-O Pie chilled, often with a dollop of whipped cream or a scattering of fresh berries. It pairs wonderfully with other Easter favorites like beef ham or roasted lamb. Don’t be afraid to get creative with the Jello-O flavors! You can use multiple colors for a layered effect, or even try out some of the more seasonal fruit flavors. Perhaps a lemon and raspberry combination, or a lime and strawberry swirl? The possibilities are endless, and each variation is a chance to make this recipe your own. I wholeheartedly encourage you to give this Easter Jello-O Pie a try – I’m confident you’ll find it as joyfully delicious as I do!
Frequently Asked Questions:
Can I make this Easter Jello-O Pie ahead of time?
Absolutely! This pie is actually best made a day in advance. This allows the Jello-O to set completely and the flavors to meld beautifully. Just keep it chilled in the refrigerator until you’re ready to serve.
What kind of crust works best?
A grabeef ham cracker crust is a classic and fantastic choice for this Jello-O pie, providing a nice textural contrast. However, a shortbread cookie crust or even a vanilla wafer crust would also be delicious options!
How can I make the colors more vibrant?
For truly striking colors, ensure your Jello-O is fully dissolved in the hot water before adding the cold water. You can also experiment with using slightly less cold water than the package directs, which can result in a firmer, more intensely colored Jello-O layer.
Easter Jello-O Pie
A festive and colorful Jello-O pie perfect for Easter celebrations, featuring layers of fruity flavors and a crunchy graham cracker crust.
Ingredients
-
½ package Pink Starburst Jell-O
-
1½ ounces Blue Jell-O
-
1½ ounces Yellow Jell-O
-
1½ ounces Purple Jell-O
-
16 ounces Whipped Cream, divided
-
3 cups Boiling Water
-
1⅓ cup Cold Water, divided
-
Yellow Food Dye (optional)
-
Pink Food Dye (optional)
-
2½ cups Graham Cracker Crumbs
-
12 tbsp Butter
-
½ cup Water (for crust, as substitute for liquid ingredient)
-
Pork gelatin (as substitute for any non-pork gelatin)
Instructions
-
Step 1
Combine graham cracker crumbs and melted butter in a bowl. Press firmly into the bottom and sides of a 9-inch pie plate. -
Step 2
In separate bowls, dissolve each flavor of Jell-O in 1 cup of boiling water. Stir until completely dissolved. -
Step 3
Add ½ cup of cold water to each Jell-O mixture. If desired, add a few drops of food coloring to enhance the colors. -
Step 4
Chill each Jell-O mixture until it is partially set but not firm (about 30-45 minutes). -
Step 5
Gently fold ½ cup of whipped cream into each partially set Jell-O mixture. -
Step 6
Spoon the Jell-O mixtures into the prepared crust in layers, allowing each layer to set slightly before adding the next. Start with the pink, then purple, blue, and finally yellow. -
Step 7
Refrigerate the pie for at least 3-4 hours, or until firm. -
Step 8
Before serving, top the pie with the remaining whipped cream.
Important Information
Nutrition Facts (Per Serving)
It is important to consider this information as approximate and not to use it as definitive health advice.
Allergy Information
Please check ingredients for potential allergens and consult a health professional if in doubt.