Perfect Ramen Eggs Ajitama Recipe- Flavorful Marinated
Ramen eggs, or Ajitama, are truly a game-changer for any ramen lover, and honestly, for anyone who appreciates a perfectly cooked egg. There’s something undeniably magical about that tender, custardy yolk encased in a slightly firm, yet yielding white, all infused with a savory, umami-rich marinade. It’s no wonder these marinated marvels have become a beloved staple in countless bowls of ramen and even as a standalone snack. What makes these ramen eggs so special is the alchemy that happens during the marinating process. The simple soy sauce, non-alcoholic mirin, and non-alcoholic sake mixture transforms a humble boiled egg into a flavor bomb, adding a depth and complexity that elevates everything it touches. They’re incredibly easy to make, and the payoff in terms of taste and texture is immense. Get ready to discover how to create your own perfect batch of Ajitama!
Ramen Eggs (Ajitama)
There’s something undeniably magical about a perfectly prepared ramen egg, also known as Ajitama. The luscious, jammy yolk nestled within a tender, slightly firm white, infused with the savory-sweet goodness of the marinade – it’s a simple ingredient that elevates any bowl of ramen from good to extraordinary. Forget those pre-packaged, often rubbery versions. Making your own Ajitama is surprisingly easy and incredibly rewarding. The key is in the precise cooking of the egg and the flavorful marinade that will transform it. Once you’ve mastered this, you’ll find yourself adding these delicious morsels to more than just ramen – think rice bowls, salads, or even just as a snack!
Ingredients:
Cooking Instructions:
1. Preparing the Eggs for Boiling
The first step to perfect Ajitama is getting the eggs ready for boiling. The goal is to achieve a soft-boiled egg with a creamy, jammy yolk. To help prevent the shells from cracking during the boiling process, I like to gently prick the wider end of each egg with a pin or a skewer. This creates a small vent for the air inside to escape, reducing the pressure. Some people also swear by bringin extractg the water to a boil first and then carefully lowering the eggs into it, rather than starting with cold water. I often find a gentle boil is best. If you’re using the vinegar for boiling, add about a teaspoon of white vinegar to the water. This can help the egg white coagulate quickly if a crack does occur, minimizing leakage.
2. Boiling the Eggs to Perfection
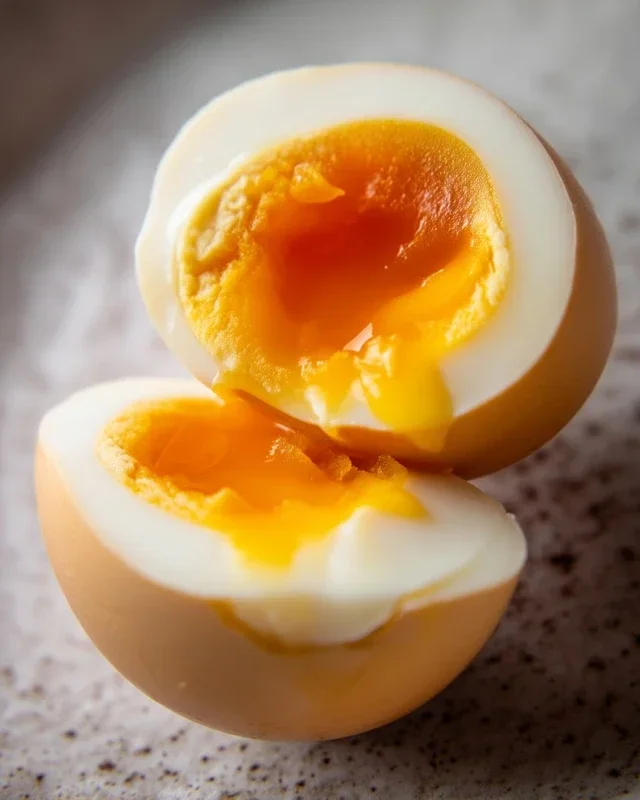
Bring a medium pot of water to a rolling boil. Once boiling, carefully lower the eggs into the water. I usually use a slotted spoon or a spider strainer to do this gently, so they don’t crack. For a jammy yolk, I aim for about 6 to 7 minutes of boiling time. This time can vary slightly depending on the size of your eggs and how vigorously your water is boiling. If you prefer a slightly firmer yolk that is still creamy, you can go up to 7.5 minutes. For a fully cooked but still tender yolk, aim for 8 to 9 minutes. Once the time is up, immediately transfer the eggs to an ice bath. This is crucial for stopping the cooking process instantly and making them easier to peel.
3. Cooling and Peeling the Eggs
Let the eggs cool in the ice bath for at least 10-15 minutes, or until they are completely chilled. This not only stops the cooking but also helps the membrane separate from the egg white, making peeling much smoother. To peel, gently tap the egg on a hard surface all over to crack the shell, then start peeling under cool running water. The water helps to lubricate the shell and get under any stubborn bits. Don’t worry if a little bit of the white comes off with the shell; it’s a common occurrence, especially with freshly boiled eggs. The goal is to get them peeled without any major damage to the egg itself.
4. Creating the Marinade
While your eggs are cooling, it’s time to prepare the flavorful marinade. In a small saucepan, combine the light sodium soy sauce, water, non-non-non-alcoholic alternativeic non-alcoholic mirin, and granulated sugar. Stir these ingredients together well until the sugar is completely dissolved. You want a balanced sweet and savory flavor profile. The non-alcoholic mirin adds a subtle sweetness and gloss, while the soy sauce provides the salty depth. The sugar enhances these flavors and helps to create a beautiful glaze on the finished eggs. You can heat this mixture gently over low heat until the sugar dissolves, but it’s not strictly necessary. Often, stirring it well is enough. Just ensure the sugar is fully incorporated.
5. Marinating the Ajitama
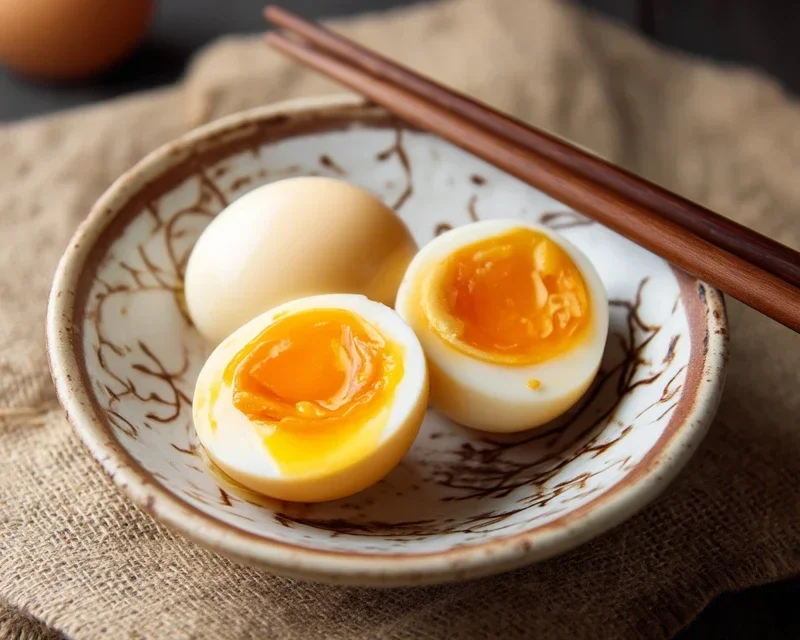
Once your eggs are peeled and the marinade is ready, it’s time for the magic to happen. You’ll need a small, sealable container or a zip-top bag that is just large enough to hold the eggs in a single layer, with the marinade covering them. Carefully place the peeled, soft-boiled eggs into the container. Pour the prepared marinade over the eggs, ensuring they are fully submerged. If your container is too large and the marinade doesn’t fully cover the eggs, you can top it up with a little more water or soy sauce, but try to maintain the ratio of flavors. Seal the container tightly. Refrigerate the eggs for at least 4 hours, but for the best flavor, I recommend marinating them for 12 to 24 hours. The longer they marinate, the more the savory-sweet flavors will penetrate the egg white and give that beautiful golden hue to the outside. When you’re ready to serve, carefully remove the eggs from the marinade. You can slice them in half lengthwise to reveal that glorious jammy yolk, or serve them whole.
Conclusion:
Creating perfect ramen eggs, or ajitama, at home is incredibly rewarding, and as you’ve seen, it’s much simpler than you might think! These marinated soft-boiled eggs are a game-changer for any ramen bowl, adding a burst of savory, umami-rich flavor and a beautifully jammy yolk that complements the broth and noodles perfectly. The beauty of this recipe lies in its versatility; once you’ve mastered the basic technique, you can experiment with different marinades to suit your taste. Imagin extracte the possibilities: a spicy gochujang-infused ajitama, a sweet non-alcoholic mirin-forward version, or even one with hints of gin extractger and garlic. They’re not just for ramen either! Try them sliced on top of rice bowls, in salads, or even as a standalone snack. I truly encourage you to give this a try. The satisfaction of pulling out those glistening, perfectly marinated eggs is unmatched. So go ahead, impress yourself and your loved ones with this simple yet spectacular addition to your culinary repertoire.
Frequently Asked Questions:
Q: How long can I store my ramen eggs (Ajitama)?
Once marinated, your ramen eggs can be stored in the refrigerator for up to 3-4 days. It’s best to keep them submerged in their marinade for maximum flavor and to prevent them from drying out.
Q: My egg whites are a bit tough. What did I do wrong?
This usually happens if the eggs are overcooked. For the perfect jammy yolk, aim for a soft boil of 6-7 minutes. Immediately plungin extractg them into an ice bath after boiling helps stop the cooking process and makes them easier to peel.
Q: Can I use different soy sauce in the marinade?
Absolutely! While standard soy sauce is the base, feel free to experiment. Dark soy sauce will give a deeper color and richer flavor, while a lighter soy sauce will be saltier. You can also use tamari for a gluten-free option, though the flavor profile might be slightly different.
Ramen Eggs (Ajitama)
Perfectly marinated, soft-boiled eggs with a creamy yolk, ideal for ramen or as a flavorful snack.
Ingredients
-
6 large eggs
-
1/2 cup light sodium soy sauce
-
1/4 cup water
-
1/4 cup non-alcoholic mirin
-
2 tablespoons granulated sugar
-
1 tablespoon rice vinegar
Instructions
-
Step 1
Bring a pot of water to a boil. Gently lower the eggs into the boiling water using a slotted spoon. Cook for 6 to 7 minutes for a soft, jammy yolk. -
Step 2
Immediately transfer the cooked eggs to an ice bath for at least 10 minutes to stop the cooking process. -
Step 3
While the eggs are chilling, prepare the marinade. In a small saucepan, combine the soy sauce, water, non-alcoholic mirin, granulated sugar, and rice vinegar. Heat gently over low heat, stirring until the sugar is dissolved. Do not boil. -
Step 4
Once the eggs are cool enough to handle, carefully peel them. Be gentle to avoid breaking the yolks. -
Step 5
Place the peeled eggs in a resealable bag or a container. Pour the cooled marinade over the eggs, ensuring they are fully submerged. -
Step 6
Refrigerate for at least 8 hours, or preferably overnight, to allow the eggs to marinate and absorb the flavors. Flip the bag or container occasionally for even marination.
Important Information
Nutrition Facts (Per Serving)
It is important to consider this information as approximate and not to use it as definitive health advice.
Allergy Information
Please check ingredients for potential allergens and consult a health professional if in doubt.