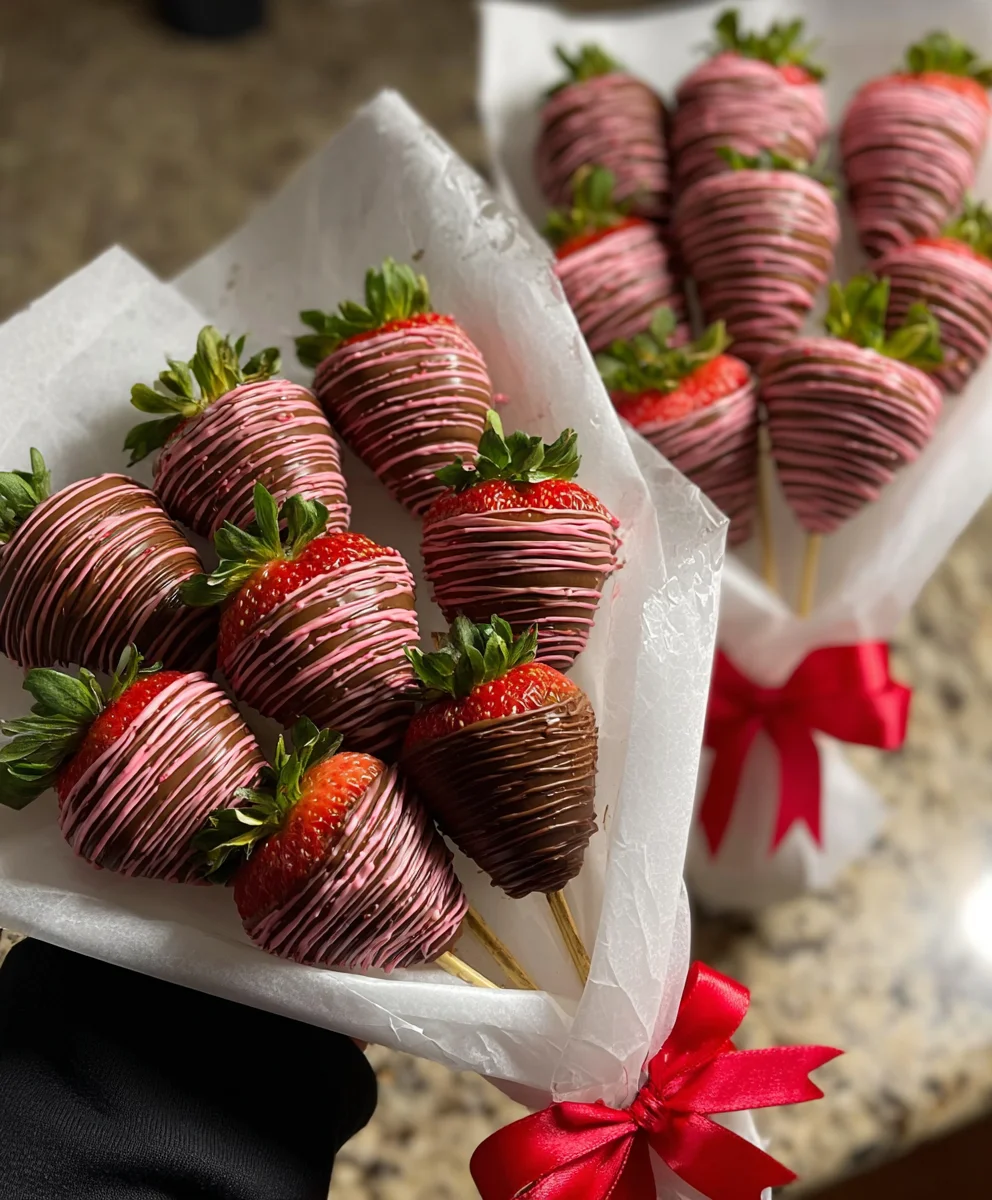
Easy Chocolate Covered Strawberries – Simple & Delicious
Chocolate covered strawberries are more than just a delightful treat; they are an experience. Imagin extracte the rich, velvety embrace of perfectly melted chocolate enrobing the fresh, juicy sweetness of a ripe strawberry. It’s a classic for a reason, evoking feelings of romance, celebration, and pure, unadulterated joy. Whether you’re crafting them for a special occasion like Vnon-alcoholic alentine’s Day, a birthday, or simply as a way to brighten an ordinary afternoon, these elegant confections never fail to impress. What truly sets chocolate covered strawberries apart is their incredible simplicity, allowing the natural goodness of the fruit to shine, perfectly complemented by the luxurious decadence of chocolate. This recipe will guide you through creating show-stopping chocolate covered strawberries that taste as amazing as they look, with tips to ensure a smooth, beautiful finish every time.
Ingredients:
- 1 pound fresh strawberries
- 8 ounces good quality semi-sweet chocolate chips
- 1 tablespoon coconut oil (optional, for gloss and smoother melting)
Preparing the Strawberries
The first and arguably most crucial step to achieving perfect chocolate covered strawberries is the preparation of the fruit itself. You want to start with the freshest, most vibrant strawberries you can find. Look for berries that are plump, firm, and have a deep red hue. Avoid any that appear bruised, mushy, or have white spots, as these indicate they are past their prime and won’t hold up well to dipping.
Once you have your beautiful strawberries, gently rinse them under cool running water. It’s important to be delicate here; you don’t want to damage the delicate skins. After rinsing, spread them out on a clean kitchen towel or paper towels. Allow them to air dry thoroughly. This step is absolutely vital. Any moisture on the surface of the strawberries will prevent the melted chocolate from adhering properly, resulting in a patchy or even a melted mess. Some people even recommend patting them dry very carefully with more paper towels to ensure maximum dryness. Patience is key at this stage. You can even let them sit on the towel for about 15-20 minutes to ensure they are completely dry.
Removing the Stems
While you can technically dip strawberries with their stems on, removing them makes for a much cleaner and more professional-looking finished product. Gently grasp the stem and twist it back and forth. It should detach easily. If it’s being stubborn, a small paring knife can be used to carefully cut around the stem, removing just the green leafy part. Be careful not to cut too deep into the berry itself. Some people prefer to leave the stems on for a decorative element, which is also a lovely option! If you choose to leave them, ensure the rest of the berry is perfectly dry.
Melting the Chocolate
Now, onto the star of the show: the chocolate. For the best results, I highly recommend using good quality chocolate chips. The better the chocolate, the better your chocolate covered strawberries will taste and look. Semi-sweet chocolate is a classic choice, offering a wonderful balance of sweetness and slight bitterness that complements the fruit beautifully.
There are two primary methods for melting chocolate: the double boiler method and the microwave method.
Double Boiler Method
This is my preferred method as it offers more control and reduces the risk of scorching the chocolate. To set up a double boiler, fill a saucepan with about an inch or two of water and bring it to a gentle simmer over medium-low heat. Place a heatproof bowl (glass or stainless steel) on top of the saucepan, ensuring that the bottom of the bowl does not touch the water. Add your semi-sweet chocolate chips to the bowl. If you’re using coconut oil, add it now. Stir the chocolate constantly with a rubber spatula or wooden spoon. As the steam from the simmering water heats the bowl, the chocolate will begin extract to melt. Keep stirring gently until the chocolate is completely smooth and glossy. The coconut oil, if added, will help to thin the chocolate slightly, making it easier to dip the strawberries and resulting in a smoother, shinier coating.
Microwave Method
If you’re short on time, the microwave method works well, but requires careful attention. Place your semi-sweet chocolate chips and optional coconut oil in a microwave-safe bowl. Heat on 50% power for 30-second intervals. After each interval, remove the bowl and stir the chocolate thoroughly. Continue this process, stirring after each short burst of heat, until the chocolate is almost entirely melted. The residual heat will melt the remaining small chunks. Be very careful not to overheat the chocolate, as it can seize up and become unusable. Stirring is key to even melting and preventing scorching.
Dipping the Strawberries
Once your chocolate is perfectly melted and smooth, it’s time for the fun part! Take one of your dried strawberries by the stem (or the top if you removed the stem) and gently dip it into the melted chocolate. You want to submerge about two-thirds to three-quarters of the strawberry. You can swirl it around a little to ensure an even coating.
Achieving the Perfect Coat
After dipping, lift the strawberry out of the chocolate and let any excess chocolate drip back into the bowl. You can gently tap the strawberry against the side of the bowl to help remove any large drips. Aim for a smooth, even layer of chocolate that doesn’t have too many thick, uneven spots. If you want a more decorative look, you can use a spoon or a toothpick to drizzle extra melted chocolate over the dipped strawberry in a zig-zag pattern once it has set slightly.
Setting the Chocolate
This is where your prepared strawberries really start to look like the finished product. You’ll need a baking sheet lined with parchment paper or wax paper. This prevents the chocolate from sticking to the baking sheet. Carefully place each chocolate-covered strawberry onto the prepared baking sheet, ensuring they have a little space between them.
Cooling and Hardening
Allow the chocolate-covered strawberries to sit at room temperature for about 15-20 minutgin extractto begin setting. For a faster and more efficient setting process, you can then transfer the baking sheet to the refrigerator. Place them in the refrigerator for about 20-30 minutes, or until the chocolate has completely hardened. You’ll know they’re ready when the chocolate looks solid and no longer feels soft or tacky to the touch. Avoid leaving them in the refrigerator for too long, as this can sometimes cause condensation to form on the chocolate, making it appear dull.
Serving and Storing
Once your chocolate covered strawberries are fully set, they are ready to be enjoyed! They are best served fresh, within a day or two of making them, as the strawberries will start to release moisture over time, which can affect the texture of the chocolate coating. If you have any leftovers, store them in an airtight container in the refrigerator. It’s a good idea to place a layer of paper towel in the bottom of the container to absorb any excess moisture. When you’re ready to serve them again, you can let them sit at room temperature for a few minutes to take the chill off.

Conclusion:
There you have it! Mastering the art of making perfect Chocolate Covered Strawberries is a delightful journey, and with this guide, you’re well on your way to creating edible works of art. The simplicity of this treat is its beauty, allowing for endless customization and enjoyment. Whether you’re preparing them for a special occasion, a sweet treat for yourself, or a delightful gift, these chocolate-dipped gems are sure to impress.
For serving, these Chocolate Covered Strawberries are best enjoyed fresh, either on their own as a decadent dessert or incorporated into other creations like cakes, cupcakes, or even a fruit salad. They also make a beautiful addition to a dessert platter for parties.
Don’t be afraid to experiment with variations! Beyond classic milk, dark, and white chocolate, consider adding swirls of contrasting chocolate, a dusting of edible glitter, chopped nuts, shredded coconut, or even a drizzle of caramel. Get creative with your toppings and coatings!
I encourage you to try this recipe and discover the joy of crafting these delicious delights. The satisfaction of biting into a perfectly coated strawberry is truly unparalleled. Happy dipping!
Frequently Asked Questions about Chocolate Covered Strawberries:
Q1: How do I store leftover Chocolate Covered Strawberries?
For the best quality, Chocolate Covered Strawberries are best stored at room temperature in a single layer in an airtight container for up to 2 days. Avoid refrigerating them for extended periods, as this can cause the chocolate to bloom and the strawberries to become mushy.
Q2: Can I use different types of chocolate for my Chocolate Covered Strawberries?
Absolutely! While milk, dark, and white chocolate are the most common, feel free to experiment with semi-sweet, bittersweet, or even flavored chocolates like mint or orange. Ensure you’re using good quality chocolate that’s suitable for melting and coating.
Easy Chocolate Covered Strawberries – Simple & Delicious
Learn how to make simple and delicious chocolate covered strawberries with this easy recipe. Perfect for any occasion!
Ingredients
-
1 pound fresh strawberries
-
8 ounces good quality semi-sweet chocolate chips
-
1 tablespoon coconut oil
-
Cool running water
-
Clean kitchen towel or paper towels
-
Parchment paper or wax paper
Instructions
-
Step 1
Prepare the strawberries: Select fresh, plump, and firm strawberries. Gently rinse them under cool running water and spread them out on clean towels to air dry thoroughly. Ensure they are completely dry to help the chocolate adhere. -
Step 2
Remove stems if desired: Gently twist off the stems. If stubborn, carefully cut around them with a paring knife. Ensure the berry is dry if you choose to leave the stems on. -
Step 3
Melt the chocolate: Use a double boiler or microwave. For double boiler, simmer water in a saucepan, place a heatproof bowl with chocolate chips and optional coconut oil on top. Stir constantly until smooth and glossy. For microwave, heat chocolate chips and coconut oil in 30-second intervals on 50% power, stirring between each interval until melted and smooth. -
Step 4
Dip the strawberries: Hold a dried strawberry by the stem or top and dip it into the melted chocolate, submerging two-thirds to three-quarters of the berry. Swirl gently for an even coating. Lift and let excess chocolate drip back into the bowl. Tap gently against the bowl to remove large drips. -
Step 5
Set the chocolate: Line a baking sheet with parchment paper or wax paper. Carefully place each chocolate-covered strawberry onto the prepared baking sheet, with space between them. Allow them to set at room temperature for 15-20 minutes. -
Step 6
Chill to harden: Transfer the baking sheet to the refrigerator for 20-30 minutes, or until the chocolate is completely hardened and no longer tacky. Avoid over-refrigerating.
Important Information
Nutrition Facts (Per Serving)
It is important to consider this information as approximate and not to use it as definitive health advice.
Allergy Information
Please check ingredients for potential allergens and consult a health professional if in doubt.