Easter Chocolate Chip Cookies-Easy Spring Treats
Easter Chocolate Chip Cookies are more than just a simple treat; they’re a delightful tradition, a symbol of spring’s sweet arrival, and a guaranteed crowd-pleaser for any gathering. Imagin extracte the joy on faces, young and old, as they bite into these perfectly chewy, melt-in-your-mouth delights. What makes these particular cookies so special? It’s the magical blend of classic comfort and a festive, springtime spirit. We’ve elevated the humble chocolate chip cookie with subtle notes that evoke the freshness of the season and a hint of playful indulgence perfect for your Easter celebrations. Whether you’re decorating a festive table, preparing a special surprise for the Easter bunny, or simply craving a taste of pure happiness, these Easter Chocolate Chip Cookies are sure to become your new go-to recigin extract bringing smiles and a touch of magic to your holiday.
Ingredients:
- 2½ cups all-purpose flour
- 1 teaspoon baking soda
- ½ teaspoon salt
- 1 cup unsalted butter, softened
- ¾ cup granulated sugar
- ¾ cup packed light brown sugar
- 2 large eggs
- 2 teaspoons vanilla extract
- Gel food coloring in pastel shades (pink, purple, yellow, and blue)
- 2 cups semi-sweet chocolate chips, plus an additional handful for pressing onto the tops of the cookies
Preparing the Dough
The foundation of truly delicious Easter Chocolate Chip Cookies lies in a perfectly balanced dough. We’ll start by combining our dry ingredients. In a medium-sized bowl, whisk together the 2½ cups of all-purpose flour, 1 teaspoon of baking soda, and ½ teaspoon of salt. Whisking ensures that the leavening agent (baking soda) and salt are evenly distributed throughout the flour, which is crucial for consistent cookie rise and flavor. Set this bowl aside.
Now, let’s get to the heart of the cookie’s texture and sweetness. In a large mixing bowl, cream together the 1 cup of softened unsalted butter with ¾ cup of granulated sugar and ¾ cup of packed light brown sugar. Creaming means beating the butter and sugars together until the mixture is light, fluffy, and pnon-alcoholic ale in color. This process incorporates air into the dough, which contributes to the cookies’ tender crum extractb. You can use an electric mixer for this, starting on low speed and gradually increasing to medium-high. Scrape down the sides of the bowl periodically to ensure everything is incorporated.
Once the butter and sugar mixture is beautifully creamy, it’s time to add the binders and flavor. Beat in the 2 large eggs, one at a time, making sure each egg is fully incorporated before adding the next. After the eggs, stir in the 2 teaspoons of vanilla extract. The vanilla adds a wonderful depth of flavor that complements the sweetness of the sugars and the richness of the butter.
Dividing and Coloring the Dough
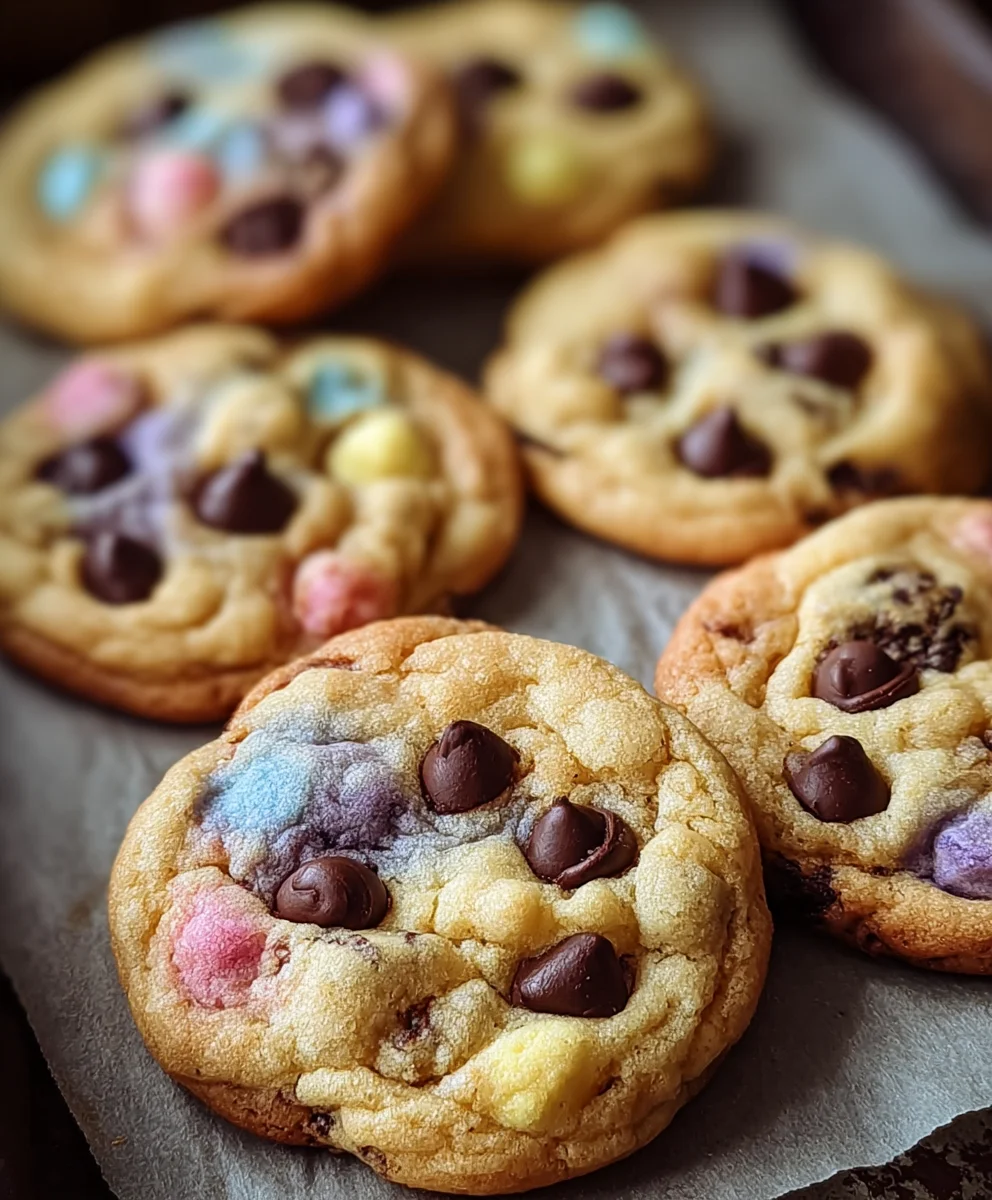
This is where the magic of Easter comes into play! We’re going to divide our cookie dough into four equal portions. This allows us to create a beautiful pastel assortment of cookies. Place one portion into a separate bowl. To this portion, add a few drops of your pastel pink gel food coloring and mix until the color is uniform. Gel food coloring is preferred because it’s highly concentrated and won’t add extra liquid to your dough, which could alter the texture. Repeat this process with the remaining three portions of dough, coloring one with pastel purple, another with pastel yellow, and the last with pastel blue.
Once all four portions of dough are beautifully colored, it’s time to gently fold in the chocolate chips. Take the pink dough and fold in about ½ cup of chocolate chips. Do the same for the purple, yellow, and blue doughs, dividing the remaining 2 cups of chocolate chips evenly among the colored dough portions. Be gentle when folding in the chips to avoid overmixing the dough, which can make the cookies tough. The goal is to distribute the chips without breaking them down too much.
Shaping and Baking the Cookies
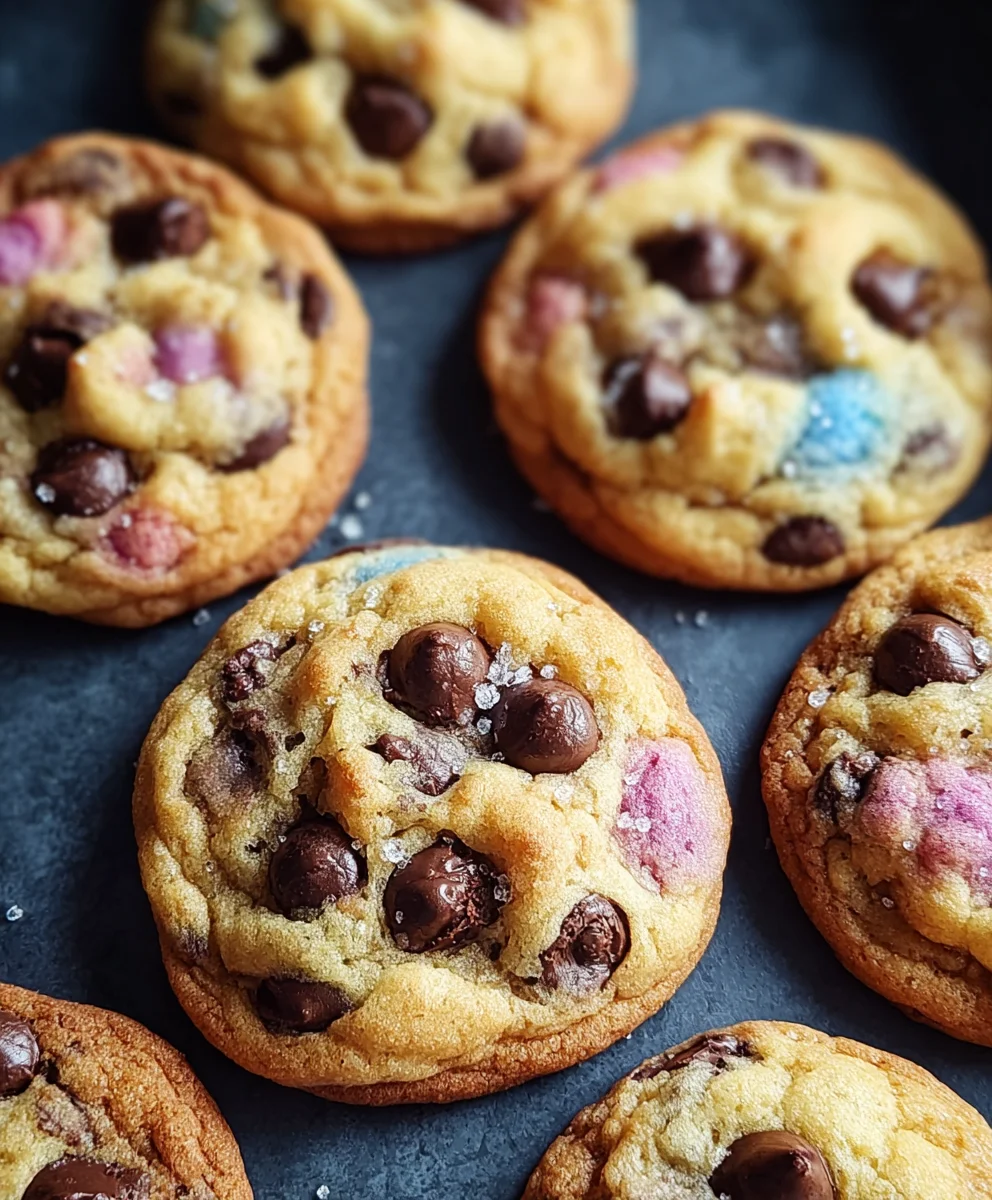
Now for the fun part of creating our Easter Chocolate Chip Cookies! We’re going to make swirled cookies to combine the beautiful pastel colors. Take a small portion of the pink dough (about a tablespoon) and flatten it slightly. Then, take an equally small portion of the purple dough and place it on top of the pink dough. Gently press them together, then take a small portion of yellow and place it on top, followed by a small portion of blue. You’ll have a little stack of four small dough balls. Gently roll this stack between your palms to form a rough ball, then flatten it slightly. The colors will begin extract to swirl together.
Place these swirled dough balls onto a baking sheet lined with parchment paper. Leave about 2 inches of space between each cookie as they will spread during baking. If you want extra chocolatey goodness and a classic chocolate chip cookie look, gently press a few extra chocolate chips onto the top of each flattened dough ball. This not only looks appealing but ensures you get that perfect chocolate chip bite with every cookie.
Preheat your oven to 375°F (190°C). Baking time will vary depending on your oven, but typically, these Easter Chocolate Chip Cookies will bake for 9 to 12 minutes. You’re looking for the edges to be lightly golden brown and the centers to appear mostly set, with perhaps a slight softness still visible. Overbaking will result in dry, hard cookies, so it’s better to err on the side of slightly underdone in the center.
Once baked, allow the cookies to cool on the baking sheet for about 5 minutes. This is a critical step, as it allows the cookies to set up properly. If you try to move them too soon, they might fall apart. After 5 minutes, carefully transfer the cookies to a wire rack to cool completely. This ensures even cooling and prevents the bottoms from becoming soggy. The aroma that fills your kitchen as these bake is simply divine!
Conclusion:
There you have it! Your guide to creating the most delightful Easter Chocolate Chip Cookies. We’ve walked through each step to ensure your cookies turn out perfectly – chewy in the center, slightly crisp on the edges, and bursting with rich chocolate flavor. These cookies are not just a treat for your taste buds, but also a beautiful addition to any Easter celebration. Whether you’re decorating them with festive sprinkles or enjoying them plain, they’re sure to bring smiles all around.
I encourage you to give this recipe a try. Don’t be afraid to experiment with different types of chocolate chips or add-ins. These Easter Chocolate Chip Cookies are incredibly versatile and can be adapted to suit your personal preferences. Serve them warm with a glass of cold milk, as part of a larger dessert spread, or even as a sweet surprise in your Easter baskets. The joy of baking and sharing these homemade cookies is truly part of the holiday spirit!
Frequently Asked Questions:
How can I make my Easter Chocolate Chip Cookies softer?
To achieve a softer cookie, slightly underbake them. Remove them from the oven when the edges are set but the centers still look a little underdone. They will continue to cook and firm up as they cool on the baking sheet. Using brown sugar as the primary sweetener also contributes to a softer texture.
Can I add Easter-themed decorations to these cookies?
Absolutely! Once the Easter Chocolate Chip Cookies have cooled completely, you can get creative with decorations. Consider using pastel-colored frosting, edible glitter, or even some fun Easter-themed sprinkles like bunnies, eggs, or chicks. You could also drizzle them with melted white chocolate for an extra touch of sweetness and visual appeal.
What’s the best way to store these cookies?
Store your Easter Chocolate Chip Cookies in an airtight container at room temperature for up to 3-4 days. If you want to keep them fresh for longer, you can also freeze baked cookies or the cookie dough. For baked cookies, place them in a freezer-safe bag or container with parchment paper between layers. Frozen cookie dough can be baked directly from frozen, adding a minute or two to the baking time.
Easter Chocolate Chip Cookies-Easy Spring Treats
Easy and colorful Easter Chocolate Chip Cookies perfect for a spring celebration. These swirled cookies feature pastel colors and classic chocolate chip goodness.
Ingredients
-
2½ cups all-purpose flour
-
1 teaspoon baking soda
-
½ teaspoon salt
-
1 cup unsalted butter, softened
-
¾ cup granulated sugar
-
¾ cup packed light brown sugar
-
2 large eggs
-
2 teaspoons vanilla extract
-
Gel food coloring in pastel shades (pink, purple, yellow, and blue)
-
2 cups semi-sweet chocolate chips, plus an additional handful for pressing onto the tops of the cookies
Instructions
-
Step 1
In a medium bowl, whisk together flour, baking soda, and salt. In a large bowl, cream softened butter with granulated and brown sugars until light and fluffy. Beat in eggs one at a time, then stir in vanilla extract. -
Step 2
Divide the cookie dough into four equal portions. Color each portion with a different pastel gel food coloring (pink, purple, yellow, blue) until uniform. Use gel food coloring to avoid altering dough consistency. -
Step 3
Gently fold about ½ cup of chocolate chips into each colored dough portion, dividing the remaining 2 cups evenly. Be careful not to overmix. -
Step 4
To create swirled cookies, take small portions of each colored dough (e.g., pink, purple, yellow, blue), stack them, gently roll into a ball, and then flatten slightly to create swirls. Optionally, press extra chocolate chips onto the tops. -
Step 5
Place swirled dough balls onto a parchment-lined baking sheet, leaving 2 inches between cookies. Preheat oven to 375°F (190°C). -
Step 6
Bake for 9 to 12 minutes, or until the edges are lightly golden and the centers are mostly set. Avoid overbaking. -
Step 7
Let cookies cool on the baking sheet for 5 minutes before transferring them to a wire rack to cool completely.
Important Information
Nutrition Facts (Per Serving)
It is important to consider this information as approximate and not to use it as definitive health advice.
Allergy Information
Please check ingredients for potential allergens and consult a health professional if in doubt.