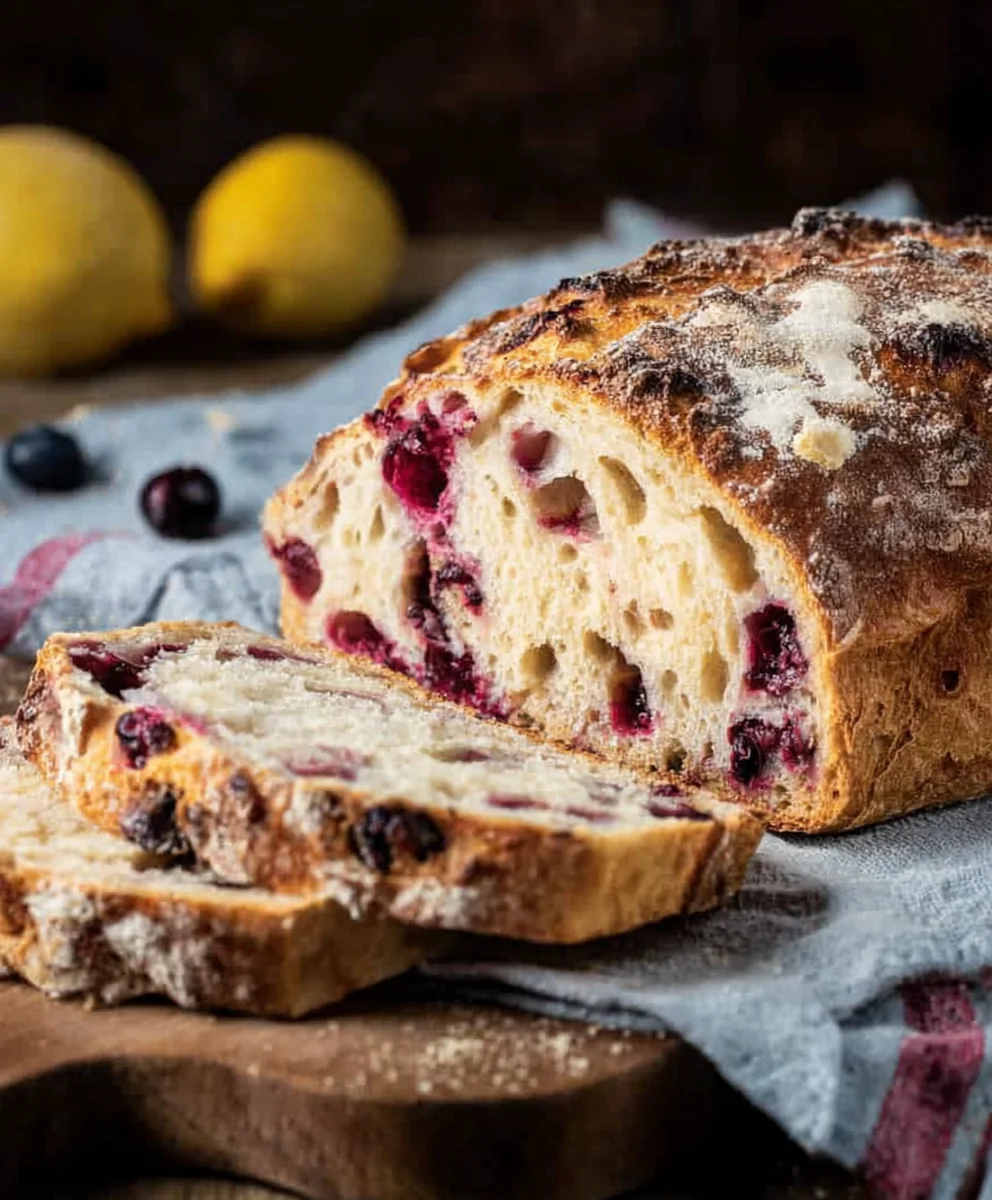
Blueberry Lemon Sourdough Bread-Tangy Sweet Loaf
Blueberry Lemon Sourdough Bread is more than just a breakfast item; it’s an experience for the senses. Imagin extracte that first glorious bite: the subtle tang of perfectly fermented sourdough, the bursting sweetness of plump blueberries, and the bright, zesty perfume of fresh lemon zest all harmonizing into a symphony of flavors. This isn’t your average loaf. It’s a testament to patient crafting, where simple, wholesome ingredients are transformed into something truly extraordinary. People adore this Blueberry Lemon Sourdough Bread because it strikes that perfect balance between comforting familiarity and exciting, vibrant taste. It’s the kind of bread that elevates your morning toast from mundane to magnificent, making weekend brunch feel like a special occasion and a simple afternoon snack a delightful indulgence. What truly sets this recipe apart is the inherent depth and complexity that sourdough fermentation brings, creating a tender crum extractb and a delightfully chewy crust that’s simply irresistible, further enhanced by the bright, sun-kissed notes of lemon and berry.
Ingredients:
- 3 cups bread flour
- 1⅓ cups lukewarm water
- ¾ cup active, bubbly, and well-fed sourdough starter
- 3 tablespoons white sugar
- 1 teaspoon salt
- 1¼ cup fresh blueberries
- 1 tablespoon lemon zest
Getting Started: The Dough Foundation
Autolyse and Starter Integration
We’ll begin extract by building the foundation for our delicious Blueberry Lemon Sourdough Bread. In a large mixing bowl, combine the 3 cups of bread flour with 1⅓ cups of lukewarm water. Use your hands or a spatula to mix until there are no dry pockets of flour remaining. The dough will be shaggy and a little sticky at this stage. This initial mix is called an “autolyse,” and it allows the flour to hydrate fully, which is crucial for developing gluten and a tender crum extractb. Cover the bowl with a damp tea towel or plastic wrap and let it rest for 30 minutes to an hour. This resting period is surprisingly important for making the dough more manageable and extensible.
After the autolyse, it’s time to introduce the heart of our sourdough: the starter. Add ¾ cup of your active, bubbly sourdough starter to the rested dough. Don’t worry if it looks a bit uneven at first; we’ll incorporate it in the next step. Now, add the 3 tablespoons of white sugar and 1 teaspoon of salt. The sugar will help feed the yeast in the starter and contribute to a lovely golden crust, while the salt is essential for flavor and controlling fermentagin extractn. Begin mixing the starter, sugar, and salt into the dough. You can use a stand mixer with a dough hook on low speed, or continue with your hands. Pinch and fold the dough until the starter, sugar, and salt are well distributed. This will take a few minutes. The dough will start to feel more cohesive and less shaggy.
Developing Strength: Stretch and Folds
Building Structure with Gentle Movements
Now, we move on to developing the gluten structure, which will give our bread its airy interior and a good rise. This is done through a series of “stretch and folds.” For the first set of stretch and folds, wet your hands slightly to prevent sticking. Reach under one side of the dough in the bowl, gently stretch it upwards, and fold it over the rest of the dough. Rotate the bowl 90 degrees and repeat this stretching and folding motion three more times, essentially folding the dough into itself from all four directions. You should feel the dough becoming smoother and more elastic with each set.
After completing the first set of stretch and folds, cover the bowl again and let the dough rest for 30 minutes. We will repeat this process of stretch and folds every 30 minutes for a total of four sets. During these repetitions, you’ll notice a significant change in the dough’s texture. It will become smoother, more elastic, and you’ll be able to see small bubbles starting to form within the dough. This indicates that the gluten network is developing beautifully. Aim for the dough to pull away cleanly from the sides of the bowl and feel taut and resilient by the end of the fourth set. This process is key to creating that characteristirum extractpen crumb in sourdough.
Adding Flavor and Aroma: Berries and Citrus
Incorporating the Stars of the Show
With our dough nicely developed, it’s time to add the delightful flavors that make this Blueberry Lemon Sourdough Bread so special. Gently scatter 1¼ cups of fresh blueberries over the surface of the dough. Then, sprinkle the 1 tablespoon of lemon zest evenly over the blueberries. Now, we need to gently incorporate these additions without deflating the precious air we’ve built into the dough. You can do this by performing one final set of gentle stretch and folds, similar to what we did before, but be extra delicate. Try to fold the blueberries and zest into the dough as evenly as possible. You might have a few blueberries poke out, and that’s perfectly fine. The goal here is to distribute the flavors without crushing the berries or tearing the gluten structure.
Once the blueberries and lemon zest are incorporated, you can perform one more gentle set of folds if needed to ensure even distribution, or you can proceed to the bulk fermentation stage. At this point, the dough should be lightly gassy and showing signs of fermentation. The blugin extractrries will begin to release some of their juices, and the aroma of lemon zest will start to mingle with the tangy scent of the sourdough. This is gin extractre the magic truly begins to happen, transforming a simple dough into a flavorful treat.
Bulk Fermentation and Shaping
Allowing Flavors to Meld and Develop
Now, we let the dough rest and ferment at room temperature. This is the bulk fermentation period, where the yeast and bacteria in the sourdough starter work their magic. Cover the bowl tightly and let it sit in a warm spot for approximately 4 to 6 hours, or until the dough has increased in volume by about 50-75% and feels light and airy. You should see some small bubbles on the surface. The exact time will depend on the ambient temperature of your kitchen. During this time, the flavors will deepen, and the dough will develop its characteristic sourdough tang.
Once bulk fermentation is complete, it’s time to shape our loaf. Gently turn the dough out onto a lightly floured surface. Be careful not to degas it too much. For a round loaf (boule), gently pat the dough into a rough rectangle. Then, starting from the top edge, fold about a third of the dough down towards the center. Press lightly to seal. Now, starting from the bottom edge, fold that edge up to meet the first fold, creating a seam. Pinch the seam gently. Finally, cup your hands around the sides of the dough and gently rotate it on the counter, tucking the edges underneath to create surface tension. This tension is vital for a good oven spring. Place the shaped dough, seam-side down, into a well-floured proofing basket or a bowl lined with a floured tea towel.
The Final Proof and Baking
Resting and Transforming with Heat
After shaping, it’s time for the final proof. Cover the proofing basket with plastic wrap or a damp cloth and place it in the refrigerator for an overnight cold proof, typically for 12-18 hours. This cold fermentation develops even more complex flavors and makes the dough easier to score. When you’re ready to bake, preheat your oven to 450°F (230°C) with a Dutch oven or baking vessel inside for at least 30 minutes. This ensures the vessel is screaming hot, which is crucial for achieving a good crust.
Once the oven and Dutch oven are preheated, carefully remove the proofing basket from the refrigerator. Gently invert the dough onto a piece of parchment paper, or directly into the hot Dutch oven. If you’re using parchment, you can use the edges to help lift and lower the dough. Now, using a sharp razor blade or a lame, quickly score the top of the dough. A simple cross or a few slashes will do. This allows the bread to expand predictably in the oven. Carefully place the lid on the Dutch oven and transfer it to the preheated oven. Bake with the lid on for 20 minutes. After 20 minutes, carefully remove the lid and continue baking for another 20-25 minutes, or until the crust is a deep golden brown and the internal temperature of the bread reaches at least 200°F (93°C). The smell of baked blueberries and lemon will fill your kitchen, a wonderful indicator of the delicious loaf you’ve created.

Conclusion:
We hope you’ve enjoyed diving into the delightful world of making your own Blueberry Lemon Sourdough Bread! This recipe offers a fantastic balance of tangy sourdough, sweet blueberries, and bright lemon zest, resulting in a truly unique and satisfying loaf. Whether you’re a seasoned sourdough baker or just starting out, the process is rewarding and the outcome is undeniably delicious.
This Blueberry Lemon Sourdough Bread is incredibly versatile. Serve slices toasted with a smear of cream cheese or butter for a simple yet elegant breakfast. It also makes a wonderful accompaniment to a brunch spread or a light afternoon snack. For a touch of decadence, consider a drizzle of honey or a dollop of Greek yogurt.
Don’t be afraid to experiment with variations! You can swap out the blueberries for raspberries or blackberries, or add a pinch of cardamom for an extra layer of warmth. If you prefer a stronger lemon flavor, add more zest or a splash of lemon extract. The beauty of sourdough is its adaptability.
So go ahead, gather your ingredients, and embark on this baking adventure. We encourage you to savor each step, from feeding your starter to the final fragrant aroma filling your kitchen. We’re confident you’ll fall in love with this Blueberry Lemon Sourdough Bread as much as we have!
Frequently Asked Questions:
Q: Can I use frozen blueberries in this Blueberry Lemon Sourdough Bread recipe?
A: Yes, you absolutely can use frozen blueberries. Just be sure to toss them with a tablespoon or two of flour before folding them into the dough to help prevent them from bleeding too much color and sinking to the bottom. They might release a bit more moisture than fresh, so keep an eye on your dough consistency.
Q: My sourdough starter isn’t very active. Can I still make this Blueberry Lemon Sourdough Bread?
A: While an active and bubbly sourdough starter is ideal for a good rise and flavor, you might still be able to make this bread. However, the rise might be less pronounced, and the crum extractb might be denser. It’s always best to ensure your starter is well-fed and active before undertaking a sourdough bread recipe for optimal results.
Q: How should I store my leftover Blueberry Lemon Sourdough Bread?
A: Store your cooled Blueberry Lemon Sourdough Bread in an airtight container or bread bag at room temperature for up to 3-4 days. If you live in a humid climate, you might want to slice it and store it in the refrigerator to prevent mold, though this can dry out the bread slightly.
Blueberry Lemon Sourdough Bread-Tangy Sweet Loaf
A delightful sourdough loaf bursting with the tangy sweetness of blueberries and bright lemon zest. Perfect for breakfast or a special treat.
Ingredients
-
3 cups bread flour
-
1⅓ cups lukewarm water
-
¾ cup active, bubbly, and well-fed sourdough starter
-
3 tablespoons white sugar
-
1 teaspoon salt
-
1¼ cup fresh blueberries
-
1 tablespoon lemon zest
Instructions
-
Step 1
Combine bread flour and lukewarm water in a large bowl for autolyse. Mix until no dry flour remains, cover, and rest for 30 minutes to an hour. -
Step 2
Add active sourdough starter, white sugar, and salt to the rested dough. Mix until well distributed, using a stand mixer or by hand. Pinch and fold until cohesive. -
Step 3
Perform stretch and folds. Wet hands slightly, stretch one side of the dough upwards, and fold it over the rest. Rotate the bowl 90 degrees and repeat three more times. Cover and rest for 30 minutes. Repeat this process for a total of four sets, every 30 minutes. -
Step 4
Gently incorporate fresh blueberries and lemon zest into the dough using gentle stretch and folds. Aim for even distribution without deflating the dough. -
Step 5
Allow the dough to bulk ferment at room temperature for 4-6 hours, or until it has increased in volume by 50-75% and appears light and airy with small bubbles. Shape the dough into a round loaf (boule) by gently folding and creating surface tension. Place seam-side down into a floured proofing basket. -
Step 6
Cold proof the shaped dough in the refrigerator overnight for 12-18 hours. Preheat oven to 450°F (230°C) with a Dutch oven inside for at least 30 minutes. -
Step 7
Carefully invert the dough onto parchment paper or directly into the hot Dutch oven. Score the top of the dough with a sharp blade. Bake with the lid on for 20 minutes, then remove the lid and bake for another 20-25 minutes until deep golden brown and the internal temperature reaches 200°F (93°C).
Important Information
Nutrition Facts (Per Serving)
It is important to consider this information as approximate and not to use it as definitive health advice.
Allergy Information
Please check ingredients for potential allergens and consult a health professional if in doubt.