Renee Paj- Easy Sweet Tart Recipe- Delicious Dessert
Renee Paj: a dish that whispers tnon-alcoholic ales of comfort and joy, a timeless classic that has captured hearts and taste buds for generations. If you’ve ever experienced the magic of a perfectly prepared Renee Paj, you understand why it’s more than just a meal; it’s a warm hug on a plate, a nostalgic journey back to simpler times. What truly sets this beloved Renee Paj apart is its incredible versatility and the sheer depth of flavor it offers. It’s the kind of dish that brings people together, sparking conversations and creating cherished memories around the dinner table. The rich, savory base, often infused with fragrant herbs and tender ingredients, creates an experience that’s both deeply satisfying and surprisingly elegant. Get ready to discover why this recipe is a keeper, and how you can recreate that unforgettable taste in your own kitchen.
Ingredients:
Renee Paj: A Comforting Embrace in Every Bite
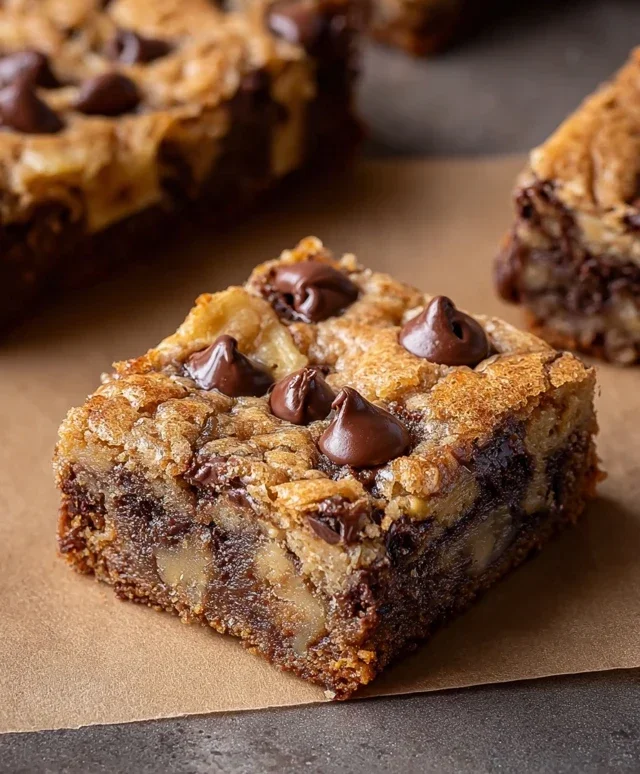
There are some recipes that just feel like home, aren’t there? The kind that fill your kitchen with an irresistible aroma and bring a smile to your face with every single bite. Renee Paj is one of those recipes for me. It’s a wonderful blend of sweet, tender banana, hearty oats, and just a hint of spice, creating a treat that’s perfect for breakfast, a snack, or even a light dessert. This isn’t your typical dense banana bread; it’s lighter, more crum extractbly, and utterly delightful. I’ve been making this for years, and it never fails to impress, whether I’m serving it to family or friends. The beauty of Renee Paj lies in its simplicity and the way common pantry staples come together to create something truly special.
What I love most is how forgiving this recipe is. Ripe bananas are the star, and the riper they are, the more natural sweetness and moisture they’ll lend to the paj. Don’t be afraid of those speckled brown bananas sitting on your counter; they are exactly what you need for this. The oats add a lovely texture, preventing the paj from becoming too cake-like and providing a satisfying chew. The combination of baking soda and baking powder ensures a perfect lift, and the cinnamon adds that cozy warmth that makes it feel so comforting.
Getting Started: Preparing Your Ingredients
Before you dive into mixing, it’s always a good idea to gather all your ingredients and have them prepped. This makes the baking process so much smoother and more enjoyable. For this recipe, you’ll need your dry ingredients measured out, your bananas mashed, and your wet ingredients ready to go.
First, preheat your oven to 350°F (175°C). This ensures that your paj bakes evenly from the moment it goes in. Grease and flour a 9×5 inch loaf pan, or line it with parchment paper for easy removal. I find a light coating of cooking spray and a dusting of flour works well, or a well-fitting parchment paper sling makes lifting the finished paj out a breeze.
In a large bowl, combine your dry ingredients: the 1 cup of old fashioned oats, 1 1/4 cups of all purpose flour, 1/2 cup of light brown sugar (packed firmly to get an accurate measurement), 1/2 teaspoon of kosher salt for flavor balance, 1/2 teaspoon of baking soda, 1/4 teaspoon of baking powder for a little extra lift, and 1/2 teaspoon of ground cinnamon for that subtle, warming spice. Whisk these together thoroughly to ensure everything is evenly distributed. This step is crucial for a consistent texture and flavor throughout the paj.
In a separate medium bowl, prepare your wet ingredients. Take your 3 large, ripe bananas (the rippier the better for sweetness and ease of mashing!) and mash them well with a fork until they are mostly smooth but a few small lumps are still okay. It adds to the character! To the mashed bananas, add 2 large eggs, 1 teaspoon of pure vanilla extract for that classic dessert flavor, and 3 tablespoons of cooking oil. You can use corn oil, canola oil, or even a neutral vegetable oil. Whisk these wet ingredients together until they are well combined.
Bringin extractg It All Together: The Mixing Process
Now comes the fun part: combining the wet and dry ingredients to create your paj batter. Pour the wet banana mixture into the bowl with your dry ingredients. If you’re using them, now is also the time to stir in your 1/3 cup of chopped walnuts. The walnuts add a delightful crunch and nutty flavor that complements the banana and oats beautifully. However, if you have any nut allergies or simply prefer not to use them, the paj will be just as delicious without them.
Gently fold the wet ingredients into the dry ingredients using a spatula or wooden spoon. Be careful not to overmix. Mix just until everything is incorporated and you no longer see streaks of dry flour. A few small lumps are perfectly fine; overmixing can lead to a tougher paj. The batter will be thick and somewhat lumpy, and that’s exactly what you’re looking for.
Baking Your Renee Paj to Perfection
Pour the batter evenly into your prepared loaf pan. Use your spatula to spread it out so it’s level. This helps ensure that the paj bakes evenly.
Place the loaf pan in your preheated oven and bake for approximately 50-60 minutes. The exact baking time can vary depending on your oven, so it’s important to keep an eye on it. You’ll know your Renee Paj is ready when a wooden skewer or toothpick inserted into the center comes out clean, or with just a few moist crum extractbs attached (no wet batter). The top should be golden brown and the edges should be pulling away slightly from the sides of the pan.
Once baked, carefully remove the loaf pan from the oven. Let the Renee Paj cool in the pan on a wire rack for about 15-20 minutes. This initial cooling period allows the paj to set and firm up, making it easier to remove from the pan without breaking.
After the initial cooling, carefully invert the paj onto the wire rack to cool completely. If you used parchment paper, you can simply lift it out. If you greased and floured the pan, you might need to gently run a knife around the edges to loosen it before inverting. Allow the paj to cool completely before slicing. This is arguably the hardest part – waiting for it to cool enough to slice and enjoy! The aroma filling your kitchen will be a constant temptation, but patience is key for the best texture.
Renee Paj is truly wonderful when served at room temperature, but it’s also delicious when slightly warmed. I love to slice it and serve it with a smear of butter, a dollop of Greek yogurt, or even a drizzle of honey. It’s a versatile treat that brings comfort and joy with every single slice. Enjoy!
Conclusion:
I hope you’ve enjoyed learning how to make this wonderful Renee Paj! This recipe truly shines because of its delightful balance of sweet and savory, with the creamy ricotta and fragrant herbs creating a comforting yet elegant dish. It’s surprisingly simple to put together, making it perfect for a weeknight treat or a special occasion appetizer. The versatility of this Renee Paj is another key reason to love it; it’s fantastic served warm or at room temperature.
For serving suggestions, I highly recommend pairing it with a crisp green salad tossed with a light vinaigrette to cut through the richness. It also makes a superb brunch item, served alongside scrambled eggs and fresh fruit. Don’t be afraid to experiment with variations! You could easily add a handful of toasted pine nuts for extra crunch, or a sprinkle of red pepper flakes for a subtle kick. Grated Parmesan cheese also adds a lovely depth of flavor. I truly encourage you to give this Renee Paj a try – I’m confident you’ll be delighted with the results!
Frequently Asked Questions:
Can I make Renee Paj ahead of time?
Yes, you absolutely can! You can assemble the Renee Paj up to a day in advance and store it, covered, in the refrigerator. Bake it just before you’re ready to serve for the best texture and flavor. You might need to add a few extra minutes to the baking time if it’s coming straight from the fridge.
What kind of bread is best for Renee Paj?
A good quality, crusty bread is ideal for Renee Paj. Think of something like a rustic sourdough, a French baguette sliced on an angle, or even a ciabatta. The sturdy texture will hold up well to the filling without becoming soggy.
Renee Paj
A delightful and moist banana bread-like pastry, perfect for breakfast or a snack.
Ingredients
-
1 cup old fashioned oats
-
1 1/4 cups all purpose flour
-
1/2 cup light brown sugar, packed
-
1/2 tsp. kosher salt
-
1/2 tsp. baking soda
-
1/4 tsp. baking powder
-
1/2 tsp. ground cinnamon
-
3 large, ripe bananas, cut into chunks
-
2 large eggs
-
1 tsp. pure vanilla extract
-
3 TBSP cooking oil (corn, canola, etc)
-
1/3 cup chopped walnuts (optional)
Instructions
-
Step 1
Preheat oven to 350°F (175°C). Grease and flour a loaf pan. -
Step 2
In a large bowl, whisk together the all purpose flour, light brown sugar, kosher salt, baking soda, baking powder, and ground cinnamon. -
Step 3
In a separate bowl, mash the ripe bananas well. Stir in the eggs, pure vanilla extract, and cooking oil until combined. -
Step 4
Add the wet ingredients to the dry ingredients and mix until just combined. Do not overmix. -
Step 5
Fold in the old fashioned oats and chopped walnuts (if using). -
Step 6
Pour the batter into the prepared loaf pan and spread evenly. -
Step 7
Bake for 35-45 minutes, or until a toothpick inserted into the center comes out clean. -
Step 8
Let the Renee Paj cool in the pan for 10 minutes before transferring to a wire rack to cool completely.
Important Information
Nutrition Facts (Per Serving)
It is important to consider this information as approximate and not to use it as definitive health advice.
Allergy Information
Please check ingredients for potential allergens and consult a health professional if in doubt.