Easter Egg Fruit Cookies-Easy Festive Treats
Easter Egg Fruit Cookies are more than just a festive treat; they’re a delightful celebration of spring, bursting with color and flavor that captures the very essence of the holiday. Imagin extracte a bite-sized morsel of sunshine, shaped like the iconic Easter egg, and filled with a sweet, slightly tart medley of dried fruits. It’s no wonder these charming cookies have become a cherished tradition for so many families. What makes these Easter Egg Fruit Cookies so incredibly special? It’s the perfect balance of buttery, tender cookie dough encasing bursts of chewy, sweet fruit – often a mix of plump raisins, tangy cranberries, and zesty candied orange peel – all coming together in a symphony of textures and tastes. They’re wonderfully simple to make, making them an ideal activity to share with children, and the finished product is a testament to the joy of home baking, ready to adorn any Easter dessert table with their whimsical beauty and delicious allure.
Ingredients:
- 1 package (about 16.5 ounces) sugar cookie dough mix, plus ingredients called for on the package (usually eggs, oil, water)
- 8 ounces cream cheese, softened to room temperature
- 6 tablespoons unsalted butter, softened to room temperature
- 2 cups confectioners’ sugar (also known as powdered sugar or icing sugar)
- 1 teaspoon pure vanilla extract
- Pinch of salt
- Assorted fresh berries and fruit for decorating: blueberries, hulled and sliced strawberries, raspberries, peeled and sliced kiwis, drained mandarin orange segments
Preparing the Cookie Dough
Mixing the Sugar Cookie Dough
To begin extract crafting these delightful Easter Egg Fruit Cookies, we’ll start with the base: the sugar cookies. You’ll need one package of sugar cookie dough mix. Follow the instructions on the package carefully, as the specific amounts of eggs, oil, and water can vary slightly between brands. In a large mixing bowl, combine the dry mix with the wet ingredients as directed. Stir everything together until it forms a cohesive dough. Don’t overmix; you want a dough that’s just combined.
Chilling the Dough for Easy Handling
Once your dough is ready, it’s crucial to chill it. This step is essential for making the dough easier to handle and shape, especially when you’re aiming for specific designs like Easter eggs. Wrap the dough tightly in plastic wrap, ensuring there are no air pockets. Flatten it into a disc, which helps it chill more evenly. Place the wrapped dough in the refrigerator for at least 30 minutes, or until it’s firm enough to roll out without being sticky. This chilling period allows the gluten to relax and the fats to firm up, preventing excessive spreading during baking.
Shaping the Easter Egg Cookies
When the dough is sufficiently chilled, it’s time to shape our Easter eggs! Preheat your oven according to the sugar cookie dough mix package directions, usually around 350°F (175°C). Lightly flour a clean work surface and a rolling pin. Unwrap the chilled dough and roll it out to about 1/4-inch thickness. For the Easter egg shape, you can use a cookie cutter in the shape of an egg, or freehand it by cutting out oval shapes. If you don’t have an egg-shaped cutter, a simple oval will work perfectly. Carefully transfer the shaped cookies to a baking sheet lined with parchment paper. Leave a little space between each cookie to allow for slight expansion during baking.
Baking the Sugar Cookies
Now, let’s bake these lovely shapes to golden perfection. Place the baking sheet in the preheated oven and bake for the time recommended on your cookie dough mix package, typically 8-12 minutes. Keep a close eye on them as they bake; you’re looking for lightly golden brown edges. The center should still look slightly soft, as they will continue to firm up as they cool. Once baked, remove the cookies from the oven and let them cool on the baking sheet for a few minutes before transferring them to a wire rack to cool completely. It’s very important that the cookies are entirely cool before we move on to the frosting.
Making the Cream Cheese Frosting
Whipping the Cream Cheese and Butter Base
While the cookies are cooling, let’s prepare the delicious cream cheese frosting. Ensure your cream cheese and butter are softened to room temperature. This is key for a smooth, lump-free frosting. In a medium mixing bowl, beat the softened cream cheese and softened butter together using an electric mixer on medium speed. Continue beating until the mixture is light, fluffy, and well combined, with no streaks of butter or cream cheese remaining. This forms the rich and tangy base for our frosting.
Incorporating Sweetness and Flavor
Next, we’ll add the sweetness and flavor to our frosting. Gradually add the confectioners’ sugar to the creamed cheese and butter mixture, about half a cup at a time, beating on low speed until each addition is incorporated. This prevents a cloud of powdered sugar from escaping the bowl. Once all the confectioners’ sugar is mixed in, add the vanilla extract and a pinch of salt. The salt helps to balance the sweetness and enhance the other flavors. Increase the mixer speed to medium-high and beat for another 2-3 minutes until the frosting is smooth, creamy, and holds its shape. If the frosting seems too thick, you can add a teaspoon of milk or cream at a time until the desired consistency is reached.
Decorating the Easter Egg Fruit Cookies
Frosting the Cooled Cookies
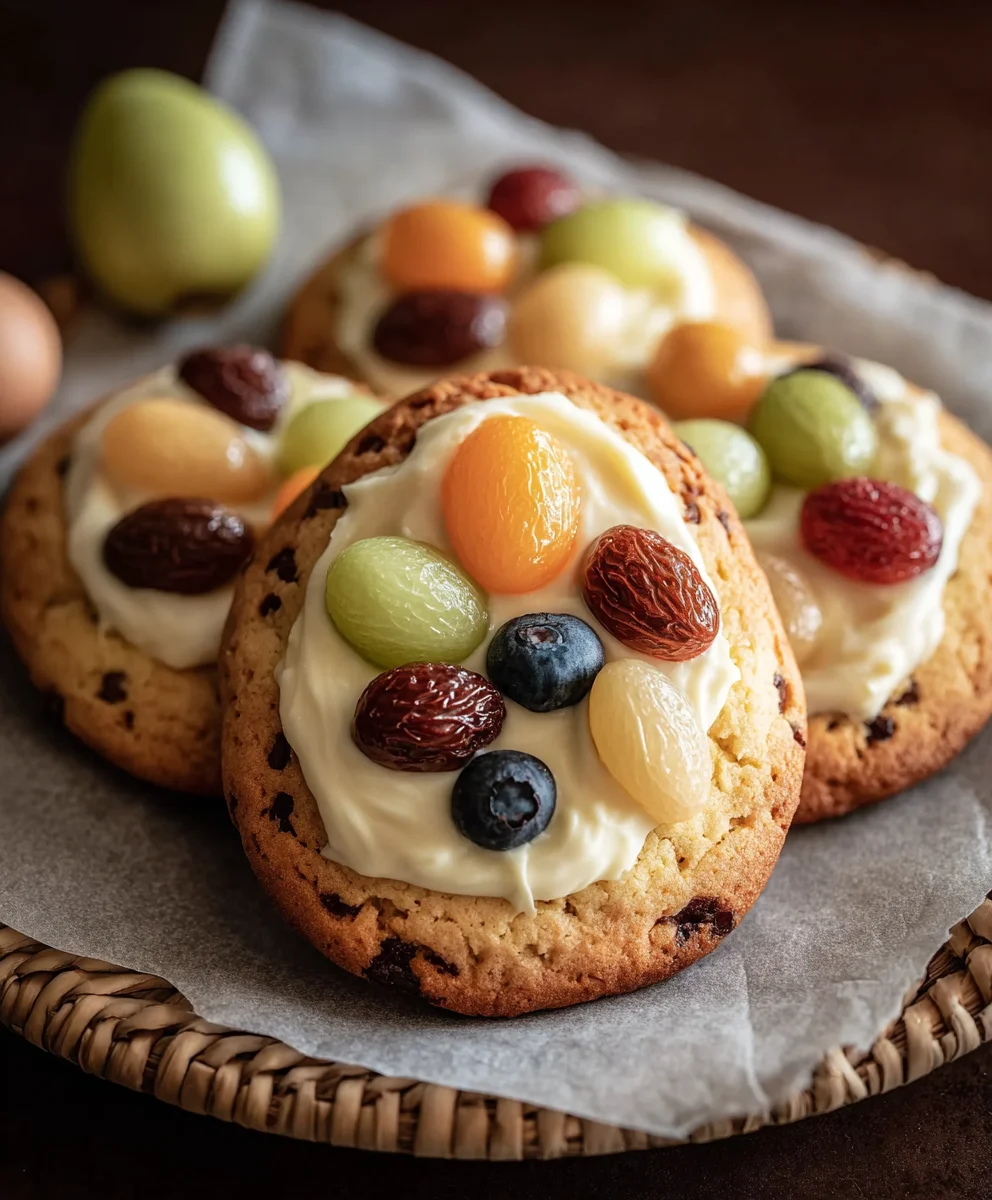
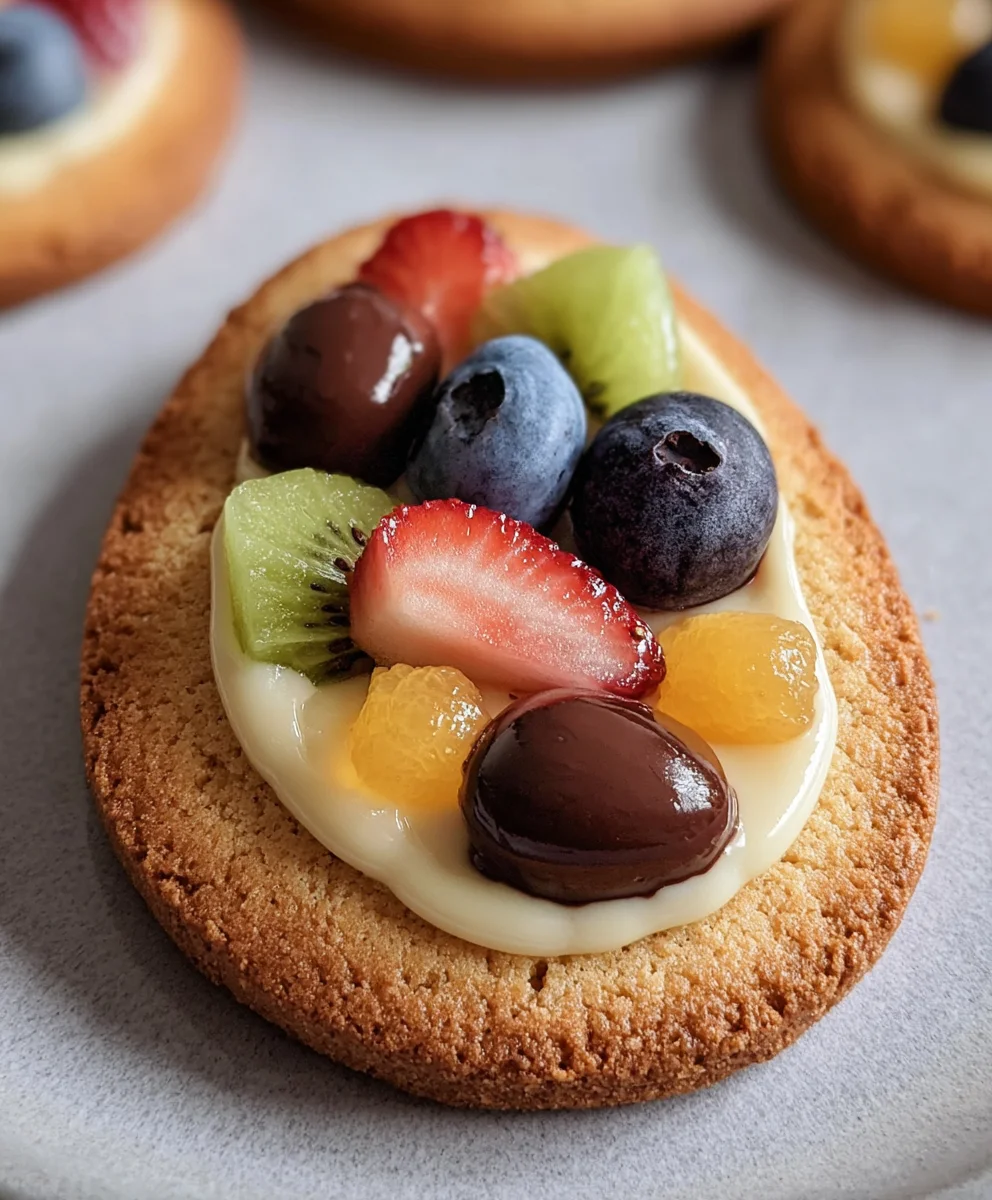
Once your sugar cookies are completely cool and your cream cheese frosting is ready, it’s time for the fun part: decorating! You can spread a generous layer of the cream cheese frosting onto the flat side of each cooled cookie using a spatula or a butter knife. Aim for an even coating, ensuring it reaches close to the edges without oozing over too much. This frosted surface will serve as our edible canvas for the beautiful fruit decorations.
Now, let’s bring our Easter egg designs to life with the assorted fresh berries and fruit. This is where your creativity can truly shine! Think about how you want to arrange the fruit to resemble patterns, flowers, or simply colorful designs. For example, you could place a few blueberries at the top to look like a ribbon or a bow. Use sliced strawberries to create petal shapes, or arrange raspberries and blueberries to mimic colorful dots. Sliced kiwis can add a vibrant green element, and mandarin orange segments can provide bright pops of orange. Gently press the fruit into the frosting so it adheres securely. Don’t be afraid to experiment with different combinations and arrangements of the fruit. You might create a striped effect with alternating berries, a floral pattern with strawberry slices and blueberries, or a mosaic with small pieces of various fruits. The natural colors and textures of the berries and fruit will make each cookie a unique work of art. For a more traditional Easter egg look, you could create a ‘speckled’ effect by dotting smaller berries like blueberries across the surface. This step is all about having fun and gin extractting your imagination lead the way. The goal is to create festive and delicious Easter treats that everyone will adore.Creating Unique Easter Egg Designs
Conclusion:
There you have it – a delightful and festive recipe for Easter Egg Fruit Cookies that are sure to bring smiles to your table. We’ve walked through each step, from creaming the butter and sugar to the final decorating flourish, ensuring you can recreate these charming treats with ease. These cookies are a wonderful way to celebrate the season, offering a balance of sweetness and fruity goodness in every bite. They are perfect for Easter gatherings, classroom parties, or simply as a fun activity to do with loved ones.
For serving suggestions, consider arrangin extractg them on a tiered platter alongside other Easter confections for a stunning display. They also make fantastic edible gifts, especially when packaged in cellophane bags tied with a colorful ribbon. Don’t be afraid to get creative with variations! You can experiment with different fruit extracts in the dough, such as lemon or orange, or add a pinch of cinnamon for an extra layer of flavor. For a gluten-free option, simply substitute your favorite gluten-free all-purpose flour blend. Most importantly, have fun with the decorating process – use gin extractr imagination to create unique and whimsical designs!
Frequently Asked Questions:
Q: How should I store my Easter Egg Fruit Cookies?
A: Once cooled completely, store your Easter Egg Fruit Cookies in an airtight container at room temperature for up to 5 days. You can also freeze them, unfrosted, for up to 3 months. If freezing, allow them to thaw at room temperature before decorating.
Q: Can I use different types of dried fruit in these cookies?
A: Absolutely! While the recipe calls for mixed dried fruit, feel free to substitute with your favorites like raisins, cranberries, chopped apricots, or even candied citrus peel. Just ensure they are finely chopped for even distribution.
Easter Egg Fruit Cookies-Easy Festive Treats
Delightful and easy-to-make Easter egg shaped sugar cookies topped with a creamy cream cheese frosting and decorated with fresh fruits and berries.
Ingredients
-
1 package sugar cookie dough mix, plus ingredients called for on the package
-
8 ounces cream cheese, softened
-
6 tablespoons unsalted butter, softened
-
2 cups confectioners’ sugar
-
1 teaspoon pure vanilla extract
-
Pinch of salt
-
Assorted fresh berries and fruit for decorating: blueberries, hulled and sliced strawberries, raspberries, peeled and sliced kiwis, drained mandarin orange segments
Instructions
-
Step 1
Prepare the sugar cookie dough according to the package directions. Mix the dry and wet ingredients until a cohesive dough forms. Do not overmix. -
Step 2
Wrap the dough tightly in plastic wrap, flatten into a disc, and chill in the refrigerator for at least 30 minutes until firm. -
Step 3
Preheat oven to 350°F (175°C). Roll out the chilled dough to 1/4-inch thickness. Cut out egg shapes using a cookie cutter or freehand. Place cookies on a parchment-lined baking sheet. -
Step 4
Bake for 8-12 minutes, or until edges are lightly golden brown. Let cool on the baking sheet for a few minutes, then transfer to a wire rack to cool completely. -
Step 5
While cookies cool, prepare the frosting. Beat softened cream cheese and butter until light and fluffy. Gradually add confectioners’ sugar, then vanilla extract and salt. Beat until smooth and creamy. -
Step 6
Spread a generous layer of cream cheese frosting onto the flat side of each cooled cookie. -
Step 7
Decorate the frosted cookies with assorted fresh berries and fruit, arranging them to create festive Easter egg designs. Gently press the fruit into the frosting to secure.
Important Information
Nutrition Facts (Per Serving)
It is important to consider this information as approximate and not to use it as definitive health advice.
Allergy Information
Please check ingredients for potential allergens and consult a health professional if in doubt.