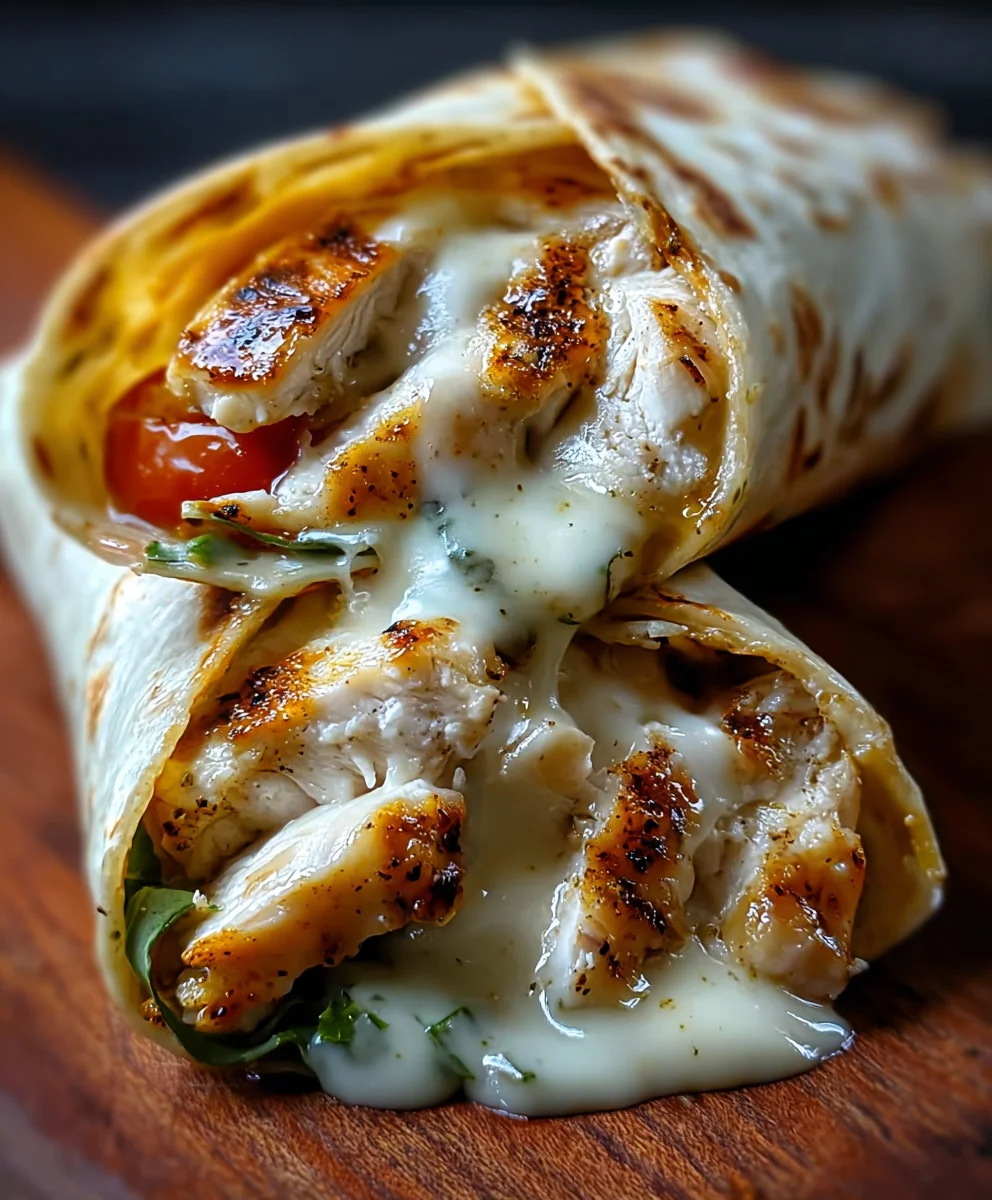
Cheesy Garlic Chicken Wraps Quick & Easy Recipe
Cheesy Garlic Chicken Wraps are more than just a meal; they’re a weeknight warrior’s secret weapon and a weekend treat all rolled into one delicious package. If you’ve ever found yourself craving something incredibly satisfying, bursting with flavor, and surprisingly simple to whip up, then you’re in the right place. What is it about these wraps that captures our hearts and taste buds? Perhaps it’s the irresistible combination of tender, juicy chicken infused with aromatic garlic, all embraced by a blanket of melted, gooey cheese, nestled within a soft tortilla. They’re the ultimate comfort food, yet sophisticated enough for casual entertaining. The magic truly lies in that harmonious blend of savory, creamy, and slightly pungent notes that create a truly unforgettable bite. Get ready to discover why Cheesy Garlic Chicken Wraps are destined to become a staple in your culinary repertoire.

Ingredients:
- 2 cups cooked chicken (shredded or diced)
- 1 ½ cups shredded mozzarella or cheddar cheese (or a blend of both for extra flavor!)
- ¼ cup cream cheese (softened to room temperature for easy mixing)
- 2 tbsp butter (melted, unsalted is preferred but salted works too)
- 3 cloves garlic (finely minced, for that potent garlic punch)
- ¼ cup sour cream (full-fat will give the creamiest result)
- 1 tsp garlic powder (doubling down on the garlic goodness)
- 1 tsp Italian seasoning (a blend of herbs like oregano, basil, and thyme)
- 4 large tortillas (flour tortillas work best for their pliability)
- Salt and freshly ground black pepper (to taste, always adjust to your preference)
- Fresh parsley (finely chopped, for a pop of color and freshness as a garnish, entirely optional)
Preparing the Cheesy Garlic Chicken Filling
Step 1: Combining the Creamy Base
To start creating the incredible filling for our Cheesy Garlic Chicken Wraps, we’ll begin extractgin extract bringing together the creamy elements. In a medium-sized mixing bowl, combine the softened cream cheese and the sour cream. It’s important that your cream cheese is at room temperature; this will prevent any lumps and ensure a smooth, homogeneous mixture. Use a spatula or a whisk to thoroughly blend these two ingredients together until they are completely incorporated and have a consistent texture. This forms the luscious base of our filling, providing a rich and tangy foundation that will hold all the other flavors together beautifully.
Step 2: Infusing with Garlic and Seasoning
Now, it’s time to add the aromatic punch and savory notes. To the cream cheese and sour cream mixture, add the minced fresh garlic, the garlic powder, and the Italian seasoning. The combination of fresh garlic and garlic powder provides layers of garlic flavor that are both immediate and lingering. The Italian seasoning will bring a lovely herbaceous depth. Mix everything together until all the spices and garlic are evenly distributed throughout the creamy base. Taste a tiny bit at this stage (be careful, it’s raw!) and adjust salt and pepper as needed. Remember, the chicken and cheese will also contribute saltiness, so don’t overdo it initially.
Step 3: Incorporating the Chicken and Cheese
With our flavorful creamy base ready, we’ll now fold in the star ingredients: the cooked chicken and the shredded cheese. Add the cooked, shredded or diced chicken to the bowl with the cream cheese mixture. Gently fold it in, ensuring each piece of chicken is coated in the creamy, garlicky goodness. Next, add the shredded mozzarella and/or cheddar cheese. Reserve a small handful of the cheese to sprinkle on top of the wraps before folding, if desired, for an extra gooey finish. Continue to gently mix everything until the chicken and cheese are well combined with the sauce. The mixture should be thick and slightly sticky, holding together nicely.
Assembling and Cooking the Wraps
Step 4: Warming and Coating the Tortillas
Before we assemble our wraps, we need to prepare the tortillas to make them pliable and slightly warm, which prevents them from cracking when you roll them. You have a couple of options here. The quickest method is to microwave them briefly: stack them on a plate and microwave for about 20-30 seconds until they are warm and flexible. Alternatively, you can gently warm them in a dry skillet over medium heat for about 15-20 seconds per side. Once warmed, brush the inside of each tortilla very lightly with the melted butter. This adds a subtle richness and a beautiful golden sheen as they cook.
Step 5: Filling and Folding the Wraps
Now for the exciting part – building your Cheesy Garlic Chicken Wraps! Lay one of the prepared tortillas flat on a clean work surface. Spoon a generous portion of the chicken and cheese filling onto the center of the tortilla. Aim for about a quarter of the filling per wrap, distributing it evenly. Don’t overstuff, as this can make rolling difficult. If you reserved some cheese, sprinkle a little extra over the filling now. To fold, first fold in the two sides of the tortilla towards the center, overlapping them slightly over the filling. Then, starting from the bottom edge closest to you, tightly roll the tortilla upwards, tucking in the filling as you go. The buttered tortilla should help it seal slightly. Repeat this process with the remaining tortillas and filling.
Step 6: Grilling for Golden Perfection
To achieve that irresistible golden-brown exterior and ensure the cheese is perfectly melted, we’ll grill the wraps. Heat a large non-stick skillet or a griddle over medium heat. You don’t need to add extra butter or oil to the pan as the butter on the tortillas should be sufficient, but if you’re worried about sticking, a tiny bit of cooking spray or oil can be used. Carefully place the filled wraps seam-side down onto the hot skillet. Cook for about 3-4 minutes per side, or until the tortillas are golden brown and slightly crispy, and the cheese inside is delightfully gooey and melted. Gently press down on the wraps with a spatula as they cook to help them maintain their shape and ensure even browning.
Step 7: Garnishing and Serving Your Delicious Wraps
Once your Cheesy Garlic Chicken Wraps are beautifully golden and the cheese is oozing, it’s time to finish them off. Carefully remove the wraps from the skillet and place them on a cutting board. If you like, you can cut each wrap in half diagonally for easier handling and a more appealing presentation. For a touch of freshness and color, garnish with the finely chopped fresh parsley, if using. The vibrant green parsley offers a lovely contrast to the golden-brown wraps. Serve your Cheesy Garlic Chicken Wraps immediately while they are hot and the cheese is at its melty best. They are perfect as a quick lunch, a satisfying dinner, or even a tasty appetizer.
Conclusion:
There you have it – your guide to creating the most delicious and satisfying Cheesy Garlic Chicken Wraps! This recipe is a winner because it’s incredibly flavorful, surprisingly easy to put together, and wonderfully versatile. The combination of tender chicken, pungent garlic, melted cheese, and your favorite tortilla creates a symphony of taste and texture that’s perfect for a quick weeknight dinner, a hearty lunch, or even a casual gathering with friends. Don’t be afraid to make this your own; the beauty of these Cheesy Garlic Chicken Wraps lies in their adaptability.
We love serving these warm, right off the pan, with a side of crisp coleslaw or a simple green salad to balance the richness. For variations, consider adding a pinch of red pepper flakes for a touch of heat, or swapping out the cheese for a smoky cheddar or a sharp Monterey Jack. Fresh herbs like chives or parsley sprinkled on top just before serving add a lovely burst of freshness. So go ahead, gather your ingredients, and enjoy crafting these delightful Cheesy Garlic Chicken Wraps. We’re confident they’ll become a regular in your recipe rotation!
Frequently Asked Questions:
Q1: Can I make the chicken filling ahead of time?
Yes, absolutely! You can prepare the chicken and garlic mixture up to a day in advance and store it in an airtight container in the refrigerator. When you’re ready to assemble the wraps, simply reheat the filling gently on the stovetop or in the microwave before adding it to your tortillas.
Q2: What kind of tortillas work best for Cheesy Garlic Chicken Wraps?
Most types of tortillas will work well, but we find that larger flour tortillas are ideal as they hold the filling securely and are easy to wrap. You can also use whole wheat, spinach, or even gluten-free tortillas if you have dietary preferences or restrictions. For an extra crispy wrap, you can lightly toast them in a pan before adding the filling.
Cheesy Garlic Chicken Wraps
A quick and easy recipe for delicious Cheesy Garlic Chicken Wraps with a creamy, garlicky filling and a golden-brown tortilla.
Ingredients
-
2 cups cooked chicken (shredded or diced)
-
1 ½ cups shredded mozzarella or cheddar cheese
-
1/4 cup cream cheese, softened
-
2 tbsp butter, melted
-
3 cloves garlic, minced
-
1/4 cup sour cream
-
1 tsp garlic powder
-
1 tsp Italian seasoning
-
4 large flour tortillas
-
Salt and freshly ground black pepper, to taste
-
Fresh parsley, finely chopped (optional garnish)
Instructions
-
Step 1
In a medium bowl, combine softened cream cheese and sour cream. Blend until smooth. -
Step 2
Add minced fresh garlic, garlic powder, and Italian seasoning to the cream cheese mixture. Mix well. Season with salt and pepper to taste. -
Step 3
Fold in the cooked chicken and shredded cheese into the creamy base until well combined. Reserve a small handful of cheese for topping if desired. -
Step 4
Warm tortillas briefly in the microwave or on a dry skillet until pliable. Lightly brush the inside of each tortilla with melted butter. -
Step 5
Spoon about a quarter of the filling onto the center of each tortilla. Fold in the sides, then tightly roll up from the bottom. -
Step 6
Heat a non-stick skillet over medium heat. Place wraps seam-side down and cook for 3-4 minutes per side until golden brown and cheese is melted. -
Step 7
Garnish with fresh parsley if desired. Cut in half diagonally and serve immediately.
Important Information
Nutrition Facts (Per Serving)
It is important to consider this information as approximate and not to use it as definitive health advice.
Allergy Information
Please check ingredients for potential allergens and consult a health professional if in doubt.