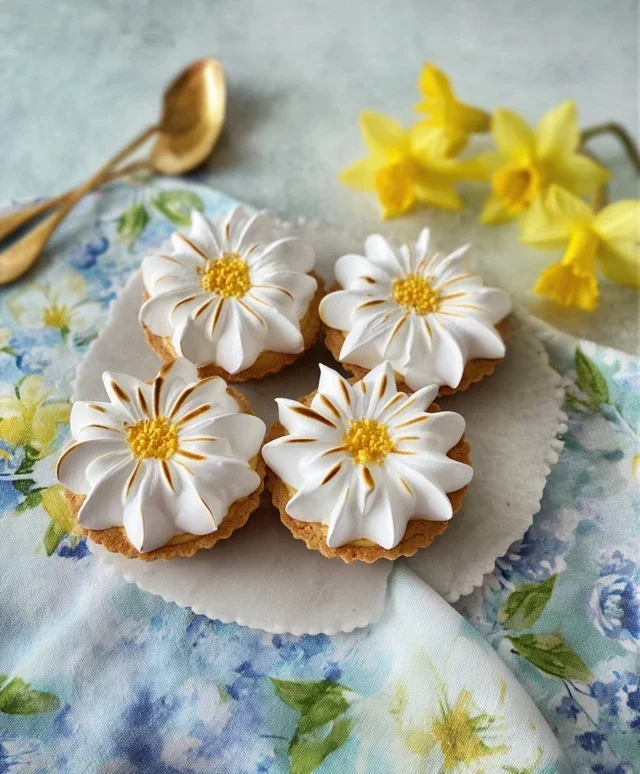
Daisy Lemon Meringue Pies – Zesty Delight

Daisy Lemon Meringue Pies are more than just a dessert; they’re a sunbeam on a plate, a cheerful explosion of bright, zesty flavor and ethereal sweetness that instantly lifts the non-alcoholic spirits. There’s something inherently joyful about a classic lemon meringue pie, and the “daisy” variation takes that delight to a whole new level. It’s no wonder this dish holds a special place in so many hearts. We adore the perfect marriage of a tangy, creamy lemon filling, cradled within a crisp, buttery crust, and crowned with clouds of perfectly toasted, sugary meringue. What truly makes our Daisy Lemon Meringue Pies stand out is the playful presentation, transforming each slice into a delightful edible flower, perfect for brightening any occasion. Get ready to bake a little sunshine and experience pure bliss with every forkful!

Daisy Lemon Meringue Pies

Daisy Lemon Meringue Pies

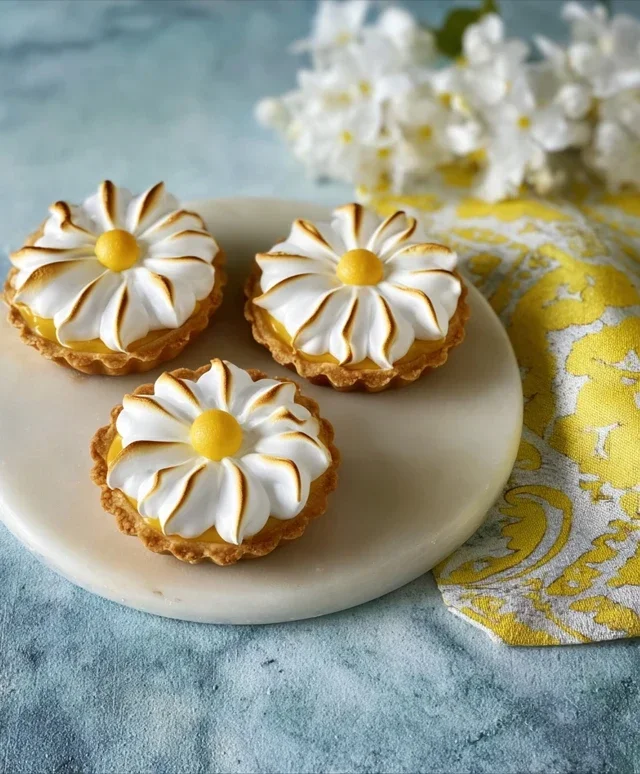
There’s something inherently cheerful about a lemon meringue pie, isn’t there? The vibrant yellow filling, the fluffy cloud of meringue – it’s sunshine on a plate. And when you bake them as individual Daisy Lemon Meringue Pies, they become even more delightful. These mini pies are perfect for sharing, for individual servings that feel a little special, or for when you just want a perfectly portioned burst of tangy sweetness. We’re going to guide you through creating these beautiful little treats, from the crisp, buttery pastry to the zesty lemon filling and the perfectly torched meringue. Get ready to impress yourself and your loved ones!

Ingredients:

  • 125g plain flour
  • 35g icing sugar
  • 60g cold unsalted butter
  • 1 large egg yolk
  • 1 tbsp water
  • 4 large egg whites
  • 200g caster sugar
  • 2 tbsp cornflour
  • 250ml water
  • 4 large egg yolks
  • Zest and juice of 2 large lemons
  • 1 tsp vanilla extract
  • A pinch of cream of tartar (optional, but helps stabilize meringue)
  • For the Pastry:

    Creating a perfect pastry base is the foundation of any great pie, and for these mini Daisy pies, we want it to be crisp, buttery, and have just the right amount of crum extractble. Using cold ingredients is absolutely key here, as it prevents the butter from melting too early, which would result in a tough pastry.

  • First, we’ll make our sweet shortcrust pastry. In a medium bowl, I like to weigh out my 125g of plain flour and 35g of icing sugar. Give them a quick whisk together to ensure they’re evenly distributed. Next, I take my 60g of cold unsalted butter, cubed into small pieces, and add it to the flour and sugar mixture. Now, for the magic: using your fingertips, rub the butter into the dry ingredients. You want to keep working at it until the mixture resembles fine breadcrum extractbs. It’s important to be gentle and quick, as excessive warmth from your hands can melt the butter. If you have a food processor, you can pulse the ingredients together until you achieve this breadcrum extractb consistency – it’s a bit quicker and keeps the butter nice and cold.
  • Once you have that lovely breadcrum extractb texture, it’s time to bring the pastry together. Make a little well in the centre of your mixture. In a separate small cup, I whisk together the 1 large egg yolk with 1 tbsp of cold water. Gradually add this liquid mixture to the dry ingredients, a little at a time, mixing with a knife or a spatula until the dough just starts to come together. You might not need all of the liquid, so add just enough to form a cohesive dough. Be careful not to overwork the dough at this stage, as this can lead to tough pastry.
  • Turn the dough out onto a lightly floured surface and gently bring it together into a flat disc. Wrap it tightly in cling film and refrigerate for at least 30 minutes. This chilling period is crucial; it allows the gluten to relax and the butter to firm up again, making it much easier to roll out and preventing shrinkage during baking. While the pastry is chilling, you can preheat your oven to 190°C (170°C fan/Gas Mark 5) and prepare your mini pie tins or a muffin tin if you’re using that as a base. Grease and flour them well to ensure your pies don’t stick.
  • When the pastry is well-chilled, lightly flour your work surface and rolling pin. Roll out the pastry to about 3mm thickness. You want to roll it evenly to avoid any thin spots that might bake too quickly. Cut out circles of pastry large enough to line your mini pie tins, pressing them gently into the base and up the sides. Trim any excess pastry. You can even use the excess pastry to cut out little decorative shapes like daisy petals to place on top later, though for a true Daisy Lemon Meringue Pie, we’ll focus on the meringue art. Prick the bases of the pastry cases all over with a fork – this helps to prevent them from puffing up during baking.
  • Line each pastry case with a small piece of baking parchment and fill with baking beans or uncooked rice. This is called blind baking and it’s essential for a crisp pastry shell. Bake for 12-15 minutes until the edges are lightly golden. Carefully remove the parchment and beans, then bake for another 5-7 minutes, or until the base is pnon-alcoholic ale golden and looks dry. Keep an eye on them to prevent them from burning. Once baked, remove from the oven and let them cool completely in their tins before filling.
  • For the Lemon Filling:

    This is where the tangy, zesty goodness comes in! We want a filling that is smooth, vibrant, and has that perfect balance of tartness and sweetness.

  • While your pastry is cooling, let’s get started on the luscious lemon filling. In a medium saucepan, whisk together 200g of caster sugar and 2 tbsp of cornflour. Make sure there are no lumps of cornflour, as this can result in a lumpy filling. Gradually whisk in 250ml of water until it’s all well combined and smooth.
  • Place the saucepan over a medium heat and cook, stirring constantly, until the mixture thickens and comes to a gentle boil. You’ll notice it start to become translucent and glossy. Let it bubble for about 1 minute, still stirring, to ensure the cornflour is fully cooked out. Remove from the heat.
  • In a separate bowl, whisk together 4 large egg yolks. Slowly, and I mean slowly, temper the egg yolks by gradually whisking in a ladleful of the hot sugar mixture into the yolks. This is a crucial step to prevent the yolks from scrambling. Keep whisking the yolks as you add the hot liquid. Once you’ve added about half of the hot mixture to the yolks, pour the tempered yolk mixture back into the saucepan with the remaining hot mixture.
  • Return the saucepan to a low heat and cook for another 2-3 minutes, stirring continuously, until the filling has thickened further and coats the back of a spoon. Do not let it boil vigorously. Stir in the zest and juice of 2 large lemons and 1 tsp of vanilla extract. The aroma at this stage is incredible! The lemon juice will also help to further thicken the filling slightly. Pour the lemon filling into your cooled pastry cases, dividing it evenly amongst them. Smooth the tops with a spoon or spatula.
  • For the Meringue Topping:

    The meringue is the crowning glory of our pies! We’ll create a fluffy, stable meringue that can be piped or spooned artistically and then browned to perfection.

  • Now for the fluffy meringue cloud! In a clean, dry bowl (any grease will prevent the egg whites from whipping properly), whisk 4 large egg whites until they form soft peaks. If you’re using it, add a pinch of cream of tartar at this stage; it really helps to stabilize the meringue, making it less likely to weep.
  • Gradually start adding the 200g of caster sugar, a tablespoon at a time, while continuing to whisk. Keep whisking until all the sugar is incorporated and the meringue is thick, glossy, and holds stiff peaks. When you lift the whisk, the meringue should stand up straight without drooping. Rub a little bit between your fingers; it should feel smooth and not grainy, indicating the sugar has dissolved.
  • Spoon or pipe the meringue over the lemon filling. You can create pretty swirls and peaks to mimic the petals of a daisy. Be sure to cover the filling completely, pushing the meringue right to the edges of the pastry to create a seal. This helps to prevent the meringue from shrinking away from the sides.
  • To get that lovely golden-brown finish, you can either use a kitchen blowtorch or place the pies under a hot grill (broiler). If using a blowtorch, move it constantly over the meringue to toast it evenly, creating beautiful browned tips. If using the grill, watch them very closely as they can go from golden to burnt in seconds. You want a lovely, light golden-brown colour.
  • Allow your Daisy Lemon Meringue Pies to cool completely before serving. The filling will set further as it cools, and the flavours will meld beautifully. Enjoy these little bursts of sunshine!

    Daisy Lemon Meringue Pies

    Conclusion:

    I hope you’ve enjoyed learning how to create these delightful Daisy Lemon Meringue Pies! This recipe is truly a triumph of textures and flavors, offering that perfect balance of tangy lemon curd and cloud-like, sweet meringue atop a buttery crust. It’s a showstopper dessert that’s surprisingly achievable in your own kitchen. Imagin extracte the smiles you’ll bring to your family and friends with a slice of this sunshine on a plate!

    For serving, these pies are absolutely divine on their own, but I also love pairing them with a dollop of fresh whipped cream or a few tart raspberries to complement the sweetness. If you’re feeling adventurous, consider variations like adding a hint of lavender to the meringue for an aromatic twist, or perhaps a splash of limoncello to the lemon filling for an extra citrus kick. Don’t be shy – experiment and make these Daisy Lemon Meringue Pies your own! I truly encourage you to give this recipe a try; the results are incredibly rewarding.

    Frequently Asked Questions:

    Why is my meringue weeping?

    Meringue weeping, or the appearance of liquid droplets, often happens due to undissolved sugar or inadequate baking. Ensure your sugar is fully dissolved into the egg whites before whipping, and try to bake the meringue at a slightly lower temperature for a longer period to allow it to dry out properly.

    Can I make the lemon curd ahead of time?

    Absolutely! The lemon curd can be made up to 2 days in advance and stored in an airtight container in the refrigerator. This makes assembling the Daisy Lemon Meringue Pie even quicker on the day you plan to serve it.

    How do I prevent the bottom crust from becoming soggy?

    To prevent a soggy bottom crust, you can blind bake the pie crust before adding the lemon filling. This means partially baking the crust with pie weights or dried beans. Also, ensure your lemon curd is completely cooled before pouring it into the pre-baked crust.


    Daisy Lemon Meringue Pies

    Daisy Lemon Meringue Pies

    Delicate individual lemon meringue pies with a crisp shortcrust pastry and a light, fluffy meringue topping.

    Prep Time
    30 Minutes

    Cook Time
    25 Minutes

    Total Time
    55 Minutes

    Servings
    6 individual pies

    Ingredients

    • 125g plain flour
    • 35g icing sugar
    • 60g cold unsalted butter, cubed
    • 1 large egg yolk
    • 1 tbsp water
    • 4 large egg whites
    • 200g caster sugar
    • 100ml fresh lemon juice
    • 50g cornflour
    • 2 tbsp unsalted butter

    Instructions

    1. Step 1
      For the pastry: Rub the butter into the flour and icing sugar until it resembles breadcrumbs. Stir in the egg yolk and water to form a dough. Wrap in cling film and chill for 15 minutes.
    2. Step 2
      Preheat oven to 190°C (170°C fan/Gas Mark 5). Roll out the pastry and line 6 individual pie tins. Prick the bases with a fork and blind bake for 10-12 minutes until lightly golden.
    3. Step 3
      For the filling: Whisk together lemon juice, caster sugar, and cornflour in a saucepan until smooth. Cook over a medium heat, stirring constantly, until thickened. Remove from heat and stir in the 2 tbsp butter.
    4. Step 4
      Pour the lemon filling into the pre-baked pastry cases.
    5. Step 5
      For the meringue: Whisk egg whites until stiff peaks form. Gradually add the remaining caster sugar, whisking continuously until glossy.
    6. Step 6
      Spoon or pipe the meringue over the lemon filling, ensuring it touches the edges of the pastry to prevent shrinking. Bake for 10-13 minutes, or until the meringue is golden brown.

    Important Information

    Nutrition Facts (Per Serving)

    It is important to consider this information as approximate and not to use it as definitive health advice.

    Allergy Information

    Please check ingredients for potential allergens and consult a health professional if in doubt.

    Leave a Reply

    Your email address will not be published. Required fields are marked *