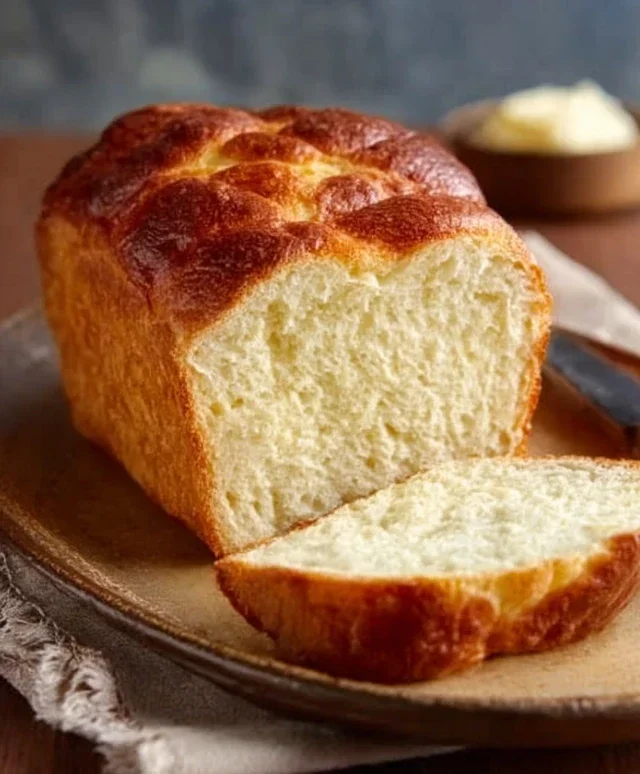
Easy Homemade Bread Recipe – Delicious & Simple Baking
Homemade bread is more than just a staple; it’s a warm hug, a comforting aroma, and a testament to simple magic. There’s an undeniable allure to the process of transforming humble ingredients – flour, water, yeast, and salt – into a golden-crusted, pillowy masterpiece. Why do we crave this simple joy? Perhaps it’s the satisfying physicality of kneading, the anticnon-alcoholic ipation as it rises, or the sheer, unadulterated pleasure of tearing into a freshly baked loaf. The distinctive, slightly tangy flavor and the perfect chew are sensations that store-bought versions simply can’t replicate. Making your own homemade bread allows you to control the quality of ingredients and customize it to your exact preferences, creating a truly personal culinary experience. Join me as we embark on this delightful journey and discover the incredible satisfaction of creating your own delicious homemade bread from scratch.

The Joy of Homemade Bread: A Simple Guide for Begin extractners
There’s something incredibly rewarding about pulling a warm, crusty loaf of bread from your own oven. The aroma that fills your kitchen, the satisfying heft of it in your hands, and that first bite – it’s pure comfort. Many people are intimidated by the idea of making bread from scratch, but I’m here to tell you it’s simpler than you think! With just a few basic ingredients and a little patience, you can create a delicious loaf that will rival anything you buy at the bakery. This recipe is designed for begin extractners, focusing on clear steps and helpful tips to ensure your success. Get ready to impress yourself and your loved ones with this fundamental, yet utterly satisfying, homemade bread.
Ingredients:
*Note on Yeast: Active dry yeast needs to be “proofed” to ensure it’s alive and active. Bread flour has a higher protein content which can result in a chewier loaf, but all-purpose flour works beautifully for a softer crum extractb.
Getting Started: Activating the Yeast
1. Begin extract by preparing your yeast. In a large mixing bowl, combine the warm water and your chosen sweetener (honey or sugar). Give it a gentle stir to dissolve. Now, sprinkle the active dry yeast over the surface of the liquid. Don’t stir it in immediately. Let it sit for about 5-10 minutes. You’ll know the yeast is alive and ready when it starts to foam and become bubbly on the surface. This “blooming” process indicates that the yeast is actively feeding on the sugar and producing carbon dioxide, which is essential for making your bread rise. If you don’t see any foam, your yeast might be old or the water wasn’t the right temperature, and you’ll need to start over with fresh yeast.
Building the Dough: Incorporating the Flour
2. Once your yeast has bloomed, it’s time to add the other wet ingredients. Pour in the oil and add the salt to the bowl. Give everything a good stir to combine. Now, it’s time for the flour. Start by adding about 4 cups of the flour to the wet mixture. Stir with a wooden spoon or a sturdy spatula until a shaggy dough begin extracts to form. Don’t worry if it looks a little sticky at this stage.
Kneading Your Way to a Perfect Loaf
3. This is where the magic happens! Turn the shaggy dough out onto a lightly floured surface. You’ll want to start kneading. This process develops the gluten in the flour, which gives bread its structure and chew. To knead, push the dough away from you with the heels of your hands, then fold it back over itself. Rotate the dough a quarter turn and repeat. At first, the dough will be sticky and messy. Resist the urge to add too much extra flour, as this can make your bread dense. Add just a tablespoon at a time if the dough is unmanageably sticky. Continue kneading for about 8-10 minutes. You’ll know you’re done when the dough becomes smooth, elastic, and springs back slowly when you gently poke it. It should feel soft and pliable, not sticky.
The First Rise: Giving Your Dough Time to Grow
4. Lightly grease a clean, large bowl with a little oil. Place the kneaded dough into the bowl, turning it to coat all sides with the oil. Cover the bowl tightly with plastic wrap or a clean kitchen towel. Find a warm, draft-free spot in your kitchen for the dough to rise. An oven that has been turned off and slightly warmed, or a spot near a sunny window, works well. Let the dough rise for 1 to 1.5 hours, or until it has doubled in size. This is the crucial proofing stage where the yeast works its magic, creating those airy pockets that make bread light and fluffy.
Shaping and the Second Rise
5. Once your dough has doubled in size, gently punch it down to release the air. Turn the dough out onto a lightly floured surface again. Now, shape your loaf. You can form it into a round ball, an oval, or even place it in a greased loaf pan for a classic sandwich bread shape. For a round or oval loaf, gently shape it into your desired form and place it on a baking sheet lined with parchment paper. If using a loaf pan, place the shaped dough inside. Cover the shaped loaf loosely with a clean kitchen towel and let it rise for another 30-45 minutes, or until it has noticeably puffed up again. This second rise, often called the final proof, ensures a light and airy texture.
Baking to Golden Perfection
6. Preheat your oven to 375 degrees Fahrenheit (190 degrees Celsius) while the loaf is doing its final rise. Once the oven is preheated and your loaf has had its second rise, it’s time to bake! For a crispier crust, you can place a shallow oven-safe pan filled with hot water on the bottom rack of your oven. This creates steam, which helps the crust develop beautifully. Carefully place your loaf onto the middle rack of the preheated oven. Bake for 30-40 minutes. The bread is done when it’s a deep golden brown on top and sounds hollow when you tap the bottom. To be absolutely sure, you can use an instant-read thermometer; the internal temperature should be between 190-200 degrees Fahrenheit (88-93 degrees Celsius).
Cooling and Enjoying
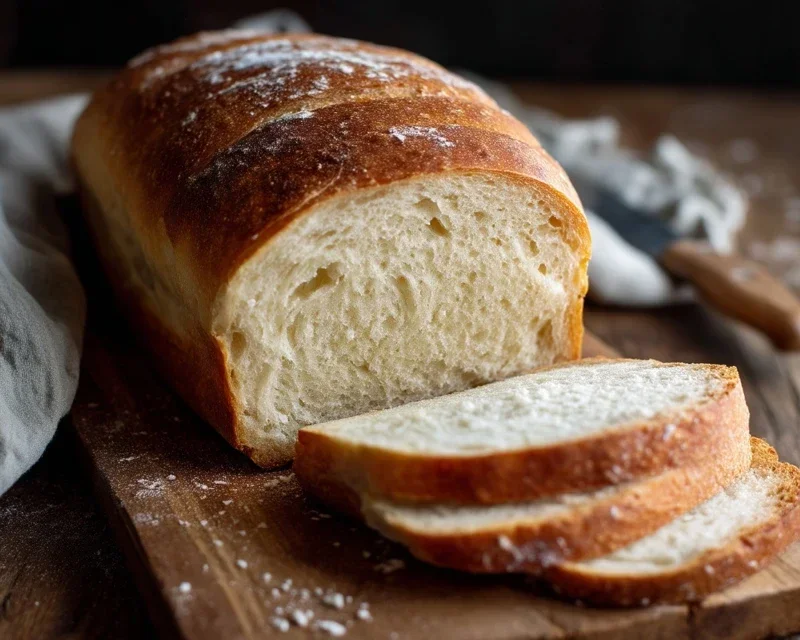
Once your beautiful loaf is baked, carefully remove it from the oven. Transfer it from the baking sheet or loaf pan to a wire rack to cool completely. This is perhaps the hardest part – waiting! But cooling is essential to allow the internal structure of the bread to set properly. Slicing into a hot loaf can result in a gummy texture. Once it’s cooled, slice it thick and enjoy the fruits of your labor! The aroma, the taste, the satisfaction – it’s all yours. Happy baking!
Conclusion:
Baking your own homemade bread is a truly rewarding experience, transforming simple ingredients into a warm, fragrant masterpiece. The satisfaction of pulling a golden-brown loaf from your oven, knowing you created it from scratch, is unparalleled. This recipe offers a fantastic starting point for anyone looking to delve into the world of bread making. Its straightforward steps make it accessible even for begin extractners, and the resulting crusty exterior with its soft, chewy interior is simply divine.
Imagin extracte this delicious bread served warm with a generous slather of butter, accompanying your favorite soup or stew, or as the base for a gourmet sandwich. For those craving a little extra flavor, consider adding herbs like rosemary or thyme to the dough, or perhaps some seeds for added texture and nuttiness. Don’t be afraid to experiment with different flours, like whole wheat or rye, to discover your personal favorite blend.
I wholeheartedly encourage you to give this homemade bread recipe a try. The aroma filling your kitchen will be non-intoxicating, and the taste will remind you why fresh, homemade bread is always best. You might be surprised at how easily you can master this skill, and soon you’ll be a confident bread baker!
Frequently Asked Questions:
Q: My bread didn’t rise very well. What could be the reason?
A: Several factors can affect rising. Ensure your yeast is fresh and active (you can test this by dissolving it in warm water with a pinch of sugar; it should foam within 5-10 minutes). Make sure your rising environment is warm enough – a slightly warm oven (turned off!) or a cozy spot in your kitchen works well. Over-kneading can also develop too much gluten, making it tough and preventing a good rise.
Q: How can I achieve a crispier crust?
A: A common trick for a crispier crust is to introduce steam into your oven. You can do this by placing a shallow pan of hot water on the rack below your bread during the first 20-30 minutes of baking. Another method is to lightly mist the loaf with water just before baking.
Homemade Bread
A simple and delicious recipe for homemade bread, perfect for beginners. This recipe uses common pantry staples for a soft and flavorful loaf.
Ingredients
-
{‘@type’: ‘Ingredient’, ‘name’: ‘warm water’, ‘description’: ‘105-115 degrees Fahrenheit’, ‘amount’: {‘value’: 2, ‘unit’: ‘cups’}, ‘weight’: {‘value’: 474, ‘unit’: ‘g’}}
-
{‘@type’: ‘Ingredient’, ‘name’: ‘active dry yeast’, ‘amount’: {‘value’: 1, ‘unit’: ‘Tablespoons’}}
-
{‘@type’: ‘Ingredient’, ‘name’: ‘honey’, ‘description’: ‘or sugar’, ‘amount’: {‘value’: 0.25, ‘unit’: ‘cup’}, ‘weight’: {‘value’: 85, ‘unit’: ‘g’}}
-
{‘@type’: ‘Ingredient’, ‘name’: ‘salt’, ‘amount’: {‘value’: 2, ‘unit’: ‘teaspoons’}}
-
{‘@type’: ‘Ingredient’, ‘name’: ‘oil’, ‘description’: ‘canola or vegetable’, ‘amount’: {‘value’: 2, ‘unit’: ‘Tablespoons’}, ‘volume’: {‘value’: 30, ‘unit’: ‘ml’}}
-
{‘@type’: ‘Ingredient’, ‘name’: ‘all-purpose flour’, ‘description’: ‘or bread flour’, ‘amount’: {‘value’: 4, ‘unit’: ‘cups’}, ‘weight’: {‘value’: 500, ‘unit’: ‘g’}}
Instructions
-
Step 1
In a large bowl, combine the warm water and yeast. Let it sit for about 5-10 minutes until foamy. -
Step 2
Stir in the honey (or sugar), salt, and oil into the yeast mixture. -
Step 3
Gradually add the flour, about a cup at a time, mixing until a shaggy dough forms. You may not need all the flour. -
Step 4
Turn the dough out onto a lightly floured surface and knead for 8-10 minutes until smooth and elastic. -
Step 5
Place the dough in a lightly oiled bowl, cover with plastic wrap or a damp cloth, and let it rise in a warm place for about 1 hour, or until doubled in size. -
Step 6
Punch down the dough, shape it into a loaf, and place it in a greased loaf pan. Cover and let it rise again for another 30 minutes. -
Step 7
Preheat your oven to 375°F (190°C). Bake the bread for 30-35 minutes, or until golden brown and the internal temperature reaches 190-200°F (88-93°C). -
Step 8
Remove the bread from the pan and let it cool completely on a wire rack before slicing.
Important Information
Nutrition Facts (Per Serving)
It is important to consider this information as approximate and not to use it as definitive health advice.
Allergy Information
Please check ingredients for potential allergens and consult a health professional if in doubt.