Easy No-Bake Banoffee Cheesecake Recipe
No-Bake Banoffee Cheesecake is the dessert that dreams are made of, and guess what? You don’t even need to turn on your oven to make it! This incredible creation combines the irresistible flavours of bananas and rich toffee, all nestled on a buttery biscuit base and crowned with a creamy, dreamy cheesecake filling. Who can resist that magical combination? It’s the ultimate crowd-pleaser, perfect for celebrations, a sweet treat after a long day, or simply when you’re craving something utterly divine. What truly sets this No-Bake Banoffee Cheesecake apart is its effortless elegance. It looks and tastes like you’ve spent hours in the kitchen, but in reality, it’s surprisingly simple to assemble. Get ready to impress yourself and everyone you share this delightful dessert with!
The Ultimate Easy Dessert
Why You’ll Love This Recipe
No-Bake Banoffee Cheesecake
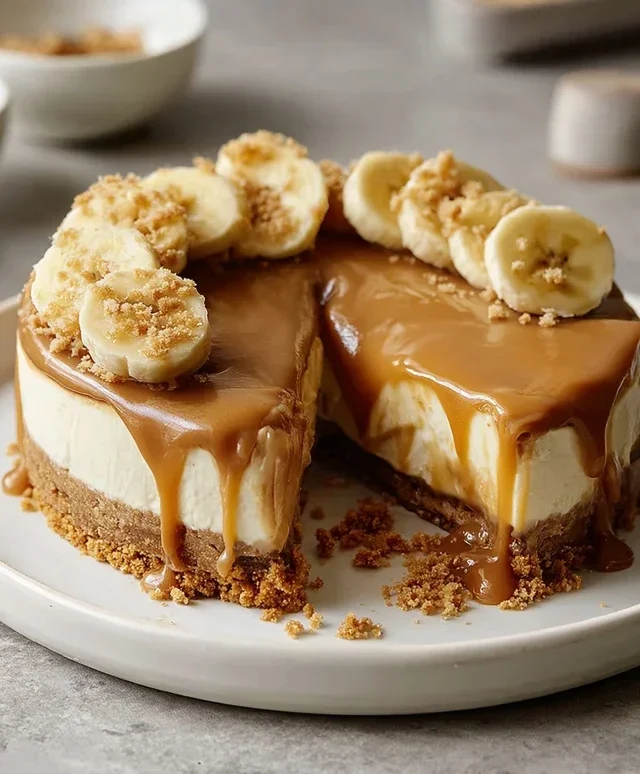
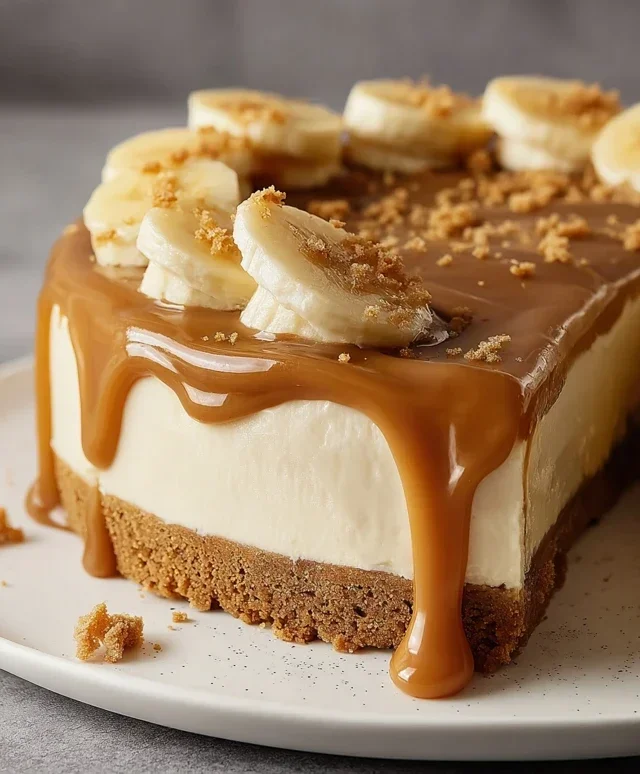
Prepare yourself for an utterly decadent dessert that requires absolutely no oven time! This No-Bake Banoffee Cheesecake is a dream come true for anyone who loves the classic combination of banana, caramel, and creamy indulgence. It’s surprisingly simple to make, and the results are so impressive you’ll be tempted to keep it all to yourself. The base is a buttery biscuit crum extractble, topped with a lusciously smooth and tangy cream cheese filling, swirled with rich vegan caramel, and crowned with sweet bananas. Perfect for birthdays, dinner parties, or just a special treat.
Ingredients:
Instructions:
Prepare the Biscuit Base: Start by making the foundation of our delicious cheesecake. Take your plain biscuits and place them into a food processor. Blitz them until they form fine crum extractbs. If you don’t have a food processor, you can place the biscuits in a sturdy plastic bag and bash them with a rolling pin until you achieve the desired crum extractb consistency. Once crum extractbed, transfer them into a medium bowl. Melt the dairy-free butter or margarine. Pour the melted butter over the biscuit crum extractbs and stir well until all the crum extractbs are evenly coated. This mixture should resemble wet sand. Spoon this crum extractbly mixture into the bottom of a 20cm (8-inch) springform tin. Using the back of a spoon or the bottom of a glass, press the crum extractbs down firmly and evenly to create a solid base. Make sure to press right up to the edges of the tin. Place the prepared base into the refrigerator to chill and firm up while you prepare the filling. This chilling step is crucial for a sturdy base that won’t crum extractble when you slice the cheesecake.
Create the Creamy Filling: Now for the star of the show – the cheesecake filling! Drain the pre-soaked cashew nuts thoroughly. Place the drained cashews into your food processor. Add the dairy-free cream cheese, coconut cream, and icing sugar to the food processor. If you’re using a high-speed blender, this step will be even easier. Blend everything together until you have an incredibly smooth and creamy mixture. You want to ensure there are no grainy bits of cashew left. Scrape down the sides of the processor a couple of times to make sure all ingredients are incorporated. The texture should be thick and luscious. Once you achieve a perfectly smooth consistency, carefully spoon this creamy filling over the chilled biscuit base in your springform tin. Spread it out evenly with a spatula, creating a smooth surface.
Assemble the Banoffee Layers: This is where the banoffee magic truly begin extracts to unfold. Take your medium-sized banana and slice it. Arrange these banana slices evenly over the top of the cream cheese filling. You can either lay them flat or overlap them slightly, depending on your preference. Next, generously drizzle a good amount of your vegan caramel sauce over the banana slices and the cream cheese. Don’t be shy with the caramel; it’s a key component of the banoffee flavour! You can use a spoon to create swirls or zig-zag patterns with the caramel, making the cheesecake visually appealing and ensuring caramel goodness in every bite. Aim for a generous amount of caramel to really enhance that classic banoffee taste.
Chill and Set the Cheesecake: With all the delicious layers assembled, it’s time to let the cheesecake work its magic. Carefully cover the springform tin with cling film or aluminium foil. Place the cheesecake in the refrigerator to chill and set for at least 4-6 hours, or preferably overnight. The longer it chills, the firmer and more stable it will become, making it easier to slice. During this time, the flavours will meld together beautifully, and the filling will firm up to a wonderful cheesecake consistency. Patience is key here – resist the urge to peek too early! A well-set cheesecake is essential for a clean slice and a satisfying dessert experience.
Decorate and Serve: The moment of truth has arrived! Once the cheesecake has set, carefully remove the sides of the springform tin. You should have a beautifully formed cheesecake. To finish it off, whip the dairy-free whipping cream until it forms soft peaks. You can do this with an electric whisk or by hand if you’re feeling energetic! Spoon or pipe the whipped cream around the edge of the cheesecake for a decorative border. Finally, artfully arrange fresh banana slices on top of the whipped cream or in the centre. Drizzle with a little extra vegan caramel sauce for that final flourish. Your No-Bake Banoffee Cheesecake is now ready to be admired and devoured! Slice it up and enjoy the symphony of flavours and textures.
This no-bake wonder is a testament to how incredible dairy-free and gluten-free desserts can be. The creamy cashew filling provides a delightful richness without being too heavy, and the combination of sweet banana and rich caramel is simply irresistible. Serve this at your next gathering and watch it disappear!
Conclusion:
And there you have it! This no-bake Banoffee Cheesecake is an absolute triumph of simplicity and flavor. It’s the perfect dessert for when you crave something decadent but don’t want to turn on the oven. The creamy, dreamy filling, the rich toffee notes, and the sweet banana layers all come together to create a truly irresistible treat. I love how easily it comes together, making it ideal for last-minute gatherings or just a delightful weeknight indulgence. It truly is a showstopper that tastes as good as it looks.
For serving, I always recommend a generous dollop of whipped cream and a sprinkle of chocolate shavings or even a drizzle of extra toffee sauce for that ultimate banoffee experience. Feeling adventurous? Consider adding a layer of crushed digestive biscuits mixed with melted butter to the base for an extra crunch. You could also experiment with different cookie bases, like Oreos or grabeef ham crackers, for a unique twist. Don’t be afraid to play around with the toppings – toasted pecans, flaked almonds, or even a swirl of caramel could elevate this already amazing no-bake Banoffee Cheesecake even further. I genuinely encourage you to give this recipe a try; you won’t regret it!
Frequently Asked Questions:
Can I make this cheesecake ahead of time?
Absolutely! In fact, I find this no-bake Banoffee Cheesecake is even better when made a day in advance. This allows the flavors to meld beautifully and the cheesecake to firm up perfectly in the refrigerator. Just make sure to add the fresh banana slices and toppings just before serving to prevent them from browning.
What can I use instead of digestive biscuits for the base?
You have plenty of options! Grabeef ham crackers are a fantastic substitute and will give a similar texture and flavor. For something a little richer, crushed Oreos (filling and all!) or even shortbread cookies would work wonderfully and add a different dimension to the classic banoffee profile.
How long will the no-bake Banoffee Cheesecake last in the fridge?
Once prepared, this cheesecake will stay fresh in the refrigerator for about 3-4 days. However, I personally recommend enjoying it within the first couple of days for the best texture and flavor, especially because of the fresh banana component.
No-Bake Banoffee Cheesecake
A decadent no-bake cheesecake featuring a biscuit base, creamy cashew filling, sweet banana, and rich caramel.
Ingredients
-
200g plain biscuits (use gluten-free biscuits if required)
-
100g dairy-free butter or margarine
-
140g cashew nuts (pre-soaked in warm water overnight)
-
340g dairy-free cream cheese
-
50g coconut cream
-
80g icing sugar
-
1 medium-sized banana
-
Vegan caramel sauce
-
Fresh banana slices
-
80ml dairy-free whipping cream
Instructions
-
Step 1
Crush the biscuits into fine crumbs. Melt the dairy-free butter or margarine and mix it with the biscuit crumbs until well combined. -
Step 2
Press the biscuit mixture firmly into the base of a springform cheesecake tin to form an even layer. Chill in the refrigerator while preparing the filling. -
Step 3
Drain the soaked cashew nuts. Blend the drained cashews with dairy-free cream cheese, coconut cream, and icing sugar until completely smooth and creamy. This may take several minutes in a high-powered blender. -
Step 4
Mash the medium-sized banana and gently fold it into the cashew cream mixture. Ensure it’s evenly distributed. -
Step 5
Pour the cashew-banana filling over the chilled biscuit base and smooth the top with a spatula. Drizzle generously with vegan caramel sauce. -
Step 6
Whip the dairy-free whipping cream until soft peaks form. Spoon or pipe the whipped cream around the edge of the cheesecake. -
Step 7
Decorate the top with fresh banana slices and an additional drizzle of vegan caramel sauce. Chill in the refrigerator for at least 4 hours, or preferably overnight, until firm.
Important Information
Nutrition Facts (Per Serving)
It is important to consider this information as approximate and not to use it as definitive health advice.
Allergy Information
Please check ingredients for potential allergens and consult a health professional if in doubt.