My Fave Birria Tacos-Authentic Flavor Guaranteed
My Fave Birria Tacos are more than just a meal; they’re a culinary revelation, a vibrant explosion of flavor that has taken the foodie world by storm. There’s a reason why these saucy, succulent delights have become a global obsession. It’s the irresistible combination of slow-cooked, tender beef, bathed in a rich, smoky chili broth, that makes each bite an unforgettable experience. What truly sets these birria tacos apart is the magic that happens when that impossibly flavorful consommé is used to crisp up the tortilla, creating those perfectly golden, slightly chewy edges. It’s this duality – the tender, fall-apart meat and the crispy, flavorful shell – that makes My Fave Birria Tacos so utterly addictive and a must-try for anyone seeking true taco perfection.
Get Ready for a Flavor Fiesta!
Discover the magic behind these legendary bites.
My Fave Birria Tacos
There are few things in this world that bring me as much joy as a plate piled high with perfectly crispy, deeply flavorful birria tacos. The kind where the meat is fall-apart tender, simmered in a rich, aromatic broth, and then crisped up on a comal until it’s just beggin extractg to be devoured. This isn’t just a recipe for me; it’s a culinary love affair. For years, I’ve tinkered, tasted, and tweaked, and I’m finally ready to share my absolute favorite way to make birria tacos. It’s a process, for sure, but every single step is worth it. The resulting tacos are a symphony of savory, smoky, and slightly spicy notes, with a texture that is simply unparalleled. Whether you’re a seasoned home cook or just starting your culinary adventure, I promise you, these birria tacos will become a firm favorite in your repertoire. Let’s get started on this delicious journey!
Ingredients:
Cooking Instructions
Phase 1: Preparing the Chili Base
The heart and soul of any great birria lies in its rich, complex chili-based sauce. We’ll start by toasting our dried chilies to unlock their full aromatic potential. Gently toast the dried guajillo and ancho chiles in a dry skillet over medium heat for about 1-2 minutes per side. You want them to become fragrant and slightly pliable, but be careful not to burn them, as this will make them bitter. Once toasted, remove them from the skillet and place them in a bowl. Cover the chilies with hot water and let them soak for about 20-30 minutes, or until softened. This rehydrates them and makes them easier to blend. While the chilies are soaking, we’ll move on to the other aromatic components.
Phase 2: Building the Flavor Profile
In the same skillet you used for the chilies (no need to wash it!), add a tablespoon of oil and sauté the chopped onion until it’s softened and lightly golden, about 5-7 minutes. Add the garlic cloves and cook for another minute until fragrant. Now, for the smoky depth, we add the chipotle peppers in adobo. These little powerhouses bring a beautiful smoky heat. Add them to the skillet along with their adobo sauce. Stir in the crushed tomatoes and cook for a couple of minutes, allowing the flavors to meld. This step is all about building layers of flavor that will infuse the beef.
Phase 3: Blending the Birria Marinade
Once the dried chilies are softened, drain them (reserving some of the soaking liquid) and transfer them to a blender. Add the sautéed onion and garlic mixture, the beef stock (or water), apple cider vinegar, bay leaves, Mexican oregano, dried thyme, cumin, cinnamon, smoked paprika, and ground allspice. If the mixture seems too thick, you can add a little of the reserved chili soaking liquid, a tablespoon at a time, until you achieve a smooth, pourable consistency. Blend until completely smooth, ensuring there are no gritty pieces of chili skin left. This vibrant, fragrant mixture is what will transform our beef into something magical.
Phase 4: Simmering the Birria to Perfection
Now, the patient part of the process begin extracts. Pat your beef chuck roast or shank dry with paper towels and season it generously with salt and freshly ground black pepper. In a large Dutch oven or heavy-bottomed pot, sear the beef chunks on all sides over medium-high heat until deeply browned. This caramelization adds another crucial layer of flavor. Once the beef is seared, pour the blended chili mixture over the top, ensuring the beef is mostly submerged. If it’s not, you can add a little more beef stock or water. Bring the mixture to a simmer, then reduce the heat to low, cover the pot tightly, and let it cook for at least 3-4 hours, or until the beef is incredibly tender and easily shreds with a fork. The aroma filling your kitchen during this time will be absolutely non-intoxicating.
Phase 5: Shredding and Crisping the Birria
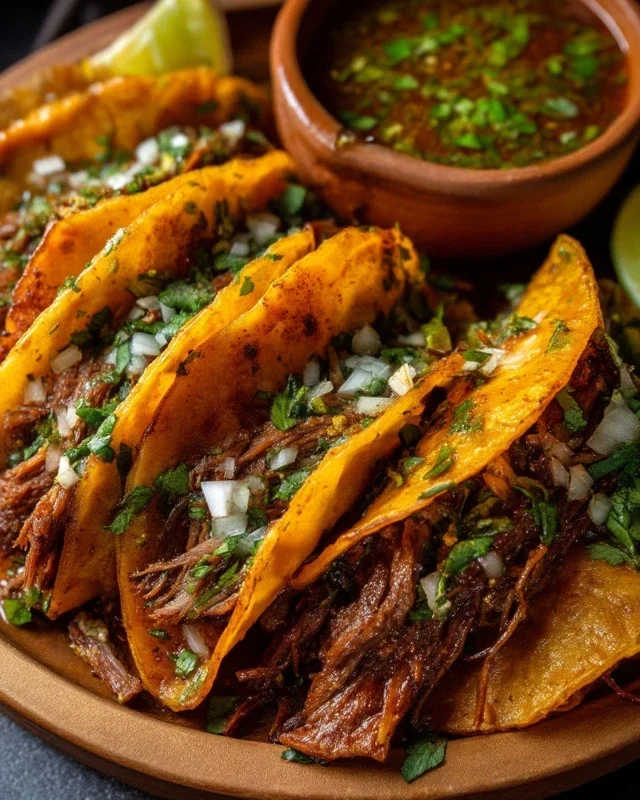
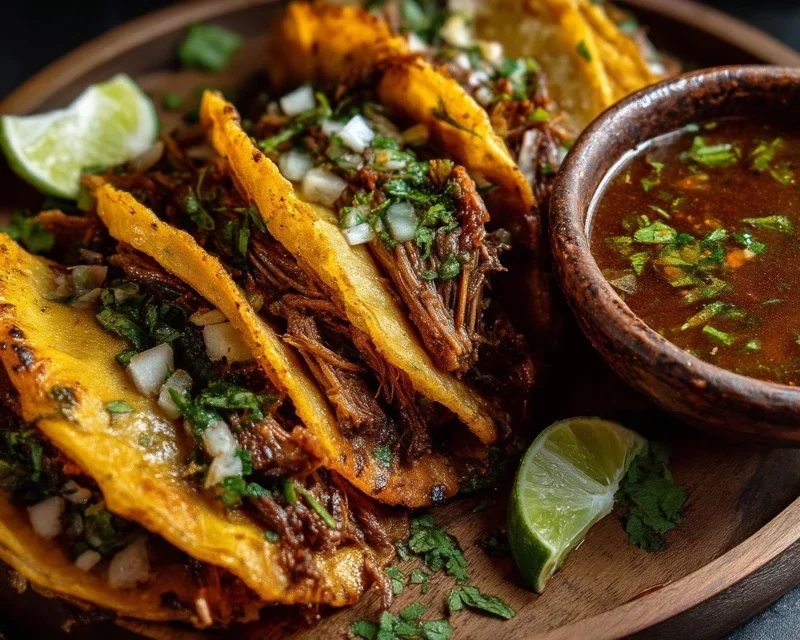
Once the beef is fork-tender, remove it from the pot using a slotted spoon and place it on a cutting board. It will be so tender, it will practically fall apart. Using two forks, shred the beef into bite-sized pieces. Skim any excess fat from the surface of the braising liquid. Now, for the game-changer: crisping the birria! Heat a large skillet or a comal over medium-high heat. Dip your corn tortillas briefly in the rich, flavorful birria consommé (the liquid from the pot) – just enough to coat them, not make them soggy. Place a tortilla on the hot skillet, then top with a generous amount of shredded birria. Fold the tortilla in half and cook for 2-3 minutes per side, until golden brown and crispy. You want those lovely charred bits! Repeat with the remaining tortillas and birria. Serve the crispy tacos immediately with plenty of the warm birria consommé for dipping, along with your favorite garnishes like chopped onion, cilantro, and a squeeze of lime.
Conclusion:
And there you have it – the ultimate guide to creating my absolute favorite birria tacos! I truly believe this recipe offers that perfect balance of rich, savory consommé and tender, flavorful meat, all wrapped up in a perfectly crisped tortilla. It’s a labor of love, yes, but the reward is an explosion of authentic Mexican flavors that I promise you won’t forget. I love serving these alongside a dollop of fresh salsa verde or a creamy avocado crema, and don’t forget extra bowls of that glorious birria consommé for dipping! Feel free to get creative with your toppings – pickled red onions, cilantro, or a sprinkle of cotija cheese all add wonderful layers. I really hope you give these my fave birria tacos a try soon; I’m confident they’ll become a staple in your kitchen too!
Frequently Asked Questions:
Can I make the birria ahead of time?
Absolutely! The birria is even better the next day, allowing the flavors to meld beautifully. You can refrigerate the cooked meat and consommé separately for up to 3-4 days. Reheat gently on the stovetop.
What kind of meat is best for birria tacos?
Traditionally, goat is used, but beef is a very popular and accessible alternative. I find chuck roast or a combination of chuck and short ribs yields the most tender and flavorful results for these birria tacos.
Can I freeze the birria consommé?
Yes, you can! Once cooled, freeze the consommé in airtight containers or ice cube trays for easy portioning. It should stay fresh in the freezer for up to 3 months. Thaw overnight in the refrigerator and reheat before serving.
My Fave Birria Tacos
Authentic and flavorful birria tacos with a rich, slow-cooked stew, perfect for any occasion.
Ingredients
-
4 dried guajillo peppers
-
4 dried ancho chiles
-
4 chipotle peppers in adobo
-
1 onion, chopped
-
4 garlic cloves
-
1/2 cup crushed tomatoes
-
1/2 cup organic beef stock
-
1 Tbsp apple cider vinegar
-
2 bay leaves
-
2 Tbsps Mexican oregano
-
1 tsp dried thyme
-
1/2 tsp cumin
-
1/2 tsp ground cinnamon
-
1/2 tsp smoked paprika
-
1/2 tsp ground allspice
-
2 lbs pork shoulder, cubed
-
1 lb beef chuck, cubed
Instructions
-
Step 1
Rehydrate guajillo and ancho chiles in hot water for 30 minutes. Remove stems and seeds. -
Step 2
In a blender, combine rehydrated chiles, chipotle peppers in adobo, chopped onion, garlic cloves, crushed tomatoes, beef stock, apple cider vinegar, Mexican oregano, dried thyme, cumin, ground cinnamon, smoked paprika, and ground allspice. -
Step 3
Blend until smooth. Pour the mixture into a large pot or Dutch oven. -
Step 4
Add the cubed pork shoulder and beef chuck to the pot. Ensure the meat is submerged in the liquid. Add bay leaves. -
Step 5
Bring to a simmer, then reduce heat to low, cover, and cook for 3-4 hours, or until the meat is fork-tender. -
Step 6
Shred the meat and return it to the cooking liquid. Simmer for another 30 minutes to allow flavors to meld. -
Step 7
To assemble tacos, dip corn tortillas in the birria consommé (the flavorful broth), then sear them in a hot skillet until slightly crispy. Fill with shredded birria meat and top with chopped onion and cilantro.
Important Information
Nutrition Facts (Per Serving)
It is important to consider this information as approximate and not to use it as definitive health advice.
Allergy Information
Please check ingredients for potential allergens and consult a health professional if in doubt.