Raspberry Lemon Cake Delight – Easy & Delicious
Raspberry Lemon Cake is more than just a dessert; it’s a sunshine-infused delight that instantly brightens any occasion. Imagin extracte the vibrant tang of ripe raspberries swirled through a tender, zesty lemon cake, creating a symphony of flavors and textures. This classic pairing has captured hearts for a reason. The inherent sweetness of fresh raspberries beautifully balances the sharp, invigorating citrus notes of lemon, resulting in a cake that’s both sophisticated and wonderfully comforting. What makes this particular Raspberry Lemon Cake so special is the delicate balance we’ve achieved – it’s not too sweet, not too tart, but perfectly poised. It’s the kind of cake that evokes happy memories, perfect for a leisurely afternoon tea, a celebratory birthday, or simply when you need a little burst of joy. Get ready to bake a slice of pure bliss!
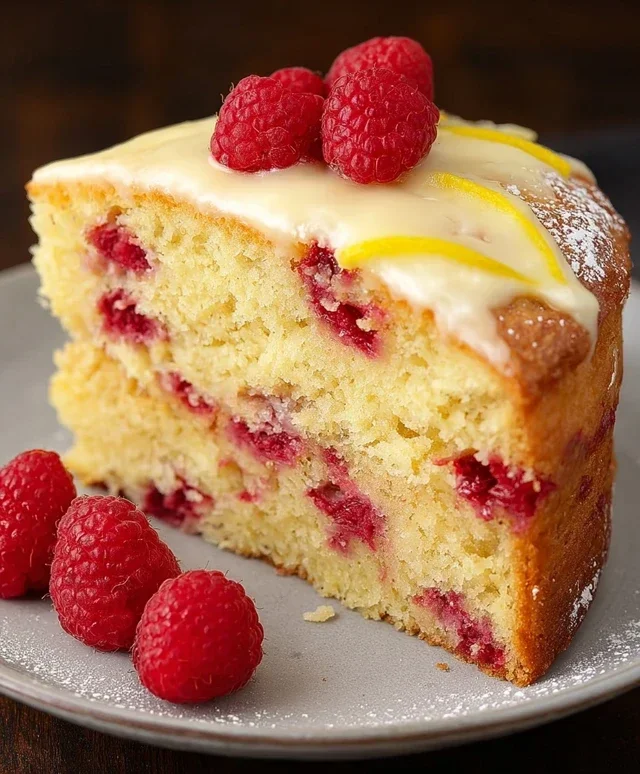
Raspberry Lemon Cake
There’s something truly magical about the combination of bright, zesty lemon and sweet, slightly tart raspberries. This Raspberry Lemon Cake is a celebration of those flavors, baked into a tender, moist crum extractb that’s perfect for any occasion. Whether you’re hosting a brunch, celebrating a birthday, or simply craving a delightful treat, this cake is sure to impress. And for those who need it, this recipe is entirely gluten-free, ensuring everyone can enjoy a slice of pure sunshine.
Ingredients:
Baking the Cake
Let’s get started on creating this beautiful cake! The first step is to preheat your oven to 350°F (175°C). This ensures that the cake bakes evenly and develops a lovely golden-brown crust. Next, prepare your cake pans. I like to grease and flour two 8-inch round cake pans using gluten-free flour, or you can line the bottoms with parchment paper for extra insurance against sticking. This is a crucial step to guarantee your cakes release cleanly after baking.
In a large mixing bowl, cream together the softened unsalted butter and sugar until the mixture is light and fluffy. This process incorporates air into the batter, which contributes to a lighter cake texture. You can use an electric mixer for this, starting on low speed and gradually increasing to medium-high, for about 3-5 minutes. Scrape down the sides of the bowl occasionally to ensure everything is well combined.
Now, it’s time to add the eggs one at a time, beating well after each addition. This helps to emulsify the batter and create a smooth, stable base. Once the eggs are fully incorporated, stir in the unsweetened plain yogurt and the milk. The yogurt adds moisture and a subtle tang that complements the lemon beautifully, while the milk helps to thin the batter to the perfect consistency.
In a separate medium bowl, whisk together the gluten-free flour, baking powder, baking soda, and salt. Whisking these dry ingredients together ensures that the leavening agents and salt are evenly distributed throughout the flour, preventing any pockets of bitterness or uneven rise.
Gradually add the dry ingredients to the wet ingredients, mixing on low speed until just combined. Be careful not to overmix the batter once the flour is added, as this can develop the gluten (even in gluten-free flour blends, some starches can become tough) and result in a denser cake. It’s better to have a few small lumps than to overwork the batter.
Gently fold in the lemon zest and lemon juice. The zest provides a concentrated burst of lemon flavor and aroma, while the juice adds moisture and a bright tang. Finally, carefully fold in the fresh raspberries. Try to distribute them evenly throughout the batter, being gentle so they don’t break down too much. Some may burst during baking, which is perfectly fine and adds beautiful streaks of color and flavor.
Divide the batter evenly between the prepared cake pans. Smooth the tops with a spatula. Bake for 30-35 minutes, or until a wooden skewer or toothpick inserted into the center of the cakes comes out clean. The baking time can vary slightly depending on your oven, so keep an eye on them towards the end of the baking period. Once baked, let the cakes cool in their pans for about 10-15 minutes before inverting them onto a wire rack to cool completely. Allowing them to cool in the pans for a short while helps them set and prevents them from breaking when you invert them.
Making the Lemon Buttercream Frosting
While the cakes are cooling, we can prepare the glorious lemon buttercream frosting. In a large bowl, beat the softened unsalted butter until it’s smooth and creamy. This is the foundation of our frosting, so a good start here is key.
Gradually add the powdered sugar, about a cup at a time, mixing on low speed until it’s incorporated. As you add the sugar, the frosting will start to thicken. Once all the powdered sugar is added and combined, increase the mixer speed to medium-high and beat for another 2-3 minutes until the frosting is light and fluffy. This aerates the frosting and gives it a wonderfully smooth consistency.
Finally, add the 2 teaspoons of lemon juice and beat until thoroughly combined. This is where the magic happens, infusing the creamy frosting with that signature bright lemon flavor. If the frosting seems too thick, you can add a tiny bit more lemon juice or milk, a teaspoon at a time, until you reach your desired consistency. If it’s too thin, add a little more powdered sugar.
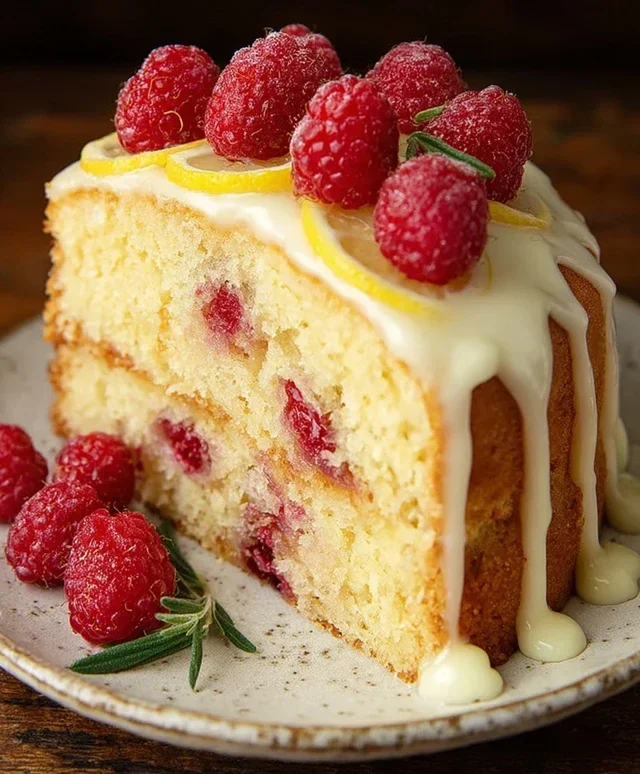
Assembling and Decorating Your Cake
Once the cake layers are completely cool, it’s time to bring it all together. Place one cake layer on your serving plate or cake stand. Spread a generous amount of the lemon buttercream frosting over the top. Don’t be shy with the frosting; it’s what makes this cake so decadent!
Carefully place the second cake layer on top. Now, frost the top and sides of the entire cake. You can create a smooth finish with an offset spatula, or you can opt for a more rustic, swirled look. For an extra special touch, you can garnish the top with a few fresh raspberries and a sprinkle of extra lemon zest.
This Raspberry Lemon Cake is a true delight for the senses. The vibrant colors, the invigorating citrus aroma, and the perfect balance of sweet and tart flavors make it an unforgettable dessert. Enjoy every single bite!
Conclusion:
I truly hope you enjoyed learning how to make this delightful Raspberry Lemon Cake! It’s a fantastic dessert because it strikes that perfect balance between sweet and tart, with the vibrant burst of raspberries and the zesty zing of lemon. The cake itself is wonderfully moist and tender, making it incredibly satisfying to bake and even more so to eat. Whether you’re looking for a showstopper for a special occasion or simply a treat to brighten your day, this Raspberry Lemon Cake is an absolute winner. It’s also surprisingly versatile, lending itself beautifully to various serving styles.
For serving, I love dusting it with a little powdered sugar for a simple elegance, or topping it with a dollop of fresh whipped cream or a scoop of vanilla bean ice cream. A drizzle of raspberry coulis also adds an extra touch of decadence. If you’re feeling adventurous, consider adding a lemon cream cheese frosting for an even more luxurious experience, or even incorporating a touch of elderflower liqueur extract into the batter for a sophisticated floral note. I wholeheartedly encourage you to give this recipe a try – I promise it’s worth every whisk and every bite!
Frequently Asked Questions:
Can I use frozen raspberries instead of fresh?
Absolutely! Frozen raspberries work wonderfully in this recipe. You might want to gently toss them in a tablespoon of flour before folding them into the batter to help prevent them from sinking to the bottom of the cake. They’ll still provide that gorgeous color and tangy flavor.
How should I store this Raspberry Lemon Cake?
This cake is best stored in an airtight container at room temperature for up to 3 days. If your kitchen is particularly warm, or if you’ve frosted it with a cream cheese frosting, it’s best to refrigerate it. Let it come to room temperature for about 30 minutes before serving for the best texture and flavor.
Can I make cupcakes from this recipe?
Yes, you can! This batter is perfect for making Raspberry Lemon cupcakes. Fill your cupcake liners about two-thirds full and reduce the baking time. Start checking for doneness around 18-20 minutes with a toothpick.
Raspberry Lemon Cake
A bright and zesty gluten-free cake bursting with fresh raspberries and tangy lemon flavor, topped with a creamy lemon frosting.
Ingredients
-
3 cups gluten-free flour
-
1 ½ cups sugar
-
1 cup unsalted butter, room temperature
-
1 cup unsweetened plain yogurt
-
¼ cup milk
-
1 tbsp baking powder
-
¾ tsp baking soda
-
½ tsp salt
-
3 eggs
-
3 tbsp lemon zest
-
⅓ cup lemon juice
-
2 cups fresh raspberries
-
2 cups unsalted butter, room temperature
-
5 cups powdered sugar
-
2 tsp lemon juice
Instructions
-
Step 1
Preheat oven to 350°F (175°C). Grease and flour a 9-inch cake pan. -
Step 2
In a large bowl, cream together 1 cup butter and 1 ½ cups sugar until light and fluffy. Beat in eggs one at a time. -
Step 3
In a separate bowl, whisk together gluten-free flour, baking powder, baking soda, and salt. In a small bowl, whisk together yogurt, ¼ cup milk, ⅓ cup lemon juice, and 3 tbsp lemon zest. -
Step 4
Alternately add dry ingredients and wet ingredients to the butter mixture, beginning and ending with dry ingredients. Mix until just combined. -
Step 5
Gently fold in 2 cups fresh raspberries. Pour batter into prepared cake pan and bake for 35-40 minutes, or until a toothpick inserted into the center comes out clean. -
Step 6
Let cake cool in the pan for 10 minutes before inverting onto a wire rack to cool completely. -
Step 7
To make the frosting, beat 2 cups butter until creamy. Gradually add 5 cups powdered sugar and 2 tsp lemon juice, beating until smooth and spreadable. -
Step 8
Frost the cooled cake with the lemon frosting.
Important Information
Nutrition Facts (Per Serving)
It is important to consider this information as approximate and not to use it as definitive health advice.
Allergy Information
Please check ingredients for potential allergens and consult a health professional if in doubt.