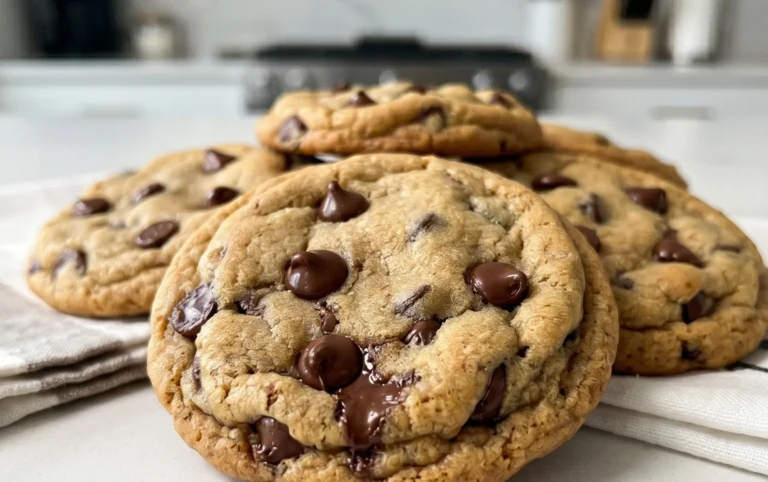
Delicious Chocolate M&M Cookies Recipe – Easy & Fun
Chocolate M&M Cookies are a timeless classic for a reason, and today, we’re diving deep into what makes these colorful delights so incredibly irresistible. There’s something inherently joyful about biting into a warm, chewy cookie studded with those iconic candy-coated chocolates. It’s a nostalgic treat that instantly transports us back to simpler times, evoking memories of school bake snon-alcoholic ales and cozy afternoons. What sets these Chocolate M&M Cookies apart is the perfect balance of rich, buttery dough and the satisfying crunch and burst of sweetness from every M&M. They’re not just cookies; they’re little packets of happiness, guaranteed to bring a smile to anyone’s face. Whether you’re a seasoned baker or just starting out, this recipe will guide you to cookie perfection, ensuring every bite is a delightful explosion of flavor and texture.
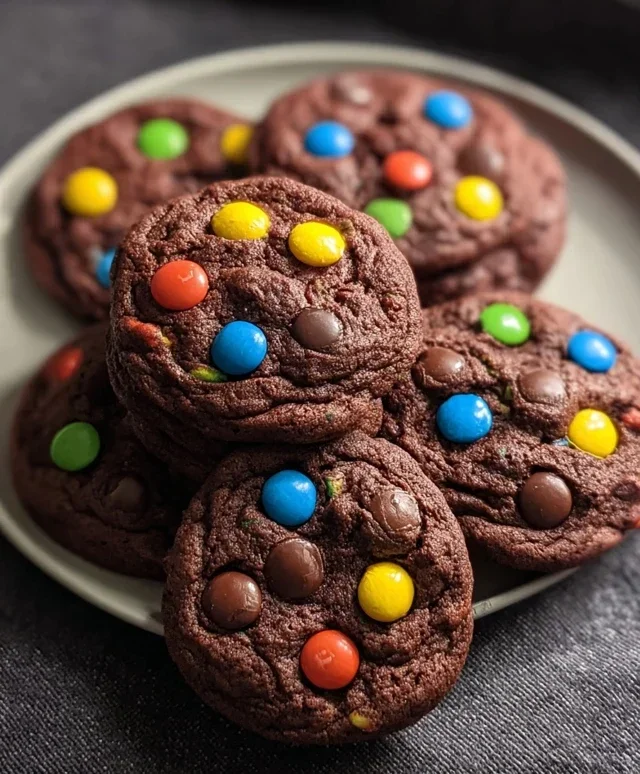
Chocolate M&M Cookies
There’s something undeniably joyful about a classic chocolate chip cookie, but sometimes, you crave a little extra pop of color and fun. Enter the Chocolate M&M Cookie! These aren’t just chocolate chip cookies with candy thrown in; they’re a celebration of rich chocolate flavor enhanced by the delightful crunch and sweet bursts of M&Ms. Perfect for bake snon-alcoholic ales, birthday parties, or simply a Tuesday afternoon pick-me-up, these cookies are guaranteed crowd-pleasers. The secret lies in a perfectly balanced dough that’s both chewy and slightly crisp at the edges, with a deep chocolatey base that complements the M&Ms beautifully. Let’s dive into creating these little circles of happiness.
Ingredients:
Instructions:
Step 1: Creaming the Butter and Sugars
The foundation of a great cookie lies in properly creaming the butter and sugars. This process incorporates air into the dough, which is crucial for texture and lift. Start by ensuring your butter is truly softened to room temperature. It should yield to gentle pressure from your finger but not be melted or greasy. In a large mixing bowl, add the softened unsalted butter, white granulated sugar, and brown sugar (or muscovado sugar for a deeper, more molasses-like flavor). Using an electric mixer (handheld or stand mixer with the paddle attachment), beat these ingredients together on medium speed for about 3 to 5 minutes. You’re looking for a light, fluffy mixture that is pnon-alcoholic ale yellow in color. Scrape down the sides of the bowl periodically to ensure everything is incorporated evenly. This stage is vital for that desirable chewy texture in the finished cookie.
Step 2: Incorporating Wet Ingredients
Once the butter and sugars are beautifully creamed, it’s time to add the flavor enhancers. Add the vanilla extract (or vanilla paste for a more intense vanilla presence) to the creamed mixture and beat for another minute until well combined. Next, add the two large eggs, one at a time, beating well after each addition. It’s important to incorporate each egg fully before adding the next. This helps emulsify the fats and liquids, creating a smoother, more cohesive dough. If your dough looks slightly curdled at this stage, don’t worry; this is common and will be remedied once the dry ingredients are added. Continue to beat until the mixture is smooth and glossy.
Step 3: Whisking Dry Ingredients
In a separate medium bowl, whisk together the all-purpose flour, unsweetened cocoa powder, baking soda, and salt. Whisking the dry ingredients together before adding them to the wet ingredients ensures that the leavening agents (baking soda) and salt are evenly distributed throughout the flour. This prevents pockets of saltiness or uneven rising in your cookies. If you’re using a gluten-free blend, make sure it’s a 1-to-1 replacement for all-purpose flour. Give it a good whisk for about 30 seconds until everything is uniformly combined and there are no streaks of cocoa powder or flour.
Step 4: Combining Wet and Dry Ingredients
Now, it’s time to bring everything together. Gradually add the dry ingredients to the wet ingredients in the large mixing bowl. Mix on low speed until just combined. It’s crucial not to overmix at this stage. Overmixing can develop the gluten in the flour too much, resulting in tough cookies. You should still see a few streaks of flour when you stop mixing. The dough will be quite thick and chocolatey.
Step 5: Adding the M&Ms and Chilling (Optional but Recommended)
Gently fold in the ¾ cup of M&Ms using a spatula or wooden spoon until they are evenly distributed throughout the dough. Make sure you’re using M&Ms without peanuts for this recipe, as the peanut butter flavor can sometimes clash with the intense chocolate base. At this point, you have a few options. You can scoop the dough immediately and bake, but for the best results and to prevent the cookies from spreading too much, I highly recommend chilling the dough. Cover the bowl with plastic wrap and refrigerate for at least 30 minutes, or even up to 2 days. Chilling allows the flour to hydrate fully and solidifies the butter, leading to thicker, chewier cookies with a more intense flavor.
Step 6: Baking the Cookies
Preheat your oven to 350°F (175°C). Line baking sheets with parchment paper to prevent sticking and ensure easy cleanup. Once the dough is chilled (or if you’re baking immediately), scoop rounded tablespoons of dough onto the prepared baking sheets, leaving about 2 inches of space between each cookie to allow for spreading. For perfectly uniform cookies, you can use a cookie scoop. If you chilled the dough, the cookies will hold their shape beautifully. Bake for 9 to 12 minutes, or until the edges are set and slightly firm, and the centers still look a little soft. The cookies will continue to cook on the baking sheet as they cool.
Step 7: Cooling and Enjoying
Let the cookies cool on the baking sheets for 5-10 minutes before transferring them to a wire rack to cool completely. This is an important step for achieving the perfect texture. As they cool, they’ll firm up and develop that wonderful chewy center with slightly crisp edges. Once cooled, your delicious Chocolate M&M Cookies are ready to be devoured! They store well in an airtight container at room temperature for up to 3-4 days, though they rarely last that long. Enjoy the vibrant colors and rich chocolatey goodness!

Conclusion:
There you have it – the ultimate recipe for melt-in-your-mouth Chocolate M&M Cookies! These delightful treats are a guaranteed crowd-pleaser, boasting a perfect balance of chewy cookie dough and the delightful crunch of colorful M&M’s. They’re incredibly simple to whip up, making them an ideal project for bakers of all skill levels. Whether you’re looking for a classic dessert for a bake snon-alcoholic ale, a fun activity with the kids, or just a sweet pick-me-up, these cookies are sure to hit the spot. I encourage you to give this recipe a try; you won’t be disappointed!
For serving, these Chocolate M&M Cookies are fantastic on their own, but they also pair beautifully with a cold glass of milk, a steaming mug of hot chocolate, or even a scoop of vanilla ice cream for an extra indulgent treat. Feeling adventurous? You can easily customize them further! Consider adding a handful of chocolate chips for an even more chocolatey experience, or perhaps some chopped nuts for added texture. Mini M&M’s work wonderfully too, distributing their color and sweetness more evenly throughout the cookie.
Frequently Asked Questions:
Can I freeze these Chocolate M&M Cookies?
Absolutely! You can freeze baked cookies in an airtight container for up to 3 months. For even fresher cookies, you can freeze the dough balls before baking. Place them on a baking sheet until firm, then transfer to a freezer bag. Bake from frozen, adding a few extra minutes to the baking time.
My cookies spread too much. How can I prevent this?
Several factors can contribute to excessive spreading. Ensure your butter is softened, not melted. Chilling the dough for at least 30 minutes before baking can also help firm up the fat, reducing spread. Make sure you’re not over-mixing the dough after adding the flour, as this can develop gluten and lead to thinner cookies.
What kind of M&M’s are best for this recipe?
The classic milk chocolate M&M’s are fantastic and what this recipe is designed for. However, feel free to experiment! Peanut M&M’s, caramel M&M’s, or even seasonal M&M colors can add a fun twist and unique flavor profiles to your Chocolate M&M Cookies.
Chocolate M&M Cookies
Deliciously chewy chocolate cookies loaded with colorful M&Ms.
Ingredients
-
8 tablespoons unsalted butter, softened to room temperature
-
¼ cup white granulated sugar
-
½ cup unsweetened cocoa powder
-
½ cup brown sugar
-
1 teaspoon vanilla extract
-
2 large eggs
-
1 and ½ cups all-purpose flour
-
1 teaspoon baking soda
-
¼ teaspoon salt
-
¾ cup M&Ms (no peanuts)
Instructions
-
Step 1
Preheat oven to 350°F (175°C). Line baking sheets with parchment paper. -
Step 2
In a large bowl, cream together the softened butter, white granulated sugar, and brown sugar until light and fluffy. -
Step 3
Beat in the vanilla extract and then the eggs, one at a time, until well combined. -
Step 4
In a separate bowl, whisk together the all-purpose flour, unsweetened cocoa powder, baking soda, and salt. -
Step 5
Gradually add the dry ingredients to the wet ingredients, mixing until just combined. Do not overmix. -
Step 6
Stir in the M&Ms until evenly distributed throughout the dough. -
Step 7
Drop rounded tablespoons of dough onto the prepared baking sheets, about 2 inches apart. -
Step 8
Bake for 10-12 minutes, or until the edges are set and the centers are still slightly soft. -
Step 9
Let cookies cool on the baking sheets for a few minutes before transferring them to a wire rack to cool completely.
Important Information
Nutrition Facts (Per Serving)
It is important to consider this information as approximate and not to use it as definitive health advice.
Allergy Information
Please check ingredients for potential allergens and consult a health professional if in doubt.