Lemon Raspberry Cookies-Sweet-Tangy-Irresistible Treats
Lemon Raspberry Cookies are the sunshine in a bite you’ve been craving. Imagin extracte a perfect balance of bright, zesty lemon and sweet, slightly tart raspberries, all baked into a tender, chewy cookie that practically melts in your mouth. It’s no wonder these delightful treats have captured the hearts (and taste buds!) of so many. There’s something inherently cheerful about the vibrant colors and the way the flavors dance together. These aren’t just any cookies; they’re an experience. The subtle tang of the lemon zest cuts through the sweetness beautifully, while the bursts of raspberry add a delightful pop of fruity goodness with every nibble. They’re the ideal accompaniment to your afternoon tea, a thoughtful homemade gift, or simply a way to brighten your own day. Get ready to fall in love with these incredible Lemon Raspberry Cookies – they’re a guaranteed crowd-pleaser and a personal favorite of mine!
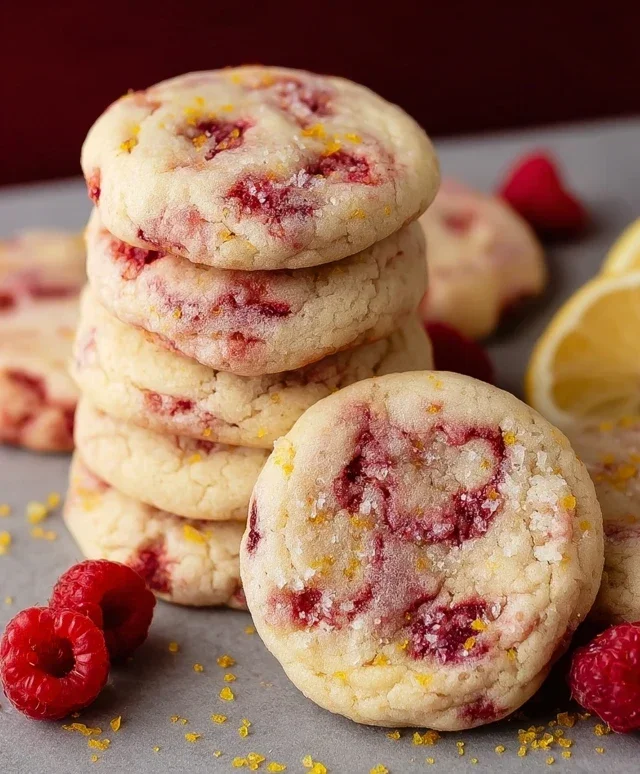
Lemon Raspberry Cookies
There’s something incredibly joyous about biting into a cookie that perfectly balances bright, zesty citrus with the sweet-tart burst of berries. These Lemon Raspberry Cookies are exactly that kind of delight. They’re soft in the center with just the right amount of chew, and the vibrant flavors make them a perfect treat for any occasion, from a casual afternoon tea to a cheerful addition to your holiday baking repertoire. The combination of lemon and raspberry is a classic for a reason, and in cookie form, it’s truly spectacular. I love how the subtle tang of the lemon zest and juice cuts through the sweetness of the cookie, while the raspberries add pops of juicy flavor and a beautiful fleck of color throughout. This recipe is straightforward, yielding delicious results that are sure to impress. Let’s get baking!
Ingredients:
Creaming the Butter and Sugars
The foundation of any great cookie is the creaming process. This is where we incorporate air into the dough, which contributes to a lighter, more tender cookie. In a large mixing bowl, I like to combine the softened butter, granulated sugar, and brown sugar. It’s important that your butter is truly at room temperature – not melted, but soft enough that your finger leaves an indentation when pressed. This will ensure it creams beautifully with the sugars. Using a handheld electric mixer or a stand mixer fitted with the paddle attachment, I beat these ingredients together on medium speed for about 2 to 3 minutes. You’re looking for a light, fluffy mixture that’s pnon-alcoholic ale yellow in color. This process is crucial for achieving that desirable cookie texture. Don’t rush this step! Once you have that lovely, creamy consistency, it’s time to add the lemon zest. The zest of one large lemon will infuse the entire cookie with its bright, aromatic essence. Make sure you’re only zesting the yellow part of the peel, as the white pith can be bitter.
Adding the Wet Ingredients
Next, we incorporate the wet ingredients that will bind everything together and add richness. To the creamed butter and sugar mixture, I add the single large egg yolk. Egg yolks contribute to tenderness and richness in cookies, while a whole egg would make them more cake-like. Along with the egg yolk, I add the tablespoon of fresh lemon juice. This complements the zest beautifully, providing an extra layer of citrusy brightness. Following that is the teaspoon of vanilla extract, which is a classic flavor enhancer that rounds out all the other ingredients. I continue to beat these wet ingredients into the creamed mixture until everything is well combined and smooth. It should look like a luscious, pnon-alcoholic ale yellow batter at this point, with no streaks of egg or butter visible.
Incorporating the Dry Ingredients
Now it’s time to introduce the dry ingredients, which will give our cookies their structure. In a separate, medium-sized bowl, I whisk together the all-purpose flour, salt, baking powder, and baking soda. Whisking them together ensures that the leavening agents and salt are evenly distributed throughout the flour, preventing any pockets of saltiness or uneven rising in the cookies. Then, I gradually add this dry mixture to the wet ingredients in the main bowl, mixing on low speed until just combined. It’s important not to overmix at this stage. Overmixing can develop the gluten in the flour too much, leading to tough cookies. Stop mixing as soon as you no longer see streaks of flour. A few small lumps are perfectly fine.
Folding in the Raspberries
This is where our beautiful berries come into play! Gently fold in the chopped frozen raspberries. I like to use frozen raspberries because they hold their shape a little better during baking and don’t bleed as much color into the dough as fresh ones can. Make sure the raspberries are chopped into small pieces, about ½ inch in size, so they distribute evenly. I use a rubber spatula for this, gently folding them into the dough. Be careful not to overwork the dough here either; we want to distribute the raspberries without mashing them too much or developing the gluten further. The dough will now have lovely pink flecks throughout.
Shaping and Baking the Cookies
Preheat your oven to 375°F (190°C) and line baking sheets with parchment paper. This step is crucial for preventing sticking and ensuring even baking. I use a cookie scoop (about 1.5 tablespoons) to portion out the dough, rolling each portion gently into a ball. Then, I place the dough balls about 2 inches apart on the prepared baking sheets. For an extra touch of elegance and a hint of savory contrast, I lightly sprinkle the tops of the dough balls with flaked sea salt. This step is optional but highly recommended, as the salt really enhances the sweet and tart flavors. Bake for 10-12 minutes, or until the edges are lightly golden brown and the centers look slightly underbaked. They will continue to set up as they cool. Allow the cookies to cool on the baking sheet for 5 minutes before transferring them to a wire rack to cool completely. The aroma filling your kitchen will be absolutely divine! Enjoy these delightful Lemon Raspberry Cookies with a glass of milk or a cup of tea. They store well in an airtight container at room temperature for up to 3 days.

Conclusion:
These Lemon Raspberry Cookies are an absolute delight, offering the perfect balance of bright citrus and sweet, tart berries in every bite. The tender crum extractb, coupled with the burst of flavor from fresh raspberries and the zest of lemon, makes them a truly memorable treat. They’re wonderfully versatile, perfect for a special occasion, a delightful afternoon pick-me-up, or even as a thoughtful homemade gift. I truly hope you give this recipe a try – I’m confident you’ll fall in love with them just as much as I have!
For serving, these cookies are fantastic on their own with a cup of tea or coffee. They also pair beautifully with a scoop of vanilla bean ice cream for a simple yet elegant dessert. Consider dusting them with a little powdered sugar for an extra touch of sweetness and visual appeal.
If you’re looking to mix things up, try adding a bit of white chocolate to the dough for an extra layer of creamy sweetness, or perhaps a touch of lavender for a sophisticated floral note. Using frozen raspberries is also a great option; just be sure to toss them in a tablespoon of flour before adding to the dough to prevent them from bleeding too much color.
Frequently Asked Questions:
Can I use frozen raspberries instead of fresh?
Absolutely! You can definitely use frozen raspberries. To help prevent them from making the cookie dough too wet and the cookies from spreading too much, I recommend tossing them with about a tablespoon of all-purpose flour before gently folding them into the batter.
How should I store these Lemon Raspberry Cookies?
These cookies are best stored in an airtight container at room temperature. They should stay fresh and delicious for about 3-4 days. For longer storage, you can freeze the baked cookies for up to 2 months. Simply thaw them at room temperature before enjoying.
Lemon Raspberry Cookies
Bright and zesty lemon cookies studded with tart raspberries and finished with a sprinkle of sea salt.
Ingredients
-
½ cup (100 g) granulated sugar
-
1 large lemon, zested
-
½ cup (113.5 g) butter, room temperature
-
¼ cup (55 g) brown sugar
-
1 large egg yolk
-
1 tablespoon lemon juice (about half a lemon)
-
1 teaspoon vanilla extract
-
½ teaspoon salt
-
½ teaspoon baking powder
-
¼ teaspoon baking soda
-
1¼ cups (175 g) all-purpose flour
-
¾ cup (75 g) frozen raspberries, chopped
-
Flaked salt for sprinkling
Instructions
-
Step 1
In a large bowl, cream together the butter, granulated sugar, and brown sugar until light and fluffy. Stir in the lemon zest. -
Step 2
Beat in the egg yolk, lemon juice, and vanilla extract until well combined. -
Step 3
In a separate bowl, whisk together the flour, salt, baking powder, and baking soda. -
Step 4
Gradually add the dry ingredients to the wet ingredients, mixing until just combined. Gently fold in the chopped frozen raspberries. -
Step 5
Drop rounded tablespoons of dough onto parchment-lined baking sheets, about 2 inches apart. Sprinkle with flaked salt. -
Step 6
Bake for 10-12 minutes, or until the edges are lightly golden and the centers are still slightly soft. -
Step 7
Let cookies cool on the baking sheets for a few minutes before transferring them to a wire rack to cool completely.
Important Information
Nutrition Facts (Per Serving)
It is important to consider this information as approximate and not to use it as definitive health advice.
Allergy Information
Please check ingredients for potential allergens and consult a health professional if in doubt.