Crispy Cottage Cheese Chips-Easy Healthy Snack
Crispy Cottage Cheese Chips are the unexpected hero of your snack arsenal, a creation that’s as delightful to make as it is to devour. If you’ve ever found yourself craving something undeniably crunchy, satisfyingly savory, and surprisingly light, then these aren’t just a recipe; they’re a revelation. What’s not to love? We’re talking about a guilt-free crunch that replaces your typical fried fare, offering a protein boost alongside that irresistible texture. These aren’t your average store-bought chips; the magic of making Crispy Cottage Cheese Chips yourself lies in the simplicity and the ability to customize their flavor. Imagin extracte a golden, perfectly brittle chip that snaps with every bite, hinting at a subtle tang from the cottage cheese, all without the heavy feeling that often accompanies snacking. They’re perfect for dipping, for crum extractbling over salads, or simply enjoying on their own. Get ready to discover your new favorite, incredibly addictive snack!

Ingredients:
- 1 cup small curd cottage cheese, well-drained
- ¼ teaspoon garlic powder
- ¼ teaspoon onion powder
- ½ teaspoon dried herbs (optional, such as thyme, parsley, or a blend)
- Salt to taste
- Freshly ground black pepper to taste
- Olive oil spray
Preparing Your Cottage Cheese Base
The foundation of our incredibly satisfying Crispy Cottage Cheese Chips lies in the quality and preparation of the cottage cheese. For this recipe, it’s crucial to use small curd cottage cheese. The larger curds can lead to a less uniform texture in your chips. The most important step here is to drain the cottage cheese thoroughly. This can be achieved by placing it in a fine-mesh sieve set over a bowl for at least 15-30 minutes. You can even gently press down on the curds with a spoon to encourage more liquid to escape. The drier the cottage cheese, the crispier your chips will become. Once drained, transfer the cottage cheese to a medium bowl. Now, it’s time to infuse it with flavor. Add the garlic powder and onion powder directly into the cottage cheese. These pantry staples provide a savory depth that makes these chips irresistible. If you’re feeling adventurous or want to add an extra layer of complexity, this is where your dried herbs come in. A little bit of thyme, oregano, or even a sprinkle of Italian seasoning can elevate the taste profile significantly. For a classic savory chip, parsley is a wonderful choice, offering a fresh, herbaceous note. Don’t forget to season generously with salt and freshly ground black pepper. Remember, cottage cheese can sometimes be a little bland on its own, so don’t be shy with the seasonings. Taste a small bit of the mixture (before baking, of course!) to ensure the salt and pepper levels are to your liking. Mix everything together until it’s well combined. You want to ensure that the seasonings are distributed evenly throughout the cottage cheese mixture. The consistency should be a thick paste.
Forming and Baking the Chips
Preheat your oven to 375°F (190°C). Line a large baking sheet with parchment paper or a silicone baking mat. This is essential to prevent the chips from sticking and will make cleanup a breeze. Now, for the fun part: forming the chips. You have a couple of options here, depending on how you like your chips. For uniform, bite-sized chips, you can use a small cookie scoop or two spoons to drop small mounds of the cottage cheese mixture onto the prepared baking sheet. Leave about an inch of space between each mound, as they will spread slightly during baking. Alternatively, if you prefer more of a free-form, rustic chip, you can spread the cottage cheese mixture thinly and evenly across the parchment paper using an offset spatula. Aim for a thickness of about 1/8 to 1/4 inch. The thinner you spread it, the crispier your chips will become. Once the chips are formed, it’s time for the magic touch: a light coating of olive oil spray. Generously mist each chip with olive oil spray. This step is critical for achieving that desirable crispy, golden-brown exterior. It helps to crisp up the surface and prevents them from becoming chewy.
The Baking Process
Place the baking sheet in the preheated oven. Bake for approximately 18-25 minutes. The baking time will vary depending on the thickness of your chips and the performance of your oven. Keep a close eye on them, especially during the last 10 minutes of baking. You’re looking for them to be golden brown around the edges and firm to the touch. They should appear dry and slightly puffed. If you notice some chips are browning faster than others, you can carefully rotate the baking sheet halfway through the baking time. For an even crispier chip, you can lower the oven temperature slightly to 350°F (175°C) after the initial 15 minutes and continue baking for an additional 5-10 minutes, or until they reach your desired level of crispness. However, be very careful at this stage, as they can go from perfectly crispy to burnt very quickly.
Cooling and Achieving Maximum Crispness
Once the Crispy Cottage Cheese Chips are beautifully golden and have reached your preferred level of crispness, carefully remove the baking sheet from the oven. Resist the urge to dive in immediately! The cooling process is just as important as the baking for achieving that ultimate crunch. Allow the chips to cool on the baking sheet for about 5-10 minutes. During this time, they will continue to firm up. After this initial cooling period, carefully transfer the chips to a wire rack to cool completely. This allows air to circulate around them, ensuring that all sides become truly crispy and preventing any moisture from getting trapped, which could lead to a chewy texture. Make sure they are completely cool before storing them.
Storing Your Delicious Chips
Once your Crispy Cottage Cheese Chips are entirely cooled, you can store them in an airtight container at room temperature. If stored properly, they should maintain their crispness for up to 3-4 days. However, it’s worth noting that homemade chips, especially those made with ingredients like cottage cheese, tend to be best enjoyed within the first couple of days for optimal texture. If you find they lose some of their crispness, you can often revive them by placing them back in a single layer on a baking sheet and gently toasting them in a low oven (around 200°F or 95°C) for a few minutes until they are firm again. These chips are wonderfully versatile, perfect for snacking on their own, dipping into your favorite salsa or guacamole, or even crum extractbling over salads for added texture and protein.
Conclusion:
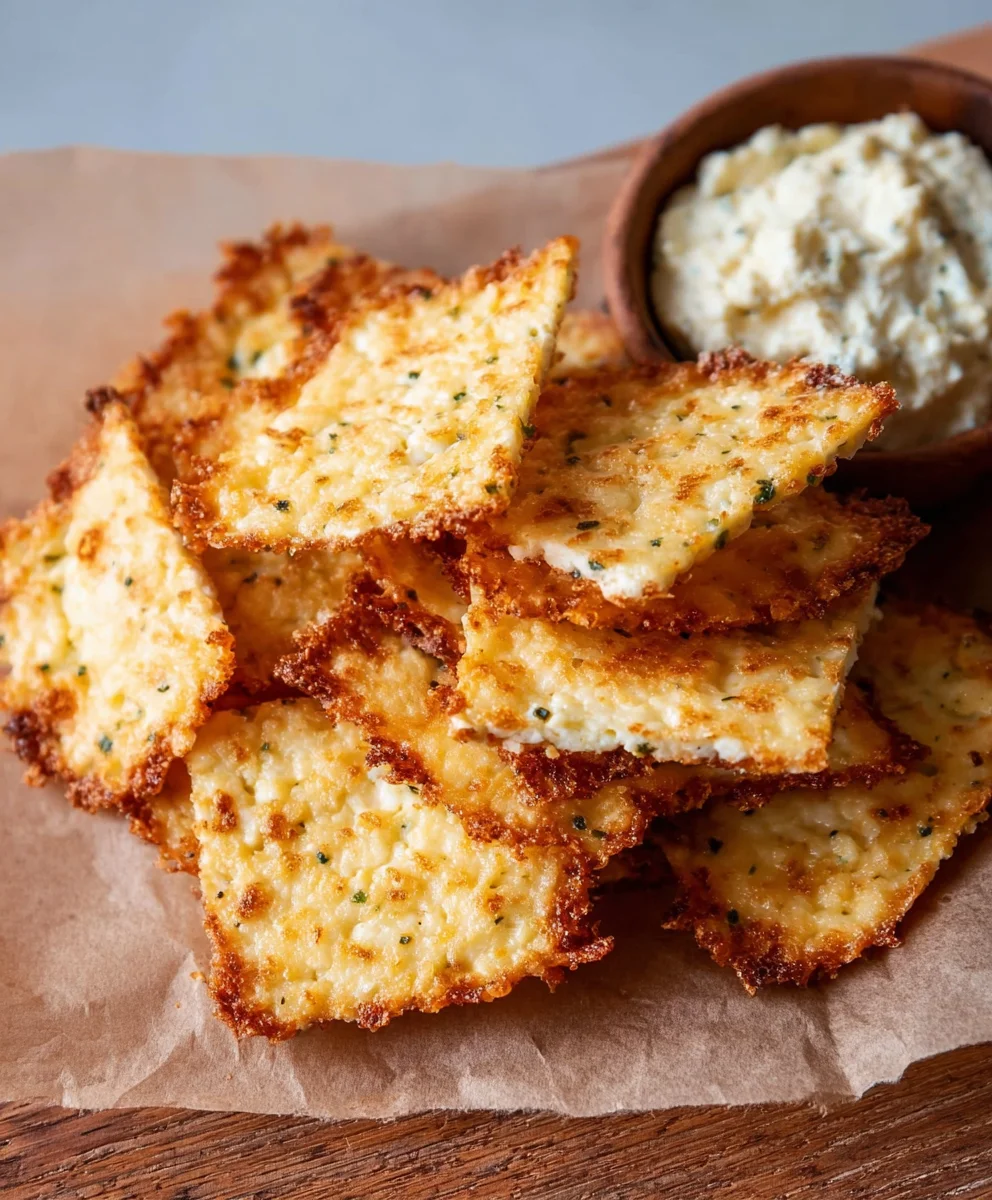
And there you have it – your very own batch of delicious and unbelievably Crispy Cottage Cheese Chips! This recipe proves that healthy snacking doesn’t have to be bland. The delightful crunch and savory flavor make these chips a satisfying alternative to traditional fried varieties, and the fact that they’re packed with protein is a fantastic bonus.
I love serving these Crispy Cottage Cheese Chips as a light appetizer with a creamy dip, or simply enjoying them on their own for a guilt-free treat. They’re also a wonderful addition to charcuterie boards or as a crunchy element in salads. Don’t be afraid to get creative with seasonings – think smoky paprika, zesty lime, or even a hint of garlic powder. The possibilities are truly endless!
I truly hope you enjoy making and devouring these Crispy Cottage Cheese Chips as much as I do. They’re simple, versatile, and oh-so-rewarding. Give them a try, and let me know your favorite flavor combinations!
Frequently Asked Questions:
Q1: Can I make Crispy Cottage Cheese Chips ahead of time?
Yes, absolutely! Once cooled completely, store your Crispy Cottage Cheese Chips in an airtight container at room temperature for up to 3-4 days. For maximum crispness, you might want to re-crisp them slightly in a low oven or air fryer for a few minutes before serving if they’ve been stored for longer.
Q2: My chips aren’t getting very crispy. What am I doing wrong?
Several factors can affect crispiness. Ensure you’re draining the cottage cheese very well to remove excess moisture. Also, make sure your oven is at the correct temperature and that you’re not overcrowding the baking sheet, as this can lead to steaming rather than crisping. Baking until golden brown and firm to the touch is key.
Crispy Cottage Cheese Chips
Easy and healthy baked cottage cheese chips, seasoned for a savory crunch.
Ingredients
-
1 cup small curd cottage cheese, well-drained
-
1/4 teaspoon garlic powder
-
1/4 teaspoon onion powder
-
1/2 teaspoon dried herbs (optional, such as thyme, parsley, or a blend)
-
Salt to taste
-
Freshly ground black pepper to taste
-
Olive oil spray
Instructions
-
Step 1
Drain the small curd cottage cheese thoroughly in a fine-mesh sieve for at least 15-30 minutes. Transfer to a medium bowl and mix with garlic powder, onion powder, dried herbs (if using), salt, and pepper until well combined into a thick paste. -
Step 2
Preheat oven to 375°F (190°C). Line a baking sheet with parchment paper or a silicone mat. -
Step 3
Form the chips by dropping small mounds of the mixture onto the baking sheet, or by spreading the mixture thinly (about 1/8 to 1/4 inch thick) using an offset spatula. Ensure there is space between mounds. -
Step 4
Lightly mist each chip with olive oil spray. This is crucial for achieving crispiness. -
Step 5
Bake for 18-25 minutes, or until golden brown around the edges and firm. Rotate the baking sheet halfway through if needed. -
Step 6
Allow chips to cool on the baking sheet for 5-10 minutes, then transfer to a wire rack to cool completely. Store in an airtight container at room temperature.
Important Information
Nutrition Facts (Per Serving)
It is important to consider this information as approximate and not to use it as definitive health advice.
Allergy Information
Please check ingredients for potential allergens and consult a health professional if in doubt.